Cuisinart WM-PZ2 WM-PZ2 Manual - Page 3
Instructions For Use, Special Features - pizzelle
 |
UPC - 086279001825
View all Cuisinart WM-PZ2 manuals
Add to My Manuals
Save this manual to your list of manuals |
Page 3 highlights
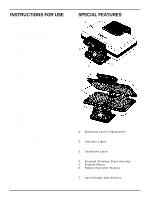
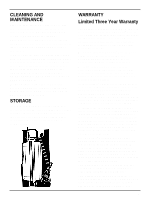
INSTRUCTIONS FOR USE 1. Before using your Cuisinart™ Pizzelle Press for the first time, remove all protective paper and wrapping. Remove any dust from shipping by wiping the plates with a damp cloth. 2. Preheat the Pizzelle Press. Close lid and plug cord into a 120V AC wall outlet. The red light will go on to signal power. The green indicator light will go on when the unit is ready to use. Note: The first time you use your Pizzelle Press, it may have a slight odor and may smoke a bit. This is normal, and common to appliances with a nonstick surface. 3. When the green indicator light goes on, scoop ingredients onto bottom plates according to the recipes provided. Close the lid and lock down the latch to hold the plates closely together. 4. The green light will go off and the red light will illuminate again. It may take several seconds for the red light to come on. This is normal. 5. Once the pizzelle are ready to be removed from the unit, the green light will illuminate once again. Baking time is determined by browning level. Choose a setting on the browning control dial. For golden crisp pizzelle, we recommend using setting #3 or #4. 6. Unlatch the plates and lift the top cover. Remove the pizzelle by loosening the edges with a heat-resistant plastic spatula. Never use metal utensils, as they may damage the nonstick coating. 7. Always disconnect the plug from the wall outlet once cooking is completed. SPECIAL FEATURES 4 . 3 . 1 . 2 . 5 . 1. Browning Control Adjustment - Five settings to customize pizzelle from light to deep golden brown. 2. Indicator Lights - Signal when pizzelle press is ready to bake, and when the pizzelle are ready to eat. 3. Lockdown Latch - Holds plates closely together, to prevent lifting during cooking. 4. Brushed Stainless Steel Housing 5. Pizzelle Plates 6. Rubber Feet (Not Shown) - Keep unit steady without marking the c o u n t e r t o p . 7. Cord Storage (Not Shown) - Cord wraps under base for easy storage. 3
-
 1
1 -
 2
2 -
 3
3 -
 4
4 -
 5
5 -
 6
6 -
 7
7 -
 8
8
 |
 |
