D-Link DCS-5009L User Manual - Page 15
WPS - Push Button Setup - setup wizard for d link
 |
View all D-Link DCS-5009L manuals
Add to My Manuals
Save this manual to your list of manuals |
Page 15 highlights
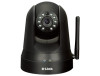
Section 2 - Installation WPS - Push Button Setup If you have a D-Link Cloud Router and an active mydlink account, the easiest way to create a secure wireless connection is by using the WPS Button on the back of the DCS-5009L. After you complete Step 3 below, you can register your camera with mydlink. Refer to "Add Your Camera to Your mydlink Account" on page 13. If you do not have a D-Link Cloud Router, use an Ethernet connection as shown under "Manual Hardware Installation" on page 17. WPS setup only establishes a wireless connection, so in order to use the mydlink features of your camera, you will still need to run the Camera Setup Wizard (proceed to the next page). To create a WPS connection: Step 1 Make sure the camera is plugged in, then press and hold the WPS button on the back of the camera for ten seconds. The blue WPS status LED will start blinking. Step 2 Press the WPS button on your router within 60 seconds. The WPS button is usually on the front or side of your router. If you are not sure where the WPS button is located on your router, refer to your router's User Manual. On some routers, you may need to log in to the web interface and click on an on-screen button to activate the WPS feature. Step 3 Allow up to one minute to configure. The DCS-5009L will automatically create a secure wireless connection to your router. While connecting, the blue LED will flash and your camera will reboot. WPS Button D-Link DCS-5009L User Manual 15
-
 1
1 -
2
-
3
-
4
-
5
-
6
-
7
-
8
-
9
-
 10
10 -
 11
11 -
 12
12 -
 13
13 -
 14
14 -
 15
15 -
 16
16 -
 17
17 -
 18
18 -
 19
19 -
 20
20 -
21
-
22
-
23
-
24
-
25
-
26
-
27
-
28
-
29
-
30
-
31
-
32
-
33
-
34
-
35
-
36
-
37
-
38
-
39
-
40
-
41
-
42
-
43
-
44
-
45
-
46
-
47
-
48
-
49
-
50
-
51
-
52
-
53
-
54
-
55
-
56
-
57
-
58
-
59
 |
 |
