D-Link DCS-7517 User Manual - Page 13
Installation, Hardware Installation, Assembly and Installation
 |
View all D-Link DCS-7517 manuals
Add to My Manuals
Save this manual to your list of manuals |
Page 13 highlights
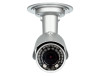
Installation Hardware Installation Assembly and Installation It is highly recommended that you configure and test your camera before mounting it. Step 1 Place the alignment sticker where you want to position the camera. Make sure the camera base will be positioned so that the cable channel is on the bottom. Step 2 Use a 6 mm drill bit to make the required holes approximately 25 mm deep, then insert the wall anchors into the holes. If you are running the camera cables through the wall, drill a hole in the center and pull the cables through the hole. Step 3 Use the screws provided to mount the camera to the wall. If you are running the camera cables out the side of the camera, guide the camera cables through the cable channel on the base. Step 4 Connect the power and Ethernet cables, or just the Ethernet cable if you are using a PoE connection. Alignment sticker D-Link DCS-7517 User Manual 13
-
 1
1 -
2
-
3
-
4
-
5
-
6
-
7
-
 8
8 -
 9
9 -
 10
10 -
 11
11 -
 12
12 -
 13
13 -
 14
14 -
 15
15 -
 16
16 -
 17
17 -
 18
18 -
19
-
20
-
21
-
22
-
23
-
24
-
25
-
26
-
27
-
28
-
29
-
30
-
31
-
32
-
33
-
34
-
35
-
36
-
37
-
38
-
39
-
40
-
41
-
42
-
43
-
44
-
45
-
46
-
47
-
48
-
49
-
50
-
51
-
52
-
53
-
54
-
55
-
56
-
57
-
58
-
59
-
60
-
61
-
62
-
63
-
64
-
65
-
66
-
67
-
68
-
69
-
70
-
71
-
72
-
73
-
74
-
75
-
76
-
77
-
78
-
79
-
80
-
81
-
82
-
83
-
84
-
85
-
86
-
87
-
88
-
89
-
90
 |
 |
