D-Link DES-3226L User Manual - Page 17
LED Indicators, Power, Console, Link/Act, Speed, LED Mode - d link des
 |
UPC - 790069262722
View all D-Link DES-3226L manuals
Add to My Manuals
Save this manual to your list of manuals |
Page 17 highlights
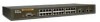
DES-3226L Layer 2 Fast Ethernet Switch User's Guide LED Indicators The LED indicators of the Switch include Power, Console, Link/Act, Speed and FDX. This Switch also includes a LED Mode button, which has the default setting set to Link/Act. The user may scroll through to show the LED status for Link/Act, Speed and FDX of each port. The following shows the LED indicators for the Switch along with an explanation of each indicator. Figure 1-2. LED Indicators Power This LED will light green after the Switch is powered on to indicate the ready state of the device. The indicator is dark when the Switch is powered off. Console This LED should blink during the Power-On Self Test (POST). When the POST is finished, the LED goes dark. This LED will light solid amber when the POST test has failed. This indicator is lit sold green when the Switch is being logged into via out-ofband/local console management through the RS-232 console port in the back of the Switch using a straight-through serial cable. Port LEDs One row of LEDs for each port is located above the ports on the front panel. The first LED is for the top port and the second one is for the bottom port. These LEDs will light accordingly with the Link/Act, Speed and FDX options chosen with the LED Mode button. A description of each is listed below. Link/Act When the LED mode has been changed to Link/Act, the LEDs will light steady green to indicate a valid link. A blinking LED indicates activity on the port. Speed When the LED mode has been changed to Speed, the LEDs will light steady green to indicate that the port is transferring data at 100Mbps. When the light is unlit, the port is transferring at a rate of 10Mbps. For the two Mini-GBIC speed LEDs, a steady green light indicates the port is transferring data at 1000Mbps, while an unlit LED indicates a transfer rate of 100Mbps or 10Mbps. FDX When the LED mode has been changed to FDX, the LEDs will light steady green to indicate that the port is transferring data at full duplex. When the light is unlit, the port is transferring at half-duplex. 5
-
 1
1 -
2
-
3
-
4
-
5
-
6
-
7
-
8
-
9
-
10
-
11
-
 12
12 -
 13
13 -
 14
14 -
 15
15 -
 16
16 -
 17
17 -
 18
18 -
 19
19 -
 20
20 -
 21
21 -
 22
22 -
23
-
24
-
25
-
26
-
27
-
28
-
29
-
30
-
31
-
32
-
33
-
34
-
35
-
36
-
37
-
38
-
39
-
40
-
41
-
42
-
43
-
44
-
45
-
46
-
47
-
48
-
49
-
50
-
51
-
52
-
53
-
54
-
55
-
56
-
57
-
58
-
59
-
60
-
61
-
62
-
63
-
64
-
65
-
66
-
67
-
68
-
69
-
70
-
71
-
72
-
73
-
74
-
75
-
76
-
77
-
78
-
79
-
80
-
81
-
82
-
83
-
84
-
85
-
86
-
87
-
88
-
89
-
90
-
91
-
92
-
93
-
94
-
95
-
96
-
97
-
98
-
99
-
100
-
101
-
102
-
103
-
104
-
105
-
106
-
107
-
108
-
109
-
110
-
111
-
112
-
113
-
114
-
115
-
116
-
117
-
118
-
119
-
120
-
121
-
122
-
123
-
124
-
125
-
126
-
127
-
128
-
129
-
130
-
131
-
132
-
133
-
134
 |
 |
