D-Link DGS-1500-20 User Manual - Page 24
Configuration, Smart Wizard Configuration, IPv4 Information, Password Settings
 |
View all D-Link DGS-1500-20 manuals
Add to My Manuals
Save this manual to your list of manuals |
Page 24 highlights
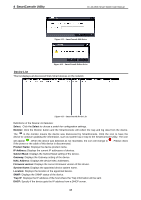
5 Configuration D-Link Web Smart Switch User Manual 5 Configuration The features and functions of the D-Link SmartPro Switch can be configured for optimum use through the Web-based Management Utility. Smart Wizard Configuration After a successful login, the Smart Wizard will guide you through essential settings of the D-Link Web Smart Switch. If you do not plan to change anything, click Exit to leave the Wizard and enter the Web Interface. You can also skip it by clicking Don't show Smart Wizard next time for the next time you logon to the Webbased Management. IPv4 Information IPv4 Information will guide you to do basic configurations on 3 steps for the IP Information, access password, and SNMP. Select Static, DHCP or BOOTP, and type the desired new IP Address, select the Netmask and type the Gateway address, then click the Apply button to enter the next Password setting page. (No need to enter IP Address, Netmask and Gateway of DHCP and BOOTP selection.) The IP address is allowed for IPv4 and IPv6 address. If you are not changing the settings, click Exit button to go back to the main page. Or you can click on Ignore the wizard next time to skip wizard setting when the switch boots up. Figure 5.1 - IPv4 Information in Smart Wizard NOTE: The IPv4 Information of Smart Wizard does not support IPv6 address. Password Settings Type the desired new password in the Password box and again in the Confirm Password, then click the Next button to the SNMP setting page. 19
-
 1
1 -
2
-
3
-
4
-
5
-
6
-
7
-
8
-
9
-
10
-
11
-
12
-
13
-
14
-
15
-
16
-
17
-
18
-
 19
19 -
 20
20 -
 21
21 -
 22
22 -
 23
23 -
 24
24 -
 25
25 -
 26
26 -
 27
27 -
 28
28 -
 29
29 -
30
-
31
-
32
-
33
-
34
-
35
-
36
-
37
-
38
-
39
-
40
-
41
-
42
-
43
-
44
-
45
-
46
-
47
-
48
-
49
-
50
-
51
-
52
-
53
-
54
-
55
-
56
-
57
-
58
-
59
-
60
-
61
-
62
-
63
-
64
-
65
-
66
-
67
-
68
-
69
-
70
-
71
-
72
-
73
-
74
-
75
-
76
-
77
-
78
-
79
-
80
-
81
-
82
-
83
-
84
-
85
-
86
-
87
-
88
-
89
-
90
-
91
-
92
-
93
-
94
-
95
-
96
-
97
-
98
-
99
-
100
-
101
-
102
-
103
-
104
-
105
-
106
-
107
-
108
-
109
-
110
-
111
-
112
-
113
 |
 |
