D-Link DNS-726-4 Product Manual - Page 21
Configuration, Getting Started
 |
UPC - 790069320200
View all D-Link DNS-726-4 manuals
Add to My Manuals
Save this manual to your list of manuals |
Page 21 highlights
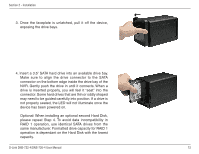
Section 3 - Configuration Configuration Getting Started Step 1: Make sure the NVR is connected to a network via a router or a switch, or directly connected to a PC. Step 2: Turn on the computer and insert the D-Link DNS-722-4/DNS-726-4 Autorun CD into the CD-ROM drive. The following step-by-step instructions appear when using Windows Vista operating system. The steps and screens are similar for other Windows operating systems. Click NVR Search Utility. Highlight an available NVR and click Configuration to access the web-based utility. D-Link DNS-722-4/DNS-726-4 User Manual 17
-
 1
1 -
2
-
3
-
4
-
5
-
6
-
7
-
8
-
9
-
10
-
11
-
12
-
13
-
14
-
15
-
 16
16 -
 17
17 -
 18
18 -
 19
19 -
 20
20 -
 21
21 -
 22
22 -
 23
23 -
 24
24 -
 25
25 -
 26
26 -
27
-
28
-
29
-
30
-
31
-
32
-
33
-
34
-
35
-
36
-
37
-
38
-
39
-
40
-
41
-
42
-
43
-
44
-
45
-
46
-
47
-
48
-
49
-
50
-
51
-
52
-
53
-
54
-
55
-
56
-
57
-
58
-
59
-
60
-
61
-
62
-
63
-
64
-
65
-
66
-
67
-
68
-
69
-
70
-
71
-
72
-
73
-
74
-
75
-
76
-
77
-
78
-
79
-
80
-
81
-
82
-
83
-
84
-
85
-
86
-
87
-
88
-
89
-
90
-
91
-
92
-
93
 |
 |

²7
D-L±nk DNS-722-4/DNS-726-4 User Manual
Sect±on ³ - Configurat±on
Step.1:
Make sure the NVR is connected to a network via a router or a switch, or directly connected to a PC.
Step.2:
Turn on the computer and insert the D-Link DNS-722-4/DNS-726-4 Autorun CD into the CD-ROM drive. The
following step-by-step instructions appear when using Windows Vista operating system. The steps and screens are
similar for other Windows operating systems.
Click
NVR.Search.Utility
.
Highlight an available NVR and
click
Configuration
to access the
web-based utility.
Getting Started
Configuration