D-Link DSN-1100-10 Software User's Guide for DSN-1100-10 - Page 63
Scanning a Volume
 |
UPC - 790069321559
View all D-Link DSN-1100-10 manuals
Add to My Manuals
Save this manual to your list of manuals |
Page 63 highlights
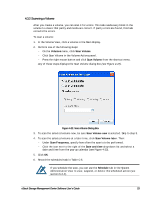
4.3.2 Scanning a Volume After you create a volume, you can scan it for errors. This task reads every block in the volume to ensure that parity and media are correct. If parity errors are found, this task corrects the errors. To scan a volume: 1. In the Volume View, click a volume in the Main Display. 2. Perform one of the following steps: - On the Volumes menu, click Scan Volume. - Click Scan Volume in the Volume Actions panel. - Press the right mouse button and click Scan Volume from the shortcut menu. Any of these steps displays the Scan Volume dialog box (see Figure 4-22). Figure 4-22. Scan Volume Dialog Box 3. To scan the selected volume now, be sure Scan Volume now is selected. Skip to step 5. 4. To scan the selected volume at a later time, click Scan Volume later. Then: - Under Scan Frequency, specify how often the scan is to be performed. - Click the icon next to the right of the Date and time drop-down list and select a date and time from the pop-up calendar (see Figure 4-23). 5. Click OK. 6. Record the scheduled task in Table C-5. If you schedule the scan, you can use the Schedule tab in the System Administration View to view, suspend, or delete this scheduled action (see section 6.2.4). xStack Storage Management Center Software User's Guide 53
-
 1
1 -
2
-
3
-
4
-
5
-
6
-
7
-
8
-
9
-
10
-
11
-
12
-
13
-
14
-
15
-
16
-
17
-
18
-
19
-
20
-
21
-
22
-
23
-
24
-
25
-
26
-
27
-
28
-
29
-
30
-
31
-
32
-
33
-
34
-
35
-
36
-
37
-
38
-
39
-
40
-
41
-
42
-
43
-
44
-
45
-
46
-
47
-
48
-
49
-
50
-
51
-
52
-
53
-
54
-
55
-
56
-
57
-
 58
58 -
 59
59 -
 60
60 -
 61
61 -
 62
62 -
 63
63 -
 64
64 -
 65
65 -
 66
66 -
 67
67 -
 68
68 -
69
-
70
-
71
-
72
-
73
-
74
-
75
-
76
-
77
-
78
-
79
-
80
-
81
-
82
-
83
-
84
-
85
-
86
-
87
-
88
-
89
-
90
-
91
-
92
-
93
-
94
-
95
-
96
-
97
-
98
-
99
-
100
-
101
-
102
-
103
-
104
-
105
-
106
-
107
-
108
-
109
-
110
-
111
-
112
-
113
-
114
-
115
-
116
-
117
-
118
-
119
-
120
-
121
-
122
-
123
-
124
-
125
-
126
-
127
-
128
-
129
-
130
-
131
-
132
-
133
-
134
-
135
-
136
-
137
-
138
-
139
-
140
-
141
-
142
-
143
-
144
-
145
-
146
-
147
-
148
-
149
-
150
-
151
-
152
-
153
-
154
-
155
-
156
-
157
-
158
 |
 |
