D-Link DSN-5410-10 Software User's Guide for DSN-4000 - Page 37
Advanced Settings Tab, Calendar Pop-Up Dialog Box
 |
UPC - 790069324000
View all D-Link DSN-5410-10 manuals
Add to My Manuals
Save this manual to your list of manuals |
Page 37 highlights
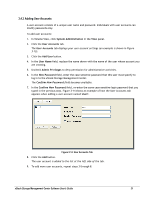
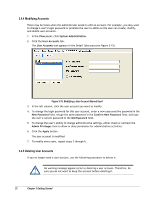
Figure 3-10. Advanced Settings Tab 3. Double-click on the current date and time value for the Remote System Time item, then type the new date and/or time and press the Enter key. You can also click on the calendar button at the far right of the date and time field to display a calendar pop-up to simplify the date selection (an example is shown in Figure 3-11). Figure 3-11. Calendar Pop-Up Dialog Box 4. Alternatively, you can double-click on the NTP (Time Server) IP Address item and enter an IP address for a third-party NTP server, or you can click on the "Synchronize Remote Time" button to get the date and time from your local computer system. xStack Storage Management Center Software User's Guide 27
-
 1
1 -
2
-
3
-
4
-
5
-
6
-
7
-
8
-
9
-
10
-
11
-
12
-
13
-
14
-
15
-
16
-
17
-
18
-
19
-
20
-
21
-
22
-
23
-
24
-
25
-
26
-
27
-
28
-
29
-
30
-
31
-
 32
32 -
 33
33 -
 34
34 -
 35
35 -
 36
36 -
 37
37 -
 38
38 -
 39
39 -
 40
40 -
 41
41 -
 42
42 -
43
-
44
-
45
-
46
-
47
-
48
-
49
-
50
-
51
-
52
-
53
-
54
-
55
-
56
-
57
-
58
-
59
-
60
-
61
-
62
-
63
-
64
-
65
-
66
-
67
-
68
-
69
-
70
-
71
-
72
-
73
-
74
-
75
-
76
-
77
-
78
-
79
-
80
-
81
-
82
-
83
-
84
-
85
-
86
-
87
-
88
-
89
-
90
-
91
-
92
-
93
-
94
-
95
-
96
-
97
-
98
-
99
-
100
-
101
-
102
-
103
-
104
-
105
-
106
-
107
-
108
-
109
-
110
-
111
-
112
-
113
-
114
-
115
-
116
-
117
-
118
-
119
-
120
-
121
-
122
-
123
-
124
-
125
-
126
-
127
-
128
-
129
-
130
-
131
-
132
-
133
-
134
-
135
-
136
-
137
-
138
-
139
-
140
-
141
-
142
-
143
-
144
-
145
-
146
-
147
-
148
-
149
-
150
-
151
-
152
-
153
-
154
-
155
-
156
-
157
-
158
 |
 |

xStack Storage Management Center Software User’s Guide
27
Figure 3-10. Advanced Settings Tab
3.
Double-click on the current date and time value for the
Remote System Time
item, then type
the new date and/or time and press the Enter key.
You can also click on the calendar button
at the far right of the date and time field to display a calendar pop-up to simplify the date
selection (an example is shown in Figure 3-11).
Figure 3-11. Calendar Pop-Up Dialog Box
4.
Alternatively, you can double-click on the NTP (Time Server) IP Address item and enter an IP
address for a third-party NTP server, or you can click on the “
Synchronize Remote Time
”
button to get the date and time from your local computer system.