D-Link DUB-H4 Installation Guide - Page 2
Installing the DUB-H4 - installation
 |
UPC - 790069243905
View all D-Link DUB-H4 manuals
Add to My Manuals
Save this manual to your list of manuals |
Page 2 highlights
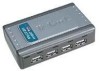
Installing the DUB-H4 A. Plug the USB type B connector (the larger end of the cable) into the back of the DUB-H4. Type B B. Plug the AC adapter into the DUB-H4 and into a power socket in a power-strip or a wall jack. C. Plug the USB type A connector (the narrow end of the cable) into an available USB 2.0 port on your computer (or USB 1.1 if you don't have USB 2.0). Type A D. Your computer will automatically detect and install the DUB-H4. You may now connect USB 2.0 or USB 1.1 devices to an available USB port on the front of the DUB-H4. 2
-
 1
1 -
 2
2 -
 3
3 -
 4
4
 |
 |

2
Installing the DUB-H4
A.
Plug the USB type B connector
(the larger end of the cable) into
the back of the DUB-H4.
B.
Plug the AC adapter into the
DUB-H4 and into a power
socket in a power-strip or a wall
jack.
C.
Plug the USB type A connector
(the narrow end of the cable)
into an available USB 2.0 port
on your computer (or USB 1.1
if you don’t have USB 2.0).
D.
Your computer will automatically detect and install the DUB-H4.
You may now connect USB 2.0 or USB 1.1 devices to an available
USB port on the front of the DUB-H4.
Type A
Type B