D-Link DUB-M610 Quick Install Guide - Page 3
Product Setup
 |
View all D-Link DUB-M610 manuals
Add to My Manuals
Save this manual to your list of manuals |
Page 3 highlights
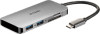
ENGLISH PRODUCT SETUP Step 1: Plug the DUB-M610's USB Type-C connector into an available USB Type-C port on your computer. Step 2: Connect a HDMI cable to the DUB-M610's HDMI port. Step 3: Attach the other end of the HDMI cable to your HDMI display. Step 4 (Optional): Connect up to two USB devices to the USB 3.0 ports. You can also use the USB Type-C port to charge your USB Type-C device or to deliver power to your laptop. Use the dual-slot card reader to access data on a SD or microSD card simultaneously. Note: The device may become warm to touch while in use. This is within normal operating temperature. USB Type-C HDMI Display Monitor Television Projector Computer USB 3.0 TECHNICAL SUPPORT DUB-M610 micro SD SD/microSD Card eu.dlink.com/support 3
-
 1
1 -
 2
2 -
 3
3 -
 4
4 -
 5
5 -
 6
6 -
 7
7 -
 8
8 -
 9
9 -
10
-
11
-
12
-
13
-
14
-
15
-
16
-
17
-
18
-
19
-
20
-
21
-
22
-
23
-
24
-
25
-
26
-
27
-
28
-
29
-
30
-
31
-
32
-
33
-
34
-
35
-
36
-
37
-
38
-
39
-
40
-
41
-
42
 |
 |
