Dacor HCT36 Installation Instruction - Heirtage Cooktop - Page 12
Verifying Proper Function, Troubleshooting
 |
View all Dacor HCT36 manuals
Add to My Manuals
Save this manual to your list of manuals |
Page 12 highlights
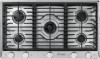
Installation Instructions Verifying Proper Function Perform this procedure for all cooktop burners. WARNING The cooktop must always be properly grounded when electrical power is applied. NOTE SimmerSearTM burner: Turn the control knob to the simmer setting, and ensure the low-level flame can be adjusted and the burner indicator illuminates. 1. Turn off power to the electrical outlet at the circuit breaker or fuse box. 2. Turn off the gas supply at the gas-supply valve. 3. Turn off all cooktop burner controls. 4. Plug in the power cord. 5. Turn on power to the electrical outlet at the circuit breaker or fuse box. 6. Press-turn a burner-control knob slowly counterclockwise to the HIGH position. Troubleshooting a. Verify that the corresponding burner igniter sparks (rapid tick-tick) and the burner indicator comes on. b. Turn off the burner. 7. Turn the gas-supply valve ON. 8. Verify that the gas flame ignites on all burners: a. Press-turn a control knob to the HIGH position. If the cooktop fails to function properly, review these steps: • Verify that the cooktop receives power/gas. • Verify that the power cord is plugged in and power is turned on at the power source. • Verify that all the burners are correctly assembled/seated. • If the burner sparks after ignition, have a licensed electrician check the electrical outlet for correct grounding or reversed polarity. • Repeat Step 8 of the Verification procedure. • If the appliance still does not work, do not try to repair the appliance, but contact Dacor Distinctive Service: (800) 793-0093 x2822. Have the model and serial numbers available. (See the inside cover for this information.) Dacor is not responsible for the cost of correcting problems caused by faulty installation. NOTE • If ignition does not occur within 4 seconds, turn the knob OFF, wait 5 minutes (for gas to dissipate), then repeat Step 8a. • A proper flame burns steadily with a sharp, blue inner cone. The Smart Flame™ feature reduces the flame under the grate fingers to lengthen grate life. b. After ignition, turn the knob clockwise to the OFF position. 10
-
 1
1 -
2
-
3
-
4
-
5
-
6
-
 7
7 -
 8
8 -
 9
9 -
 10
10 -
 11
11 -
 12
12 -
 13
13 -
 14
14
 |
 |
