Dacor RNOV130 Installation Instructions - Page 11
Electrical Connection
 |
View all Dacor RNOV130 manuals
Add to My Manuals
Save this manual to your list of manuals |
Page 11 highlights
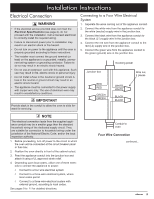
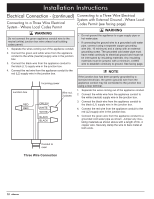
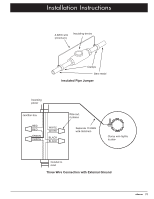
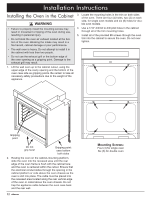
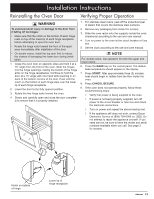
Installation Instructions Electrical Connection WARNING • If the electrical service provided does not meet the Electrical Specifications (see page 4), do not proceed with the installation. Call a licensed electrician to correctly install the required wiring. • Failure to disconnect power prior to installation may result in an electric shock or fire hazard. • Do not turn on power to the appliance until the oven is properly grounded according to these instructions. • The installer must connect the ground terminal (or lead) on the appliance to a grounded, metallic, permanent wiring system or grounding conductor. Failure to do so may result in an electric shock hazard. • Do not use an extension cord with this appliance. Such use may result in fire, electric shock or personal injury. • Do not install a fuse in the neutral or ground circuit. A fuse in the neutral or ground circuit may result in an electric shock hazard. • The appliance must be connected to the power supply with copper wire only. The use of aluminum wire may result in unsatisfactory conditions. IMPORTANT Provide slack in the conduit to allow the oven to slide forward for servicing. Connecting to a Four Wire Electrical System 1. Separate the wires coming out of the appliance conduit. 2. Connect the white wire from the appliance conduit to the white (neutral) supply wire in the junction box. 3. Connect the black wire from the appliance conduit to the black (L1) supply wire in the junction box. 4. Connect the red wire from the appliance conduit to the red (L2) supply wire in the junction box. 5. Connect the green wire from the appliance conduit to the green (ground) wire in the junction box. Junction box RED RED GREEN GREEN Incoming power Wire nut, 4 places WHITE WHITE BLACK BLACK NOTE The electrical connection leads from the supplied appliance conduit may be a smaller gage than the standard household wiring of the dedicated supply circuit. They are suitable for connection to household wiring under the jurisdiction of the National Electric Code, and/or the local inspection authority. 1. Before proceeding, turn off power to the circuit to which the oven will be connected at the circuit breaker panel or fuse box. 2. Position the oven directly in front of the cabinet cutout. 3. Feed the appliance conduit into the junction box and attach it using a UL approved strain relief. 4. Depending upon local codes, utilize one of three methods to connect the appliance to power: ◊ Connect to a four wire electrical system ◊ Connect to a three wire electrical system, where local codes permit ◊ Connect to a three wire electrical system with external ground, according to local codes. See pages 9 to 11 for detailed directions. Conduit to oven Four Wire Connection continued... 9
-
 1
1 -
2
-
3
-
4
-
5
-
 6
6 -
 7
7 -
 8
8 -
 9
9 -
 10
10 -
 11
11 -
 12
12 -
 13
13 -
 14
14 -
 15
15 -
 16
16 -
17
-
18
-
19
-
20
-
21
-
22
-
23
-
24
-
25
-
26
-
27
-
28
-
29
-
30
-
31
-
32
-
33
-
34
-
35
-
36
 |
 |
