Dacor RV36 Installation Instructions - Page 9
Planning the Duct Work
 |
View all Dacor RV36 manuals
Add to My Manuals
Save this manual to your list of manuals |
Page 9 highlights
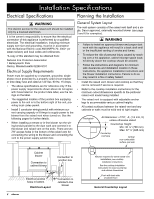
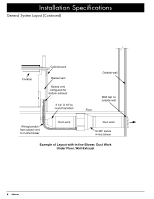
Installation Specifications Planning the Duct Work warning • To reduce the risk of fire and to properly exhaust air, be sure to duct air outside the house or building. Do not vent exhaust air into spaces within walls or ceilings or into attics, crawl spaces or garages. • Tape all duct joints securely to prevent combustion by-products, smoke or odors from entering the home. Doing so will also improve system efficiency. • TO REDUCE THE RISK OF FIRE, USE ONLY METAL DUCT WORK. • DO NOT install more than one blower. Even small differences between blower air flow rates can greatly reduce the air draw by the raised vent. You must install one of the Dacor blower models listed below for proper operation. For ILHSF or REMP series blowers, see the blower installation instructions. For model CABP3, see the instructions later in this manual. Only one blower shall be installed. APPROVED DACOR BLOWERS FOR USE WITH RV SERIES RAISED VENTS Model Number Rating CABP3 600 CFM* ILHSF8 600 CFM** ILHSF10 REMP3 1100 CFM** 600 CFM** REMP16 1000 CFM** * Nominal rating at zero inches static pressure, see the CABP3 Cabinet Blower Data on page 15 for actual rating. ** Nominal rating at zero inches static pressure. See the blower installation instructions for actual blower rating. • The raised vent can be configured to exhaust through the bottom or either side: ►► On installations using the ILHSF or REMP series blowers, the cover plate on the appropriate side or on the bottom is removed to expose the exhaust. See page 8 for locations and dimensions. Configure the raised vent for bottom exhaust and use an elbow to vent through the rear cabinet wall. ►► On installations using the CABP3 blower, the blower assembly is mounted to the front of the raised vent with the exhaust pointing in the desire direction. See page 8. Point the exhaust down and use an elbow to vent through the rear cabinet wall. • When planning new duct work, always look for the shortest, most direct route to the outside. See pages 5 and 6 for examples. Calculate the maximum duct length (see page 9) to determine if the planned duct route will work with the blower selected. • On bottom exhaust installations you may cut a hole in the floor to allow the duct work to pass through. • All duct work materials (including screws and duct tape) must be purchased separately by the customer. • You can increase the duct size over the duct run if desired. To prevent a back draft, never decrease the duct size over the run. • Do not rely on duct tape alone to seal duct joints. Fasten all connections with sheet metal screws and tape all joints with certified silver tape or duct tape. • Use sheet metal screws as required to support the duct weight. • To prevent back-drafts, a damper at the duct outlet may also be required. • Make sure duct work does not interfere with floor joists or wall studs. • With concrete slab construction, "box-in" the duct work and blower wiring to prevent collapsing or other damage when the wet concrete is poured. • Cross-drafts or air currents from adjacent open windows or doors, heating/air conditioning outlets, ceiling fans and recessed ceiling lights reduce vent efficiency. Duct Work Design Tips • Wherever possible, reduce the number of transitions and turns to as few sharp angles as possible. Two staggered 45° angles are better than one 90°. Keep turns as far away from the hood exhaust as possible, with as much space between each bend as possible. • For best performance, use round duct instead of rectangular when possible, especially when elbows are required. • If multiple elbows are used, try to keep a minimum of 24" of straight duct between them. Avoid "S" or "back to back" configurations of adjacent elbows. • Do not use flexible metal duct. 7
-
 1
1 -
2
-
3
-
 4
4 -
 5
5 -
 6
6 -
 7
7 -
 8
8 -
 9
9 -
 10
10 -
 11
11 -
 12
12 -
 13
13 -
 14
14 -
15
-
16
-
17
-
18
-
19
-
20
 |
 |
