Dacor RV36 Use & Care Manuals - Page 5
Operating Your Raised Vent - filter
 |
View all Dacor RV36 manuals
Add to My Manuals
Save this manual to your list of manuals |
Page 5 highlights
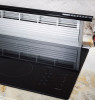
Operating Your Raised Vent Operation warning If the vent intake becomes jammed while being raised or lowered, immediately press the UP/DOWN key once to stop the intake motion, then turn off power at the circuit breaker or fuse box. Remove the obstruction, turn on the power and press the UP/DOWN key to continue raising or lowering the intake. important The direction of travel of the vent intake cannot be reversed while it is moving. The intake must complete a full up or down cycle before changing directions. To operate the RV raised vent system when the vent intake is in its lowered position, press and release the UP/DOWN key on the control panel. The intake will take approximately ten seconds to reach its uppermost position, where it will stop. The blower will turn on automatically and run on the high speed setting. Adjust the blower speed by pressing and releasing either the MEDIUM or LOW keys. The fan speed may be changed whenever desired, as long as the vent intake is in the fully raised position. The blower will not operate if the intake is in any other position. Turn off the blower in one of two ways: Press and release the OFF key or lower the vent by pressing and releasing the UP/DOWN key. CLEAN FILTER DELAY OFF MEDIUM UP / DOWN OFF LOW HIGH Top cap Control panel Intake grill Parts the of Raised Vent - Shown Raised Appearance varies with model number Operating Tips: • Activate the blower a few minutes before starting to cook to establish an airflow pattern in the room. • Adjust the fan speed according to the volume and weight of the cooking exhaust. • Reduce the fan speed if the flame on a gas cooktop is being drawn by the vent system. Flame drawing is a normal occurrence with powerful vent systems, especially when installed with short duct runs. • Always raise the vent intake and activate the blower whenever using the cooktop or range. • Eliminate air currents in the vent vicinity by shutting nearby windows and doors, turning off ceiling fans and closing adjacent heating and air conditioning outlets. • Place your largest frying pans, skillets and stock pots on the rear burners whenever possible, as the draft is strongest closest to the vent intake. Using Delay Off When the cooking process is complete, use the Delay Off feature to remove any residual smoke and fumes. Turn the Delay Off function by pressing the DELAY OFF key while the raised vent is on. The blower will continue to run at the selected fan speed for five minutes, then automatically turn off. The vent intake will remain in the fully raised position after the blower shuts off. The intake may be lowered by pressing and releasing the UP/DOWN key at your convenience. While the blower is operating in Delay Off mode, the blower speed may be adjusted to a different speed by pressing the HIGH, MEDIUM or LOW keys. To manually cancel the Delay Off function, press and release the OFF key or the UP/DOWN key. The blower will shut off and if pressing the UP/DOWN key, the vent will retract. Securing the Electronic Keypad To prevent accidental raising or lowering of the vent, secure the electronic keypad so that the keys (buttons) do not function. This feature is especially helpful when young children are present or when cleaning the vent and surrounding areas. • While the vent is in the fully lowered or fully raised position, press and the HIGH and LOW keys at the same time for one second. The electronic controls will secure and the keys will become inoperative. The HIGH and LOW key indicator lights will illuminate at the same time when the controls are secured. • To reactivate the controls, press the HIGH and LOW keys at the same time for one second. The HIGH and LOW key indicator lights will go out, indicating that the control panel is active again. 3
-
 1
1 -
 2
2 -
 3
3 -
 4
4 -
 5
5 -
 6
6 -
 7
7 -
 8
8 -
 9
9 -
 10
10 -
 11
11 -
12
 |
 |
