Danby DAR0488 Product Manual - Page 2
Save These Instructions - refrigerator
 |
View all Danby DAR0488 manuals
Add to My Manuals
Save this manual to your list of manuals |
Page 2 highlights
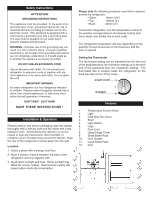
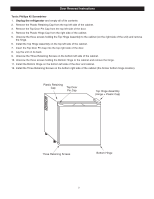
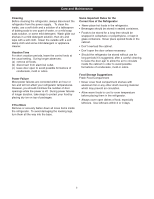
Safety Instructions ATTENTION GROUNDING INSTRUCTIONS This appliance must be grounded. In the event of an electrical short circuit, grounding reduces the risk of electrical shock by providing an escape wire for the electrical current. This appliance is equipped with a cord having a grounding wire with a grounding plug. The plug must be plugged into an outlet that is properly installed and grounded. WARNING - Improper use of the grounding plug can result in a risk of electric shock. Consult a qualified electrician or serviceman if the grounding instructions are not completely understood, or if doubt exists as to whether the appliance is properly grounded. DO NOT USE AN EXTENSION CORD Use an exclusive wall outlet. Do not connect your refrigerator to extension cords or together with any other appliance in the same wall outlet. Do not splice the cord. IMPORTANT WARNING An empty refrigerator is a very dangerous attraction to children. Remove either the gasket, latches, lids or doors from unused appliances, or take some other action that will guarantee it harmless. Please note the following clearance area that is required around the refrigerator: • Sides: 19mm (3/4") • Top: 100mm (4") • Back: 50mm (2") To start the refrigerator, turn the temperature control to the position corresponding to the desired cooling (thin line is least cold, thicker line is most cold). The refrigerator temperature will vary depending on the quantity of food stored and on the frequency that the door is opened. Setting the Thermostat The thermostat setting can be adjusted from the thin end of the graduated blue line (minimum setting) up to the thick end of the graduated blue line (maximum setting). The thermostat dial is located inside the refrigerator on the back top-right corner of the cavity. Least Cold Coldest DON'T WAIT! DO IT NOW! SAVE THESE INSTRUCTIONS ! Features 1. Temperature Control Knob 2. Light Installation & Operation 3. Cold Sink Fan Cover 4. Shelf Remove exterior and interior packaging; wipe the outside thoroughly with a soft dry cloth and the inside with a wet, lukewarm cloth. Avoid placing the cabinet in a narrow recess or near any heat source, direct sunlight, or moisture. Let air circulate freely around the cabinet. Keep the rear of the refrigerator 2 inches away from the wall. 5. Light Switch 6. Legs 7. Door Liner 8. Upper Hinge Cover 9. Small Bottle Rack 10. Door Gasket 11. Large Bottle Rack Location 12. Door 1. Select a place with a strong, level floor. 1 8 2. Allow 2 inches of space between the back of the refrigerator and any adjacent wall. 2 3. Avoid direct sunlight and heat. Direct sunlight may 9 affect the acrylic coating. Heat sources nearby will 3 cause higher electricity consumption. 10 4 11 5 6 7 12 1
-
 1
1 -
 2
2 -
 3
3 -
 4
4 -
 5
5 -
 6
6 -
 7
7 -
 8
8 -
9
-
10
-
11
-
12
-
13
 |
 |
