Danby DCRM31BSLDD Product Manual - Page 4
Installation Instructions - refrigerator
 |
View all Danby DCRM31BSLDD manuals
Add to My Manuals
Save this manual to your list of manuals |
Page 4 highlights
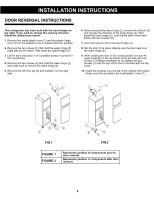
INSTALLATION INSTRUCTIONS DOOR REVERSAL INSTRUCTIONS This refrigerator has been built with the door hinges on the right. if you wish to change the opening direction, follow the instructions below: 1. Remove the small plastic cover (7) and the plastic hinge cover (6) on the appliance top to disassemble the worktop. 2. Remove the two screws (1) that hold the upper hinge (5) (right side) to the frame. Take away the upper hinge (5). 3. Lift the door and place it on a padded surface to prevent it from scratching. 4. Remove the two screws (8) that hold the lower hinge (2) and make sure to remove the lower hinge (2). 5. Remove the left front leg (4) and transfer it to the right side. 6. Before placing this lower hinge (2,) remove the bolt-pin (9) and reverse the direction of the lower hinge (2). Then install the lower hinge (2) onto the left side of the lower frame with two screws. (8) 7. Insert the bolt-pin (9) to the lower hinge (2.) 8. Set the door to its place making sure the door seat is at the lower hinge (2.) 9. While holding the door in the closed position secure the upper hinge (5) in the top frame of the left side with two screws (1.) Please remember to not tighten the two screws (1) until the top of the door is levelled with the top cover. 10. Install the worktop onto the top of the cabinet with plastic hinge cover (6) and attach the small plastic cover (7.) FIG.1 FIG.2 FIGURE 1 FIGURE 2 Represents position of components prior to door reversal. Represents position of components after door reversal. 3
-
 1
1 -
 2
2 -
 3
3 -
 4
4 -
 5
5 -
 6
6 -
 7
7 -
 8
8 -
 9
9 -
 10
10
 |
 |
