DeLonghi DC36TB Owner Manual - Page 7
Brew Cycle Delay Feature Timer Function, Operating Your Coffee Maker
 |
View all DeLonghi DC36TB manuals
Add to My Manuals
Save this manual to your list of manuals |
Page 7 highlights
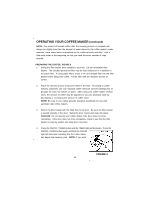
BREW CYCLE DELAY FEATURE (TIMER FUNCTION) 1. To preset your coffee maker to brew at a later time first verify that the clock is set to the correct time. See "How to Set the Clock" section for details. 2. Press and hold the PROG button. Continuing to hold the PROG button, press the HOUR button until the desired brew time hour is reached. NOTE: Be sure to check the AM / PM indicator, located on the left side of the digital clock display. Then press the MIN button until the desired minutes have been reached. Release the PROG button. 3. Press the ON/OFF / TIMER button once. The TIMER light will illuminate indicating that the coffee maker is waiting for the preset brew time to be reached before it will begin the brewing cycle. 4. NOTE: If you wish to use the AROMA function, press the AROMA button immediately after TIMER light is illuminated. When the AROMA function is activated, the indicator will illuminate. NOTE: If the ON/OFF / TIMER button is pressed before the PROG button, the Brew Cycle Delay (TIMER) feature will not activate. OPERATING YOUR COFFEE MAKER PREPARING COFFEE MAKER FOR BREWING COFFEE: 1. Place the coffee maker on a flat, level surface away from any edge. 2. Plug the unit into a 120V / 60Hz only outlet. 3. The lid of the carafe must be fitted properly during the brewing process. And the carafe must be set on the carafe warming plate. 4. The filter basket door must be properly closed during the brewing process. CAUTION: If the filter basket door is not completely closed, the Pause 'N Serve feature will not function properly. It could cause hot water or hot coffee to overflow. FILLING THE WATER RESERVOIR: FIGURE 3 5. Open the hinged water reservoir cover located at the top of the coffee maker. 6. Fill the carafe with the desired amount of cold water. Empty the water from the carafe into the water reservoir. 7. The water level indicator lets you know much water is in the water reservoir. 8. Close the hinged lid. Place the carafe with the lid in place on the warming plate. -7- FIGURE 3
-
 1
1 -
 2
2 -
 3
3 -
 4
4 -
 5
5 -
 6
6 -
 7
7 -
 8
8 -
 9
9 -
 10
10 -
 11
11 -
 12
12 -
13
-
14
-
15
-
16
-
17
-
18
-
19
-
20
-
21
-
22
-
23
-
24
-
25
-
26
-
27
-
28
-
29
-
30
-
31
-
32
-
33
-
34
-
35
-
36
-
37
-
38
-
39
-
40
-
41
-
42
-
43
-
44
 |
 |