DeLonghi DC50B Owner Manual - Page 6
Know Your Coffee Maker, Setting The Clock, Setting The Timer
 |
View all DeLonghi DC50B manuals
Add to My Manuals
Save this manual to your list of manuals |
Page 6 highlights
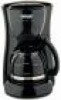
KNOW YOUR COFFEE MAKER (continued) UNDERSTANDING THE CONTROL PANEL: (DC50T Series Only) 1. CLOCK / TIMER DIGITAL DISPLAY: Displays the clock and timer settings. See "Setting the Clock" section of this manual for programming the time. 2. PROG BUTTON: This button allows you to program the coffee maker up to 24 hours before the desired brewing time. See the section on "Setting the Timer" for details on activating the TIMER function. 3. HOUR AND MIN BUTTONS: These buttons advance the hour and minute display for the clock and timer. See the section on "Setting the Clock". 4. TIMER LIGHT: When illuminated, indicates that the TIMER function is being used. 5. ON-OFF / TIMER BUTTON: Activates the ON / OFF (power) and TIMER functions. 6. ON / OFF LIGHT: When the light is illuminated it indicates that the unit has begun the brewing cycle. SETTING THE CLOCK To set the correct time of day, first press the HOUR button until the desired hour is reached. Then, press the MIN button until the desired minutes are reached. Use the AM / PM indicator on the left side of the digital display when setting the time. NOTE: Unplugging the unit will reset the clock to 12:00. SETTING THE TIMER 1. To preset your coffee maker to brew at a later time first verify that the clock is set to the correct time. (See "Setting the Clock" section of this manual for details). 2. Press and hold PROG button. While continuing to hold the PROG button, press the HOUR button until the desired brew time hour is reached. NOTE: Be sure to check the AM / PM indicator, located on the left side of the digital clock display. Then press the MIN button until the desired minutes have been reached. Release the PROG button. 3. Follow the "Operating Your Coffee Maker" steps 1 through 3. Then, press the ON-OFF / TIMER button only once, the TIMER light will illuminate. Your coffee maker is now set to start brewing at the programmed time. When the ON / OFF light illuminates, this indicates that your programmed brew time has now been activated. NOTE: If you wish to deactivate the TIMER function, press the ONOFF / TIMER button located on the side control panel repeatedly until the TIMER light on the front control panel is no longer illuminated. -6-
-
 1
1 -
 2
2 -
 3
3 -
 4
4 -
 5
5 -
 6
6 -
 7
7 -
 8
8 -
 9
9 -
 10
10 -
 11
11 -
 12
12 -
13
-
14
-
15
-
16
-
17
-
18
-
19
-
20
-
21
-
22
-
23
-
24
-
25
-
26
-
27
-
28
-
29
-
30
-
31
-
32
-
33
-
34
-
35
-
36
-
37
-
38
-
39
-
40
-
41
-
42
 |
 |
