DeLonghi DCG59 Owner Manual - Page 6
Operating, Coffee, Grinder,
 |
View all DeLonghi DCG59 manuals
Add to My Manuals
Save this manual to your list of manuals |
Page 6 highlights
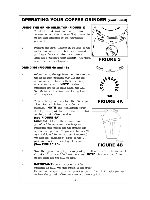
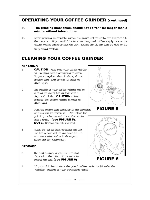
OPERATING YOUR COFFEE GRINDER (continued) USING THE GRIND SELECTOR (FIGURE 3) 5. To adjust the desired degree of grinding (coarse, rrediurt, fine or extra fire) rotate the coffee bean caitainer to the appropriate placement. 6. Position the arrow (located Co the bane of the coffee bean contairer) above your desired grind type (located an the ccrtiol ixtr1). There are 8 different grind settings. The grind cele-4-nr will click into place. GRINDING (FIGURE 4A and 4B) 7. Before turning tie appliance on , be sure that the cof fee bean container with lid and the ground cof fee container with lid are firmly attached to the unit. NOTE : If these containers are not in their place, the T1cl Safe System will activate and the appliance will not q:erate. --..._ DRIP , NVE - MEV°. FIGURE 3 ,.t. .„Esse DRIP ° oo a To turn the appliancean, turn the Tablespoon FIGURE 4A Tirrer knob clockwise to your desired election. NOTE : The TablepLon. Tiner directly corresponds to the indicators located on the ground cof fee container. (see FIGURE 4A) Example : Refer to the indicators cn the ground cof fee container. The large represents drip coffee and the sieller cup represents espresso. If you went to brew 12 otos of drip cof fee (or 24 cups of espresso) you turn the Tablespoon Timer to the L position to grind the (exact quantity needed. (See FIGURE 4B) FIGURE 4B 9. Shake the al acre slightly daring grinding if all of the cof fee beans do not slip dean aurt the cof fee bean container. NOTE :This can coarr if the ccf fee beans are too oily or darrp. 10. II14130FrTikPlir: Once the ground coffee container is full, you rust remove it and empty the contents completely before grinding again. Once it is empty you may Ltplace the ground coffee container and resume grinding. - 6 -
-
 1
1 -
 2
2 -
 3
3 -
 4
4 -
 5
5 -
 6
6 -
 7
7 -
 8
8 -
 9
9
 |
 |