DeLonghi ESAM5600SL Owner Manual - Page 13
Making Drinks With Milk
 |
View all DeLonghi ESAM5600SL manuals
Add to My Manuals
Save this manual to your list of manuals |
Page 13 highlights
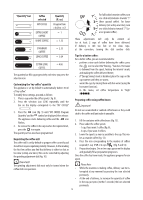
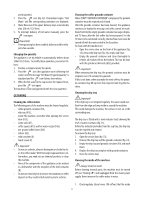
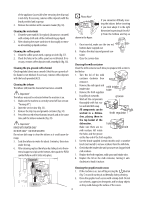
• For hotter coffee, see the section "Tips for a hotter coffee". Important! If the coffee is delivered a drop at a time, too fast and not creamy enough or too cold, read the tips in the "Troubleshooting" section on page 22. Various alarm messages could be displayed while the machine is in use. Their meaning is explained in the section "Displayed messages" (page 21). Making coffee using pre-ground coffee Important! • Never add pre-ground coffee when the machine is off or it could spread through the inside of the machine and dirty it. This could damage the appliance. • Never use more than one level measure or it could dirty the inside of the machine or block the funnel. Please Note! If you use pre-ground coffee, you can only make one cup of coffee at a time. Please Note! For a richer denser froth, use skim or 2% milk at refrigerator temperature (about 41°F / 5°C). To avoid milk with poor froth or large bubbles, always clean the milk lid and hot water nozzle as described in the section "Cleaning the milk container"on page 16 and 18. 3. Make sure the milk intake tube is correctly inserted in the bottom of the milk container lid (fig. 18). 4. Replace the milk container lid and turn anticlockwise as far as it will go. 5. Remove the hot water spout from the nozzle (fig. 19). 6. Attach the container to the nozzle and push as far as it will go (fig. 20). The machine emits a beep (if the beep function is enabled). 7. Place a sufficiently large cup under the coffee spouts and frothed milk spout (fig. 21). To use particularly tall cups/ glasses, raise the lid of the special compartment in the cup tray (fig. 22). 8. Follow the instructions below for each function. 1. Repeatedly press the selection icon (C4) corresponding to the "taste" bar until "Ground" and - + flash on the di- splay. - + 2. Put one level measure of p-re-ground+coffee into the fun- nel (fig. 15). - + 3. Place a cup under the coffe-e spouts (fi+g. 8). 4. Press the 1 cup coffee icon - (fig. 9+). 5. Preparation begins. A cup appears on the display and gra- dually fills as preparation progresses. Making caffelatte 1. After attaching the milk container (see previous section), position the froth regulator on CAFFELATTE (fig. 23) printed on the milk container lid. 2. Press the CAFFELATTE icon (fig. 24). A cup is displayed and gradually fills as preparation progresses. After a few seconds, frothed milk is delivered from the milk spout into the cup below. Milk delivery stops automatically and coffee delivery begins. 3. At the end of delivery, the machine is automatically ready for use again. Once the coffee has been made, the appliance prepares for use again. MAKING DRINKS WITH MILK Please Note! If during delivery you want to stop preparing milk, press the CAFFELATTE icon or interrupt preparation of the coffee by pressing the icon. Please Note! If"Energy Saving"mode is enabled, you may have to wait a few seconds before the drink is delivered. Filling and attaching the milk container 1. Turn the lid of the milk container clockwise until it beco- mes noticeably difficult to turn, then remove the lid (fig. 16). 2. Fill the milk container with a sufficient quantity of milk, not exceeding the MAX level marked on the handle (fig. 17). Making cappuccino 1. After attaching the milk container (see previous section), position the froth regulator on CAPPUCCINO printed on the milk container lid (fig. 25). The quality of froth can be adjusted during delivery by moving the regulator slightly towards LATTE MACCHIATO for a denser froth. 2. Press the CAPPUCCINO icon (fig. 26). A cup is displayed and gradually fills as preparation progresses. After a few seconds, frothed milk flows out of the milk spout into the cup below. Milk delivery stops automatically and coffee delivery begins. 15
-
 1
1 -
2
-
3
-
4
-
5
-
6
-
7
-
 8
8 -
 9
9 -
 10
10 -
 11
11 -
 12
12 -
 13
13 -
 14
14 -
 15
15 -
 16
16 -
 17
17 -
 18
18 -
19
-
20
-
21
-
22
 |
 |
