Dell 1430X User Guide - Page 7
About Your Projector, Top View, Bottom View - mount
 |
View all Dell 1430X manuals
Add to My Manuals
Save this manual to your list of manuals |
Page 7 highlights
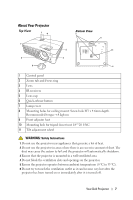
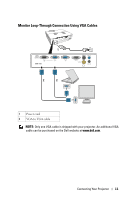
About Your Projector Top View 1 4 7 Bottom View 8 9 2 10 6 3 5 11 1 Control panel 2 Zoom tab and Focus ring 3 Lens 4 IR receivers 5 Lens cap 6 Quick-release button 7 Lamp cover 8 Mounting holes for ceiling mount: Screw hole M3 x 4.6mm depth. Recommended torque
-
 1
1 -
 2
2 -
 3
3 -
 4
4 -
 5
5 -
 6
6 -
 7
7 -
 8
8 -
 9
9 -
 10
10 -
 11
11 -
 12
12 -
13
-
14
-
15
-
16
-
17
-
18
-
19
-
20
-
21
-
22
-
23
-
24
-
25
-
26
-
27
-
28
-
29
-
30
-
31
-
32
-
33
-
34
-
35
-
36
-
37
-
38
-
39
-
40
-
41
-
42
-
43
-
44
-
45
-
46
-
47
-
48
-
49
-
50
-
51
-
52
-
53
-
54
-
55
-
56
-
57
-
58
-
59
-
60
-
61
-
62
-
63
 |
 |

Your Dell Projector
7
About Your Projector
WARNING:
Safety Instructions
1
Do not use the projector near appliances that generate a lot of heat.
2
Do not use the projector in areas where there is an excessive amount of dust. The
dust may cause the system to fail and the projector will automatically shutdown.
3
Ensure that the projector is mounted in a well-ventilated area.
4
Do not block the ventilation slots and openings on the projector.
5
Ensure the projector operates between ambient temperatures (0 ºC to 35 ºC).
6
Do not try to touch the ventilation outlet as it can become very hot after the
projector has been turned on or immediately after it is turned off.
1
Control panel
2
Zoom tab and Focus ring
3
Lens
4
IR receivers
5
Lens cap
6
Quick-release button
7
Lamp cover
8
Mounting holes for ceiling mount: Screw hole M3 x 4.6mm depth.
Recommended torque <8 kgf-cm
9
Front adjuster foot
10
Mounting hole for tripod: Insert nut 1/4"*20 UNC
11
Tilt adjustment wheel
5
2
3
4
1
6
7
9
10
11
8
Top View
Bottom View