Dell 1815dn Owners Manual - Page 52
Copying, Printing from the USB Memory Key, Knowing the Copy Menu, Setting the Basic Copy Options
 |
UPC - 000061100008
View all Dell 1815dn manuals
Add to My Manuals
Save this manual to your list of manuals |
Page 52 highlights
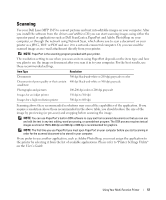
Printing from the USB Memory Key You can print files stored in the USB memory key. TIFF, BMP, TXT, PDF, and PRN file formats are supported. NOTE: Only English TXT files, PDF files generated by this printer, and TIFF 6.0 files are available. 1 Insert the USB memory key into the USB memory port on your printer 2 Press Scroll ( or ) to highlight PRINT from and press Select ( ). 3 Press Scroll ( or ) to select the folder or file you want and press Select ( ). 4 If you selected a file in step 3, go to the next step. If you selected a folder, press Scroll ( or ) to select the file you want to print and press Select ( ). 5 Enter the number of prints and press Select ( ). Printing is started. If the selected file format is not supported, Version Not supported appears. 6 The display asks if you want to print another file. Select Yes or No. 7 Press Cancel ( ) to return to Standby mode. Copying NOTE: A computer connection is not required for copying. Knowing the Copy Menu Copy # of Copies Zoom Contrast Quality Select Tray Layout Duplex Copy Defaults Refer to the following copy settings. Setting the Basic Copy Options The Copy menus on the operator panel let you customize all the basic copy options; number of copies, copy size, contrast and image quality. Set the following options for the current copy job before pressing Start ( ) to make copies. 52 Using Your Multi-Function Printer
-
 1
1 -
2
-
3
-
4
-
5
-
6
-
7
-
8
-
9
-
10
-
11
-
12
-
13
-
14
-
15
-
16
-
17
-
18
-
19
-
20
-
21
-
22
-
23
-
24
-
25
-
26
-
27
-
28
-
29
-
30
-
31
-
32
-
33
-
34
-
35
-
36
-
37
-
38
-
39
-
40
-
41
-
42
-
43
-
44
-
45
-
46
-
 47
47 -
 48
48 -
 49
49 -
 50
50 -
 51
51 -
 52
52 -
 53
53 -
 54
54 -
 55
55 -
 56
56 -
 57
57 -
58
-
59
-
60
-
61
-
62
-
63
-
64
-
65
-
66
-
67
-
68
-
69
-
70
-
71
-
72
-
73
-
74
-
75
-
76
-
77
-
78
-
79
-
80
-
81
-
82
-
83
-
84
-
85
-
86
-
87
-
88
-
89
-
90
-
91
-
92
-
93
-
94
-
95
-
96
-
97
-
98
-
99
-
100
-
101
-
102
-
103
-
104
-
105
-
106
-
107
-
108
-
109
-
110
-
111
-
112
-
113
-
114
-
115
-
116
-
117
-
118
-
119
-
120
-
121
-
122
-
123
-
124
-
125
-
126
-
127
-
128
-
129
-
130
-
131
-
132
-
133
-
134
-
135
-
136
-
137
-
138
-
139
-
140
-
141
-
142
-
143
-
144
-
145
-
146
-
147
-
148
-
149
-
150
 |
 |