Dell 223-3185 User Guide - Page 43
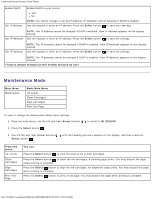
Setup Mode Menu, Arrow, Select, From this menu, You can
 |
View all Dell 223-3185 manuals
Add to My Manuals
Save this manual to your list of manuals |
Page 43 highlights
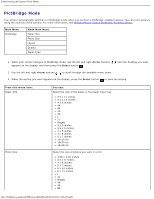
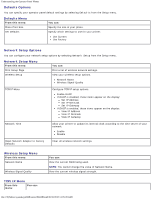
Understanding the Operator Panel Menus Defaults Network Setup Photo Print Size Set Defaults Print Setup Page Wireless Setup TCP/IP Menu Network Time Network Name Wireless Signal Quality Reset Network Adapter to Factory Defaults Enable DHCP Set IP Address/View IP Address Set IP Netmask/View IP Netmask Set IP Gateway/View IP Gateway To access the Setup mode menu: 1. From the main menu, use the left and right Arrow buttons . to scroll to SETUP, and then press the Select button 2. Use the left and right Arrow buttons Select button . until the heading you want appears on the display, and then press the 3. Use the left and right Arrow buttons to save your settings. to scroll to the available menu items, and then press the Select button Setup Mode Menu From this menu: Paper Setup You can: Select the size and type of the paper in the paper input tray. Paper Size 8.5 x 11 inches* 8.5 x 14 inches A4 B5 A5 A6 L 2L Hagaki 3 x 5 inches 3.5 x 5 inches 4 x 6 inches 4 x 8 inches 5 x 7 inches 10x15 cm 10x20 cm 13x18 cm Paper Type Auto Detect* Plain Heavyweight matte Photo Transparency Device Setup Select the operator panel setting you want to reconfigure. Language file:///T|/htdocs/systems/prn948/en/en/d0e648.html[10/10/2012 11:05:28 AM]
-
 1
1 -
2
-
3
-
4
-
5
-
6
-
7
-
8
-
9
-
10
-
11
-
12
-
13
-
14
-
15
-
16
-
17
-
18
-
19
-
20
-
21
-
22
-
23
-
24
-
25
-
26
-
27
-
28
-
29
-
30
-
31
-
32
-
33
-
34
-
35
-
36
-
37
-
 38
38 -
 39
39 -
 40
40 -
 41
41 -
 42
42 -
 43
43 -
 44
44 -
 45
45 -
 46
46 -
 47
47 -
 48
48 -
49
-
50
-
51
-
52
-
53
-
54
-
55
-
56
-
57
-
58
-
59
-
60
-
61
-
62
-
63
-
64
-
65
-
66
-
67
-
68
-
69
-
70
-
71
-
72
-
73
-
74
-
75
-
76
-
77
-
78
-
79
-
80
-
81
-
82
-
83
-
84
-
85
-
86
-
87
-
88
-
89
-
90
-
91
-
92
-
93
-
94
-
95
-
96
-
97
-
98
-
99
-
100
-
101
-
102
-
103
-
104
-
105
-
106
-
107
-
108
-
109
-
110
-
111
-
112
-
113
-
114
-
115
-
116
-
117
-
118
-
119
-
120
-
121
-
122
-
123
-
124
-
125
-
126
-
127
-
128
-
129
-
130
-
131
-
132
-
133
-
134
-
135
-
136
-
137
-
138
-
139
-
140
-
141
-
142
-
143
-
144
 |
 |
