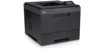
Dell 5330dn Workgroup Mono Laser Printer User's Guide - Page 41
Cleaning the inside of the printer manually
 |
View all Dell 5330dn Workgroup Mono Laser Printer manuals
Add to My Manuals
Save this manual to your list of manuals |
Page 41 highlights
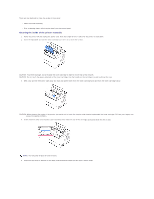
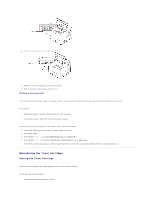
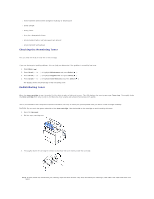
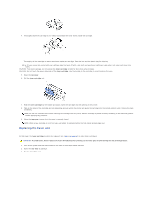
There are two methods to clean the inside of the printer: l Clean the inside manually l Print a cleaning sheet, which can be done from the control panel. Cleaning the inside of the printer manually 1. Power the printer off and unplug the power cord. Note the length of time it takes for the printer to cool down. 2. Open the top cover and pull the toner cartridge out. Set it on a clean flat surface. CAUTION: To prevent damage, do not expose the toner cartridge to light for more than a few minutes. CAUTION: Do not touch the green underside of the toner cartridge. Use the handle on the cartridge to avoid touching this area. 3. With a dry and lint-free cloth, wipe away any dust and spilled toner from the toner cartridge area and from the toner cartridge cavity. CAUTION: While cleaning the inside of the printer, be careful not to touch the transfer roller located underneath the toner cartridge. Oil from your fingers can cause print quailty problems. 4. Gently swab the long strip of glass (Laser Scanning Unit) inside the top of the cartridge cavity and check for dirt or dust. NOTE: The long strip of glass is hard to locate. 5. Locate the PTL lens by flipping up the feed guide and gently swab the lens with a cotton swab.
-
 1
1 -
2
-
3
-
4
-
5
-
6
-
7
-
8
-
9
-
10
-
11
-
12
-
13
-
14
-
15
-
16
-
17
-
18
-
19
-
20
-
21
-
22
-
23
-
24
-
25
-
26
-
27
-
28
-
29
-
30
-
31
-
32
-
33
-
34
-
35
-
 36
36 -
 37
37 -
 38
38 -
 39
39 -
 40
40 -
 41
41 -
 42
42 -
 43
43 -
 44
44 -
 45
45 -
 46
46 -
47
-
48
-
49
-
50
-
51
-
52
-
53
-
54
-
55
-
56
-
57
-
58
-
59
-
60
-
61
-
62
-
63
-
64
-
65
-
66
-
67
-
68
-
69
-
70
-
71
-
72
-
73
-
74
-
75
-
76
-
77
-
78
-
79
-
80
-
81
-
82
-
83
-
84
-
85
-
86
-
87
-
88
-
89
-
90
-
91
-
92
-
93
-
94
-
95
-
96
-
97
-
98
-
99
-
100
-
101
-
102
-
103
-
104
-
105
-
106
-
107
-
108
-
109
-
110
-
111
-
112
-
113
-
114
-
115
-
116
-
117
-
118
-
119
-
120
-
121
-
122
-
123
-
124
-
125
-
126
-
127
 |
 |
