Dell Alienware M11x Mobile Manual - Page 63
Upgrading or Replacing Memory - memory upgrade
 |
View all Dell Alienware M11x manuals
Add to My Manuals
Save this manual to your list of manuals |
Page 63 highlights
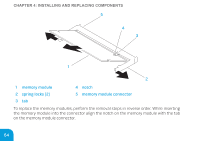
CHAPTER 4: INSTALLING AND REPLACING COMPONENTS Upgrading or Replacing Memory Your laptop is equipped with a configurable memory unit. The industry standard JEDEC PC3‑8500/PC3-10600 (DDR3) SODIMM memory module connectors are available for memory upgrade. The table below illustrates all the possible ways system memory can be configured. Memory connector #1 1 GB 2 GB 4 GB Memory connector #2 1 GB 2 GB 4 GB Total Memory 2 GB 4 GB 8 GB Removing the Memory Module(s) 1. Follow the instructions in "Before You Begin" on page 56. 2. Remove the battery (see "Replacing the Battery Pack" on page 60). 3. Use your fingertips to carefully spread apart the memory module connector's spring- locks until the module pops up. 4. Remove the memory module. 63
-
 1
1 -
2
-
3
-
4
-
5
-
6
-
7
-
8
-
9
-
10
-
11
-
12
-
13
-
14
-
15
-
16
-
17
-
18
-
19
-
20
-
21
-
22
-
23
-
24
-
25
-
26
-
27
-
28
-
29
-
30
-
31
-
32
-
33
-
34
-
35
-
36
-
37
-
38
-
39
-
40
-
41
-
42
-
43
-
44
-
45
-
46
-
47
-
48
-
49
-
50
-
51
-
52
-
53
-
54
-
55
-
56
-
57
-
 58
58 -
 59
59 -
 60
60 -
 61
61 -
 62
62 -
 63
63 -
 64
64 -
 65
65 -
 66
66 -
 67
67 -
 68
68 -
69
-
70
-
71
-
72
-
73
-
74
-
75
-
76
-
77
-
78
-
79
-
80
-
81
-
82
-
83
-
84
-
85
-
86
-
87
-
88
-
89
-
90
-
91
-
92
-
93
-
94
-
95
-
96
-
97
-
98
-
99
-
100
 |
 |

CHAPTER 4: IN°TALLING AND REPLACING COMPONENT°
63
Upgrading or Replacing Memory
Your laptop is equipped with a configurable memory unit. °e industry standard JEDEC
PC3-8500/PC3-10600 (DDR3) SODIMM memory module connectors are available for memory
upgrade. °e table below illustrates all the possible ways system memory can be configured.
Memory connector #1
Memory connector #2
Total Memory
1 GB
1 GB
2 GB
2 GB
2 GB
4 GB
4 GB
4 GB
8 GB
Removing the Memory Module(s)
Follow the instructions in “Before You Begin” on page
1.
5
6
.
Remove the battery (see “Replacing the Battery Pack” on page
2.
60
).
Use your fingertips to carefully spread apart the memory module connector’s spring-
3.
locks until the module pops up.
Remove the memory module.
4.