Dell Alienware X51 Owner's Manual
Dell Alienware X51 Manual
 |
View all Dell Alienware X51 manuals
Add to My Manuals
Save this manual to your list of manuals |
Dell Alienware X51 manual content summary:
- Dell Alienware X51 | Owner's Manual - Page 1
Alienware X51 Owner's Manual Regulatory model: D05S Regulatory type: D05S001 www.dell.com | support.dell.com/manuals - Dell Alienware X51 | Owner's Manual - Page 2
to hardware or loss of data, and tells you how to avoid the problem. WARNING: A WARNING indicates a potential for property damage, personal injury, or the DELL logo are trademarks of Dell Inc. Alienware® is a registered trademark of Alienware Corporation. Microsoft®, Windows®, and the Windows start - Dell Alienware X51 | Owner's Manual - Page 3
5 Back View 6 Specifications 6 2 Before You Begin 7 Turn Off Your Computer and Connected Devices 7 Safety Instructions 7 3 Working Inside Your Computer 9 4 System Setup 11 Overview 11 Entering System Setup 11 System Setup Screens 12 System Setup Options 12 Boot Sequence 16 Contents 3 - Dell Alienware X51 | Owner's Manual - Page 4
5 Flashing the BIOS 19 6 Contacting Alienware 21 Websites 21 4 Contents - Dell Alienware X51 | Owner's Manual - Page 5
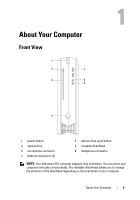
Your Computer Front View 1 2 7 3 6 5 4 1 power button 3 optical drive 5 microphone connector 7 USB 2.0 connectors (2) 2 optical-drive eject button 4 rotatable AlienHead 6 headphone connector NOTE: Your Alienware X51 computer supports dual orientation. You can place your computer vertically - Dell Alienware X51 | Owner's Manual - Page 6
-cable slot 11 coaxial S/PDIF connector 2 HDMI connector 4 USB 3.0 connectors (2) 6 hard-drive activity light 8 discrete graphics card 10 network connector and network lights Specifications For more information on specifications of your computer, see support.dell.com/manuals. 6 About Your - Dell Alienware X51 | Owner's Manual - Page 7
all attached devices from their electrical outlets. 4 Disconnect all telephone cables, network cables, and attached devices from your computer. 5 Press and hold the power button, while the computer is unplugged, to ground the system board. Safety Instructions Use the following safety guidelines to - Dell Alienware X51 | Owner's Manual - Page 8
cables, ensure that the connectors and ports are correctly oriented and aligned. CAUTION: To disconnect a network cable, first unplug the cable from your computer and then unplug the cable from the network device. NOTE: Ensure that you remove the security cable from the security-cable slot, if - Dell Alienware X51 | Owner's Manual - Page 9
components inside the computer. See the safety instructions for complete information about safety precautions and protecting against electrostatic discharge. For information on removing and replacing the internal component of your computer, contact Alienware. See "Contacting Alienware" on page 21 - Dell Alienware X51 | Owner's Manual - Page 10
10 Working Inside Your Computer - Dell Alienware X51 | Owner's Manual - Page 11
user password, type of hard drive installed, enabling or disabling base devices, and so on NOTE: Before you change system setup, it is recommended that you note the system-setup screen information for future reference. Entering System Setup 1 Turn on (or restart) your computer. 2 During POST, when - Dell Alienware X51 | Owner's Manual - Page 12
exactly as listed. Main BIOS Information Product Information Build Date Product Name BIOS Version Set Service Tag Asset Tag Displays the BIOS release date. Displays the product name. Displays the BIOS version number. Allows you to enter the service tag of your computer. Displays the asset tag - Dell Alienware X51 | Owner's Manual - Page 13
Num-Lock OptionROM Display Screen Displays the SATA 1 drive integrated in the computer. Displays the SATA 2 drive integrated in the computer. Displays the SATA 3 drive integrated in the computer. If enabled, the system will HALT during boot to display system errors. Select power-on state for num - Dell Alienware X51 | Owner's Manual - Page 14
-saving mode of the ACPI function. AC Recovery Sets what action the computer takes when power is restored. Auto Power On Allows the computer to start up at a certain time. Auto Power On Date Allows you to set RTC Wake Up Date. Auto Power On Hour Allows you to set RTC Wake Up Hour. Auto - Dell Alienware X51 | Owner's Manual - Page 15
sixth boot device. Default: network boot. Displays the seventh boot device. Default: UEFI. Sets the hard drive boot priority. The items displayed are dynamically updated according to the hard drives detected. Sets the USB drive boot priority. Sets the CD/DVD drive boot priority. System Setup 15 - Dell Alienware X51 | Owner's Manual - Page 16
and Reset, and Restore Defaults. Boot Sequence This feature allows you to change the boot sequence for devices. Boot Options • Diskette Drive - The computer attempts to boot from the floppy disk drive. If no operating system is on the drive, the computer generates an error message. • Hard Drive - Dell Alienware X51 | Owner's Manual - Page 17
the Drivers and Utilities disc. The previous boot sequence is restored at the next boot. 1 If you are booting from a USB device, connect the USB device to a USB connector. 2 Turn on (or restart) your computer. 3 When F2 Setup, F12 Boot Options appears in the lower-right corner of the screen, press - Dell Alienware X51 | Owner's Manual - Page 18
18 System Setup - Dell Alienware X51 | Owner's Manual - Page 19
board. To flash the BIOS: 1 Turn on the computer. 2 Go to support.dell.com/support/downloads. 3 Locate the BIOS update file for your computer: NOTE: The Service Tag for your computer is located on a label at the back of your computer. If you have your computer's Service Tag: a Click Enter a Tag - Dell Alienware X51 | Owner's Manual - Page 20
20 Flashing the BIOS - Dell Alienware X51 | Owner's Manual - Page 21
provides several online and telephone-based support and service options for your Alienware computer. These services may vary by country and product and may not be available in your area. To contact Dell for sales, technical support, or customer service issues: 1 Go to dell.com/contactdell. 2 Select
-
 1
1 -
 2
2 -
 3
3 -
 4
4 -
 5
5 -
 6
6 -
 7
7 -
8
-
9
-
10
-
11
-
12
-
13
-
14
-
15
-
16
-
17
-
18
-
19
-
20
-
21
 |
 |

www.dell.com | support.dell.com/manuals
Alienware X51
Owner’s Manual
Regulatory model: D05S
Regulatory type: D05S001