Dell B1260dn Laser Printer User's Guide - Page 82
MAC_Installer, Installer OS X, Continue, Agree, User Options Pane, Install, Customize, Installation
 |
View all Dell B1260dn Laser Printer manuals
Add to My Manuals
Save this manual to your list of manuals |
Page 82 highlights
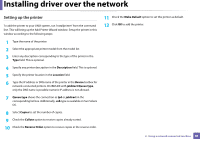
Installing driver over the network • The Custom installation allows you to select the machine's connection and choose individual components to install. Follow the instructions on the window. 5 The searched machines will be shown on the screen. Select the one you wish to use and click Next. If you cannot find your machine in network, turn off the firewall and click Update. For Windows operating system, Start > Control Panel and start windows firewall, and set this option unactivated. For other operating system, refer to its on-line guide. 5 Click Continue. 6 Read the license agreement and click Continue. 7 Click Agree to agree to the license agreement. 8 When the message which warns that all applications will close on your computer appears, click Continue. 9 Click Continue on the User Options Pane. If you have not set the IP address yet, click Set IP address and refer to "IPv4 configuration using SetIP (Macintosh)" on page 79. 6 Follow the instructions in the installation window. 6 Macintosh 1 Make sure that the machine is connected to your network and powered on. 2 Insert the supplied software CD into your CD-ROM drive. 3 Double-click the CD-ROM icon that appears on your Macintosh desktop. 4 Double-click the MAC_Installer folder > Installer OS X icon. 10 Click Install. All components necessary for machine operations will be installed. If you click Customize, you can choose individual components to install. 11 Enter the password and click OK. 12 Installing software requires you to restart your computer. Click Continue Installation. 13 After the installation is finished, click Close. 2. Using a network-connected machine 82
-
 1
1 -
2
-
3
-
4
-
5
-
6
-
7
-
8
-
9
-
10
-
11
-
12
-
13
-
14
-
15
-
16
-
17
-
18
-
19
-
20
-
21
-
22
-
23
-
24
-
25
-
26
-
27
-
28
-
29
-
30
-
31
-
32
-
33
-
34
-
35
-
36
-
37
-
38
-
39
-
40
-
41
-
42
-
43
-
44
-
45
-
46
-
47
-
48
-
49
-
50
-
51
-
52
-
53
-
54
-
55
-
56
-
57
-
58
-
59
-
60
-
61
-
62
-
63
-
64
-
65
-
66
-
67
-
68
-
69
-
70
-
71
-
72
-
73
-
74
-
75
-
76
-
 77
77 -
 78
78 -
 79
79 -
 80
80 -
 81
81 -
 82
82 -
 83
83 -
 84
84 -
 85
85 -
 86
86 -
 87
87 -
88
-
89
-
90
-
91
-
92
-
93
-
94
-
95
-
96
-
97
-
98
-
99
-
100
-
101
-
102
-
103
-
104
-
105
-
106
-
107
-
108
-
109
-
110
-
111
-
112
-
113
-
114
-
115
-
116
-
117
-
118
-
119
-
120
-
121
-
122
-
123
-
124
-
125
-
126
-
127
-
128
-
129
-
130
-
131
-
132
-
133
-
134
-
135
-
136
-
137
-
138
-
139
-
140
-
141
-
142
-
143
-
144
-
145
-
146
-
147
-
148
-
149
-
150
-
151
 |
 |
