Dell Brocade 6520 Quick Start Guide
Dell Brocade 6520 Manual
 |
View all Dell Brocade 6520 manuals
Add to My Manuals
Save this manual to your list of manuals |
Dell Brocade 6520 manual content summary:
- Dell Brocade 6520 | Quick Start Guide - Page 1
Brocade 6520 QuickStart Guide Complete the steps in this guide to install and set up your Brocade 6520 switch in a single-switch configuration using EZSwitchSetup. See the Brocade 6520 Hardware Reference Manual and the Fabric OS Administrator's Guide if you want to choose a different setup. 1 - Dell Brocade 6520 | Quick Start Guide - Page 2
+ transceivers, you may want to connect the cable to the SFP+ first, and then insert them into the port as a unit. If you are using 8 or 10 Gbps SFP+ transceivers, close the latching wire bail. b. Repeat for the other ports. 5 Setting the switch password 1. Click Next on the EZManager Welcome to - Dell Brocade 6520 | Quick Start Guide - Page 3
Brocade 6520 EZSwitchSetup 安装 Brocade 6520 Brocade 6520 Fabric OS 1 IP IP 地址 (IPv4 或 IPv6) (无 DHCP Brocade WWN ID 2. 遵循 EZSwitchSetup 3. 等待 EZSwitchSetup Windows 和 Linux EZSwitchSetup 4. 在 EZSwitchSetup EZSwitchSetup Manager LAN 5 4 WWNɻ IP IP - Dell Brocade 6520 | Quick Start Guide - Page 4
4 IP 地址 1 IP 2 Active X 或 Java Runtime 3 IP 4 5 EZManager。 1 SFP a. 该 16 Gbps SFP ! 使用的 SFP SFP 16 Gbps Brocade、Brocade Assurance、B-wing 符号、BigIron、DCX、Fabric OS、FastIron、MLX、NetIron、SAN Health、ServerIron、TurboIron、VCS、 和 VDX 是 Brocade Communications Systems, Inc AnyIO、Brocade - Dell Brocade 6520 | Quick Start Guide - Page 5
Brocade 6520 EZSwitchSetup Brocade 6520 Brocade 6520 Fabric OS 1 IP IP 位址 (IPv4 或 IPv6) (無 DHCP Brocade World Wide Name (WWN ID EZSwitchSetup HBA SFP+ 收發器 3 Connect Cables 1 1 LED 2 3、5 2 6)。 3 4) 1 COM 連接埠 (7) 連接至 2 6 4 3 7 5 9600 - Dell Brocade 6520 | Quick Start Guide - Page 6
Ports and Connect Devices 15 Next 3. Finish Congratulations - you've successfully completed the setup 請參閱 EZSwitchSetup © 2012 Brocade Communications Systems, Inc 53-1002706-01 *53-1002706-01* Brocade、Brocade Assurance、B-wing 標誌、BigIron、DCX、Fabric OS、FastIron、MLX、NetIron、SAN Health - Dell Brocade 6520 | Quick Start Guide - Page 7
de démarrage rapide Brocade 6520 Effectuez les étapes qui figurent dans ce guide pour installer et configurer votre commutateur Brocade 6520 en configuration à un seul commutateur à l'aide d'EZSwitchSetup. Voir le Manuel de référence du matériel Brocade 6520 et le Guide de l'administrateur du syst - Dell Brocade 6520 | Quick Start Guide - Page 8
IP du commutateur. 2. Si vous êtes invité à installer instructions (à l'endroit dans la rangée de ports supérieure et à l'envers dans la rangée inférieure de ports le Guide de Brocade Communications Systems, Inc. aux États-Unis et/ou dans d'autres pays. Les autres marques, produits ou noms de services - Dell Brocade 6520 | Quick Start Guide - Page 9
Brocade 6520-Switch in einer Einzel-Switch-Konfiguration mithilfe des Programms „EZSwitchSetup" zu installieren. Wenn Sie ein anderes Setup auswählen möchten, finden Sie weitere Informationen im Brocade 6520-Hardware der Installation switch with a serial cable" (Direkte Verbindung mit dem Switch - Dell Brocade 6520 | Quick Start Guide - Page 10
mit dem SFP+ verbinden und die Transceiver anschließend als Einheit in den Port einsetzen. Wenn Sie SFP+-Transceiver mit 8 Switches finden Sie im EZSwitchSetup-Administratorhandbuch. © 2012 Brocade Communications Systems, Inc. Alle Rechte vorbehalten. 53-1002706-01 *53-1002706-01* Brocade, Brocade - Dell Brocade 6520 | Quick Start Guide - Page 11
Selesaikan langkah di dalam panduan ini untuk memasang dan menyetel switch Brocade 6520 Anda dalam konfigurasi satu switch menggunakan EZSwitchSetup. Lihat Panduan Referensi Perangkat Keras Brocade 6520 dan Panduan Administrator Fabric OS jika Anda ingin memilih penyetelan yang berbeda. 1 Persiapan - Dell Brocade 6520 | Quick Start Guide - Page 12
Zoning (Penzonaan Umum) adalah konfigurasi zona default. 2. Masukkan jumlah dan tipe perangkat yang akan Anda sambungkan ke switch di layar Device Selection (Pilihan Perangkat). EZSwitchSetup menggunakan nilai-nilai ini untuk mengonfigurasikan port di switch Anda secara otomatis. a. Lepaskan tutup - Dell Brocade 6520 | Quick Start Guide - Page 13
Brocade 6520 EZSwitchSetup Brocade 6520 Brocade 6520 Hardware Reference Manual』 (Brocade 6520 Fabric OS Administrator's Guide』(Fabric OS 1 準備 IP IP IPv4 または IPv6、DHCP Brocade WWN ID EZSwitchSetup CD HBA SFP 3 Connect Cables 1 1 LED 1~3 1 2 6 4 3 7 5 - Dell Brocade 6520 | Quick Start Guide - Page 14
completed the setup EZManager EZSwitchSetup Administrator's Guide』(EZSwitch © 2012 Brocade Communications Systems, Inc. All Rights Reserved. 53-1002706-01 *53-1002706-01* Brocade、Brocade Assurance、B-wing BigIron、DCX、Fabric OS、FastIron、MLX、NetIron、SAN Health、ServerIron、TurboIron、VCS VDX - Dell Brocade 6520 | Quick Start Guide - Page 15
Brocade 6520 EZSwitchSetup Brocade 6520 Brocade 6520 Fabric OS 1 IP 3 Connect Cables 1 1 LED 1~3 DHCP IP 주소 (IPv4 또는 IPv6 Brocade WWN ID 1 2 4 3 7 2 3, 5 2 LAN 6 3 COSSM 포트(7 4 COM 포트(7 9600 EZSwitchSetup CD HBA SFP 6 5 8 1 - Dell Brocade 6520 | Quick Start Guide - Page 16
Communications Systems, Inc 53-1002706-01 *53-1002706-01* Brocade, Brocade Assurance, B-wing 기호, BigIron, DCX, Fabric OS, FastIron, MLX, NetIron, SAN Health, ServerIron, TurboIron, VCS 및 VDX AnyIO, Brocade One, CloudPlex, Effortless Networking, ICX, NET Health, OpenScript 및 The Effortless Network - Dell Brocade 6520 | Quick Start Guide - Page 17
6520 Hardware Reference Manual (Manual de Referência do Hardware Brocade 6520) e Fabric OS Administrator's Guide (Guia do Administrator do Fabric OS) se você quiser escolher uma outra configuração. 1 Preparação Verifique se você tem os itens mostrados na lista abaixo. Insira os valores da rede IP - Dell Brocade 6520 | Quick Start Guide - Page 18
ar). A tela Confirm IP Address (Confirmar o endereço IP) é mostrada. 4. comutador. 1. Instale os transceptores SFP sicas mostradas na tela Configure Ports and Connect Devices (Configurar Administrator's Guide (Guia SAN Health, ServerIron, TurboIron, VCS e VDX são marcas registradas e AnyIO, Brocade - Dell Brocade 6520 | Quick Start Guide - Page 19
Brocade 6520 en una configuración de conmutador único mediante EZSwitchSetup. Consulte el Brocade 6520 Hardware Reference Manual(Manual de referencia de hardware de Brocade 6520) y la Fabric OS Administrator's Guide al puerto serie del conmutador utilizando el cable serie que se envió junto con el - Dell Brocade 6520 | Quick Start Guide - Page 20
Switch IP Address (Establecer la dirección IP del conmutador). 2. Si se le pide que instale Gbps, puede que desee conectar el cable al SFP+ primero y, a continuación, pantalla Configure Ports and Guide SAN Health, ServerIron, TurboIron, VCS y VDX son marcas c omerciales registrads y AnyIO, Brocade - Dell Brocade 6520 | Quick Start Guide - Page 21
için bu kılavuzdaki adımları tamamlayın. Farklı bir kurulum seçmek isterseniz, Brocade 6520 Donanım Başvuru El kitabı ve Fabric OS Sistem Yöneticisi Kılavuzu 'na girin. Anahtarın keşfi tamamlandıktan sonra Anahtara IP Adresi Ata ekranı görüntülenir. • Seri bağlantı noktası bağ - Dell Brocade 6520 | Quick Start Guide - Page 22
kleyin. Gerekirse kurulum bilgisayarını yeniden başlatın. 3. leri'yi tıklatın. IP Adresini Do rula ekranı görüntülenir. 4. Adresleri doğrulamak için Brocade, Brocade Assurance, B-wing simgesi, BigIron, DCX, Fabric OS, FastIron, MLX, NetIron, SAN Health, ServerIron, TurboIron, VCS ve VDX, Brocade - Dell Brocade 6520 | Quick Start Guide - Page 23
Ports and Connect Devices 15 Next .3 Finish Congratulations - you've successfully completed the setup EZManager EZSwitchSetup Administrator's Guide © .Brocade Communications Systems, Inc 2012 53-1002706-01 **53-1002706-01 ,Brocade Assurance ,Brocade ServerIron ,SAN - Dell Brocade 6520 | Quick Start Guide - Page 24
.3 COM 7 4 9600 : 8 :(Databits 1 : 3 Connect Cables 1 2 6 4 3 7 5 Brocade 6520 EZSwitchSetup Brocade 6520 Hardware Reference Manual Fabric OS Administrator's Guide 1 IP IP IPv4 IPv6 DHCP WWN) World Wide Name
-
 1
1 -
 2
2 -
 3
3 -
 4
4 -
 5
5 -
 6
6 -
 7
7 -
8
-
9
-
10
-
11
-
12
-
13
-
14
-
15
-
16
-
17
-
18
-
19
-
20
-
21
-
22
-
23
-
24
 |
 |
Brocade 6520 QuickStart Guide
Complete the steps in this guide to install and set up your Brocade 6520 switch in a single-switch configuration using
EZSwitchSetup. See the
Brocade 6520 Hardware Reference Manual
and the
Fabric OS Administrator’s Guide
if you want
to choose a different setup.
Ensure that you have the items listed below. Write down the IP network values in the space provided.
Getting ready
Fixed IP address (IPv4 or IPv6) for the switch (no DHCP server): __________________________________________________
Subnet mask value: ______________________________________________________________________________________
Default Gateway value: ___________________________________________________________________________________
Brocade switch World Wide Name (WWN): located on the switch ID pullout: ________________________________________
Ethernet connection (hub or switch)
Ethernet and Fibre Channel cables
EZSwitchSetup CD
Setup computer
Host computer with an installed HBA
Disk array
Standard screw driver
Optical SFP+ transceivers
Browser that allows pop-up windows
1
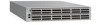
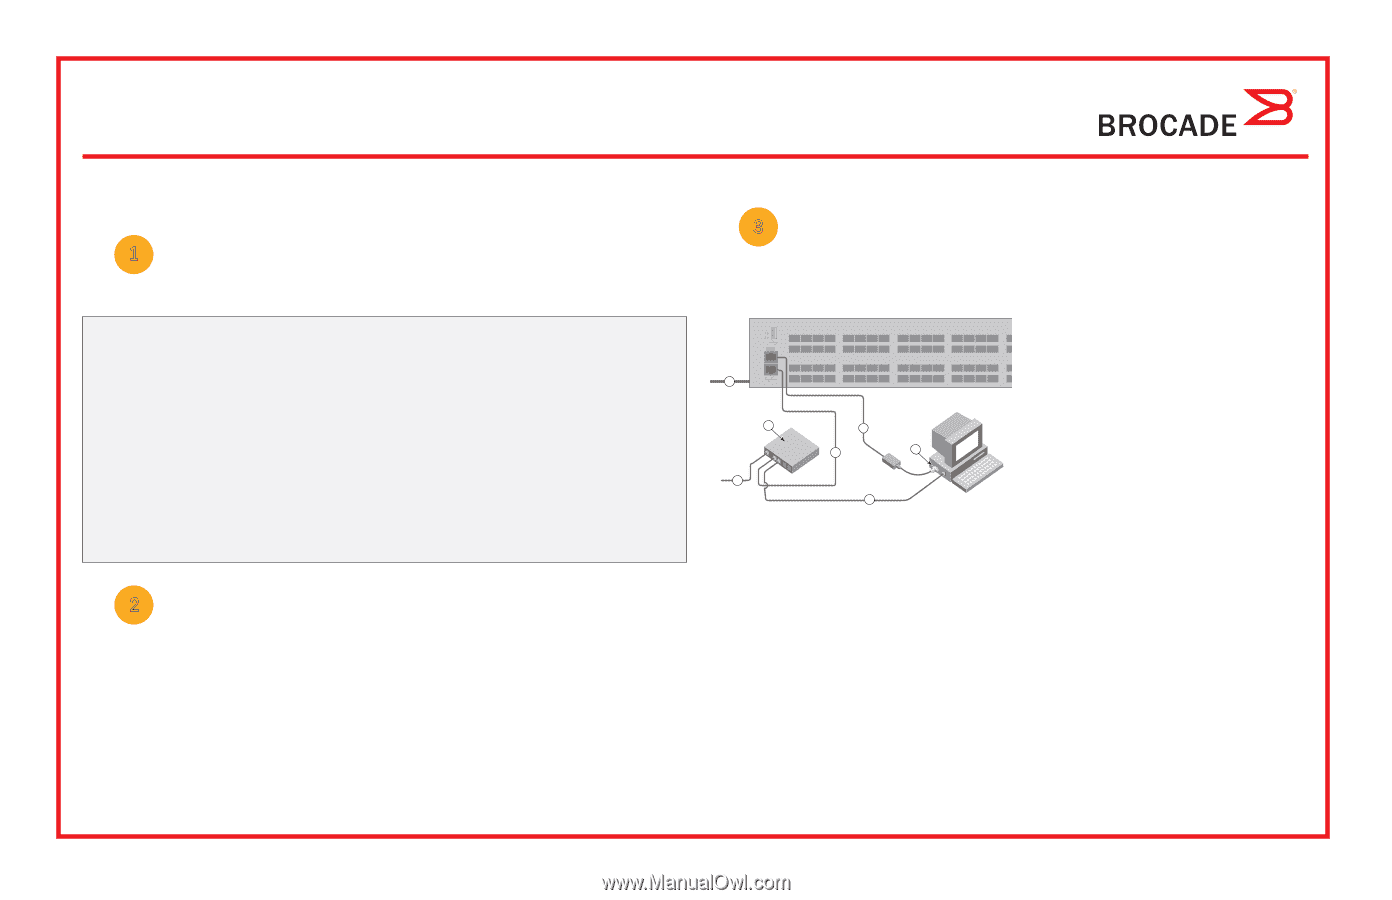
Powering up and connecting cables to the switch
3
Installing and starting EZSwitchSetup
2
1.
Insert the EZSwitchSetup CD into the CD-ROM drive of your setup computer. The installer will autostart in about a minute.
2.
Follow the EZSwitchSetup directions for installation. Installation will take a few minutes after you click
OK.
3.
Wait for EZSwitchSetup to start, which should happen automatically after it is installed.
For Windows and Linux instructions, refer to the
EZSwitchSetup Administrator’s Guide.
4.
On the EZSwitchSetup
Introduction
screen, choose the option that matches your setup configuration:
•
Ethernet connection. This option uses the Ethernet LAN connection you will use for running EZSwitchSetup Manager.
•
Direct connection to the switch with a serial cable.
Most users will find it more convenient to use the Ethernet connection.
5.
Click
Next.
The
Connect Cables
screen is displayed.
4.
Click
Next.
•
If you chose to use the Ethernet connection, the
Discover Switch
screen is displayed. Enter the switch WWN, following
the instructions on the
Discover Switch
screen. After completing switch discovery, the
Set Switch IP Address
screen
is displayed.
•
If you chose to use the serial port connection, the
Set Switch IP Address
screen is immediately displayed.
The
Connect Cables
screen shows you the connections you need to make.
1. Connect the power cord to the switch and to a power
source (1). The power and status LEDs display amber then
green. This can take from one to three minutes.
2. Connect the switch and the setup computer to the
same LAN using Ethernet cables (3, 5) and an Ethernet
hub or switch (2). Be sure the Ethernet hub or switch is
connected to a power source (6).
3. If you want to use a serial connection for setup, connect
your setup computer COM port (7) to the serial port on the
switch using the serial cable shipped with the switch (4).
The serial connection settings are as follows:
•
Bits per second: 9600
•
Databits: 8
•
Parity: none
•
Stop bits: 1
•
Flow control: none
1
2
7
5
6
4
3