Dell Brocade M5424 Brocade M5424 Blade Server SAN I/O QuickStart Guide - Page 3
Overview, Unpacking and installing the SAN I/O Module - m1000e
 |
View all Dell Brocade M5424 manuals
Add to My Manuals
Save this manual to your list of manuals |
Page 3 highlights
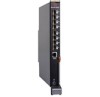
Overview This Quick Start guide is intended as an overview to help experienced installers unpack, install, and configure an 8 Gbps M5424 SAN I/O Module quickly. For detailed installation and configuration instructions, see the Brocade M5424 SAN I/O Module Hardware Reference Manual. NOTE Throughout this document, the M5424 SAN I/O Module is referred to as the SAN I/O Module. Unpacking and installing the SAN I/O Module If the SAN I/O Module is installed in the Blade Server Enclosure that is shipped to you, skip this section. This section applies when installing a new module in an empty bay or replacing an existing SAN I/O Module. NOTE The SAN I/O Module is designed to work only in I/O bays B1/B2 and C1/C2 of the Dell M1000e Blade Server Enclosure. Make sure to comply with installation requirements in the Blade Server Enclosure Hardware Owner's Manual. Perform the following steps to remove the SAN I/O Module from its shipping package. 1. Open the shipping box and inspect the contents, making sure that nothing is missing or damaged. Do not insert a damaged SAN I/O Module into the Blade Blade Server Enclosure. If the SAN I/O Module appears to be damaged, contact your sales representative before proceeding. 2. Remove the cardboard accessory tray from on top of the SAN I/O Module. This tray contains the documentation, regulatory statements, product information guide, and Documentation CD. 3. Remove the SAN I/O Module from the box. The protective foam ends will slide out with the SAN I/O Module. 4. Remove the foam ends from the SAN I/O Module. 5. Be sure that you have taken the necessary precautions for electrostatic sensitivity; then break the seal warning. 6. Slide the SAN I/O Module out of the antistatic sleeve and inspect it carefully for any obvious defects or shipping damage. 7. For complete instructions to install the SAN I/O Module into the Blade Server Enclosure, refer to the section on installing an I/O module in the Blade Server Enclosure Hardware Owner's Manual. NOTE Be sure to remove the protective covers from the external ports before installing the module into the enclosure. M5424 QuickStart Guide Publication Number: 53-1001081-01 5 of 16
-
 1
1 -
 2
2 -
 3
3 -
 4
4 -
 5
5 -
 6
6 -
 7
7 -
 8
8 -
 9
9 -
10
-
11
-
12
-
13
-
14
 |
 |
