Dell Chromebook 3110 SIM/eSIM Setup Guide for Chromebook - Page 5
Connect to the cellular network service
 |
View all Dell Chromebook 3110 manuals
Add to My Manuals
Save this manual to your list of manuals |
Page 5 highlights
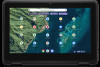
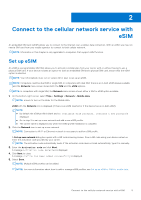
2 Connect to the cellular network service with eSIM An embedded SIM card (eSIM) allows you to connect to the Internet over a cellular data connection. With an eSIM, you may not need a SIM card from your mobile operator to connect to their cellular network. NOTE: Information in this chapter is only applicable to computers that support eSIM function. Set up eSIM An eSIM is a programmable SIM that allows you to activate a cellular plan from your carrier with or without having to use a physical SIM card. If your device includes an option for both an embedded SIM and a physical SIM card, ensure that the eSIM option is selected. NOTE: Your Chromebook must run on version 92 or later to set up an eSIM. NOTE: Computers could be dual SIM or single SIM. In computers with dual SIM, there is an in-built eSIM always available and the Network menu screen shows both the SIM and the eSIM options. NOTE: In computers with single SIM, the Network menu screen shows either a SIM or eSIM option available. 1. On the bottom-right corner, select Time > Settings > Network > Mobile data. NOTE: Ensure to turn on the slider for the Mobile data. eSIM with the Network icon is displayed (if there is an eSIM inserted or if the device has an in-built eSIM). NOTE: ● By default the eSIM profile is blank and No available eSIM profiles. Download a new profile is displayed. ● Go to step 2 to set up a new network and add a new eSIM profile. ● The carrier name is displayed only when the eSIM profile installation is complete. 2. Click the Network icon to set up a new network. NOTE: Connection to Wi-Fi or Ethernet network is necessary to add an eSIM profile. A Set up new network dialog box opens with a QR code scanning screen. Scan a QR code using your device camera or enter the activation code provided by your carrier. NOTE: The activation code automatically loads. If the activation code does not load automatically, type it in manually. 3. Enter the Activation code and click Next. A message Activation code detected is displayed. 4. Click Next to close. A message Profile has been added successfully is displayed. 5. Select Done. NOTE: Multiple eSIM profiles can be added. NOTE: For more information about how to add or manage eSIM profiles, see Set up an eSIM or SIM for mobile data. Connect to the cellular network service with eSIM 5
-
 1
1 -
 2
2 -
 3
3 -
 4
4 -
 5
5 -
 6
6 -
 7
7 -
 8
8 -
 9
9
 |
 |
