Dell D1901N User Manual
Dell D1901N Manual
 |
View all Dell D1901N manuals
Add to My Manuals
Save this manual to your list of manuals |
Dell D1901N manual content summary:
- Dell D1901N | User Manual - Page 1
D1901N 18.5" wide LCD Monitor User Manual English Deutsch Français Italiano Español ㅔԧЁ᭛ 3\FFɤɢɣ Svenska Suomi Dansk Polski Nederlands 穢剳檺 Model: D1901Nc - Dell D1901N | User Manual - Page 2
YOU OPERATE THE MONITOR 3 FEATURES 3 PACKING LIST 3 INSTALLATION INSTRUCTIONS 4 CONTROLS AND CONNECTORS 5 ADJUSTING THE VIEWING ANGLE 6 OPERATING INSTRUCTIONS 7 GENERAL INSTRUCTIONS 7 HOW TO ADJUST A SETTING 9 ADJUSTING THE PICTURE 10-11 PLUG AND PLAY 12 TECHNICAL SUPPORT(FAQ 13-14 - Dell D1901N | User Manual - Page 3
monitor, please read this manual thoroughly. This manual installed and used in accordance with the instructions, may cause harmful interference to radio communications monitor to rain or moisture. Dangerously high voltages are present inside the monitor. Do not open the cabinet. Refer servicing - Dell D1901N | User Manual - Page 4
with the monitor. If you mount the monitor on a wall or shelf, use a mounting kit approved by the manufacturer and follow the kit instructions. • monitor cabinet. It could short circuit parts causing a fire or electric shock. Never spill liquids on the monitor. • Do not attempt to service the monitor - Dell D1901N | User Manual - Page 5
are normal with LCD monitor and do not indicate a problem. NOTES • Due to service center to replace parts. Don't repair the screen by yourself! BEFORE YOU OPERATE THE MONITOR FEATURES • 18.5" (470 mm) Wide ScreenTFT Color LCD Monitor • Crisp, Clear Display for Windows • Recommended Resolutions - Dell D1901N | User Manual - Page 6
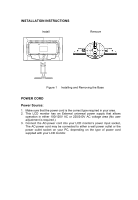
INSTALLATION INSTRUCTIONS Install Remove Figure 1 Installing and Removing the Base POWER CORD Power Source: 1. Make sure that the power cord is the correct type required in your area. 2. This LCD monitor has an External universal power supply that allows operation in either 100/120V AC or 220/240V - Dell D1901N | User Manual - Page 7
Connecting the Signal Cable: Plug the Signal Cable one end to LCD monitor's "DSUB-Input" socket , the other end to the computer's VGA connector. Connecting the Power Cord: Plug one end of the AC power cord to the LCD monitor's AC input socket, and the other end to Wall outlet. Caution: If the AC - Dell D1901N | User Manual - Page 8
it is recommended to look at the full face of the monitor, then adjust the monitor's angle to your own preference. • Hold the stand so you do not topple the monitor when you change the monitor's angle. • You are able to adjust the monitor's angle from -5° to 20°. Figure 3 NOTES • Do not touch the - Dell D1901N | User Manual - Page 9
OPERATING INSTRUCTIONS GENERAL INSTRUCTIONS Press the power button to turn the monitor on or off. The other control buttons are located at front panel of the monitor (See Figure 4). By changing these settings, the picture can be adjusted to your personal preferences. • The power cord should be - Dell D1901N | User Manual - Page 10
when the OSD is OFF or navigate through adjustment icons when OSD is ON or adjust a function when function is activated. • Image Ratio(+) : Select monitor display mode. Press Image Ratio(+) button to change wide mode or 4:3 mode. • Auto/Source: 1. When the OSD is off, press Auto/Source button - Dell D1901N | User Manual - Page 11
these will damage the cabinet. As a safety precaution, always unplug the monitor before cleaning it. • Do not scratch the screen with hard things, it may cause permanent damage. • Don't leak liquid into monitor which will result in the damage of component. HOW TO ADJUST A SETTING - Dell D1901N | User Manual - Page 12
. Adjust Picture Phase to reduce Horizontal-Line noise Adjust the vertical position of the picture. Adjust the horizontal position of the picture. Image Ratio Enable monitor wide mode or 4:3 mode 10 - Dell D1901N | User Manual - Page 13
the verticalposition of OSD Adjust the horizontal position of OSD Adjust the OSD Timeout Select the OSD language DDC/CI Turn ON/OFF DDC/CI Support Reset yes or no Reset the menu to default Information Show the information of the main image and sub-image source 11 - Dell D1901N | User Manual - Page 14
APPEAR TO BE NON-FUNCTIONAL IF THERE IS NO VIDEO INPUT SIGNAL. IN ORDER FOR THIS MONITOR TO OPERATE PROPERLY, THERE MUST BE A VIDEO INPUT SIGNAL. This monitor meets the Green monitor standards as set by the Video Electronics Standards Association (VESA) and The Swedish Confederation Employees (NUTEK - Dell D1901N | User Manual - Page 15
TECHNICAL SUPPORT (FAQ) Problem & either turn ON or OFF after hitting the CAPS LOCK key. *Inspect the monitor's video cable and make sure that none of the pins are bent. * function of the display is affected, send it to our authorized service center for repair. *Use win 95/98/2000/ME/XP shut-down mode - Dell D1901N | User Manual - Page 16
the signal-cable is properly connected, If the connector is loose, tighten the connector's screws. 2. Check the signal-cable's connection pins for damage. INPUT NOT SUPPORT : Your computer has been set to unsuitable display mode, set the computer to display mode given in the following table. 14 - Dell D1901N | User Manual - Page 17
APPENDIX SPECIFICATIONS LCD Panel Input Display Colors Dot Clock Max. Resolution Plug & Play Power Consumption Input Connector Input Video Signal Power Source Environmental Considerations Dimension Weight (N. W.) Driving system TFT Color LCD Size Pixel pitch Video 470 - Dell D1901N | User Manual - Page 18
Switch External Controls: Functions Power Consumption ( Maximum ) Regulatory Compliance • Power Button • Menu • Image Ratio(+) • ECO/• Source/Auto • Contrast • Brightness • Phase • Clock • H. Position • V. Position • OSD setup • Language • Information • (Warm)Color • (Cool)Color • sRGB • USER - Dell D1901N | User Manual - Page 19
FACTORY PRESET TIMING TABLE STANDARD RESOLUTION VGA Dos-mode SVGA XGA WXGA 640×480 @60Hz 640×480 @75Hz 720×400 @70Hz 800×600 @60Hz 800×600 @75Hz 1024×768 @60Hz 1024×
-
 1
1 -
 2
2 -
 3
3 -
 4
4 -
 5
5 -
 6
6 -
 7
7 -
8
-
9
-
10
-
11
-
12
-
13
-
14
-
15
-
16
-
17
-
18
-
19
 |
 |

User Manual
English
Deutsch
Français
Italiano
Español
Svenska
Suomi
Dansk
Polski
Nederlands
D
1901N
18.5
"
wide LCD Monitor
Model: D
1901N
c