Dell D620 Service Manual - Page 32
Palm Rest - wireless not working
 |
UPC - 837654219218
View all Dell D620 manuals
Add to My Manuals
Save this manual to your list of manuals |
Page 32 highlights
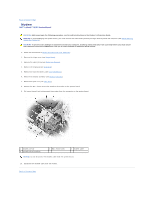
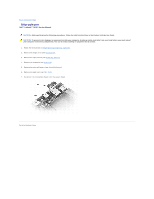
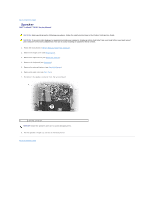
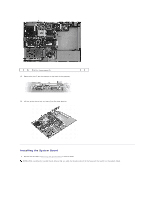
Back to Contents Page Palm Rest Dell™ Latitude™ D620 Service Manual CAUTION: Before performing the following procedures, follow the safety instructions in the Product Information Guide. CAUTION: To prevent static damage to components inside your computer, discharge static electricity from your body before you touch any of your computer's electronic components. You can do so by touching an unpainted metal surface. 1. Follow the instructions in Before Working Inside Your Computer. 2. Remove the hinge cover (see Hinge Cover). 3. Remove any devices installed in the media bay (see Media Bay Devices). 4. Remove the keyboard (see Keyboard). 5. Remove the display assembly (see Display Assembly). 6. Remove the internal card with Bluetooth® wireless technology (see Internal Card with Bluetooth® Wireless Technology). 7. Remove the coin-cell battery (see Coin-Cell Battery). 8. Remove the three screws labeled "P" from the top of the palm rest. 9. Turn the computer upside-down. 10. Remove the hard drive (see Hard Drive). 11. Loosen the two captive screws located at the front of the hard drive bay. 12. Remove the seven M2.5 x 8-mm screws from the bottom of the computer.
-
 1
1 -
2
-
3
-
4
-
5
-
6
-
7
-
8
-
9
-
10
-
11
-
12
-
13
-
14
-
15
-
16
-
17
-
18
-
19
-
20
-
21
-
22
-
23
-
24
-
25
-
26
-
 27
27 -
 28
28 -
 29
29 -
 30
30 -
 31
31 -
 32
32 -
 33
33 -
 34
34 -
 35
35 -
 36
36 -
 37
37 -
38
-
39
-
40
-
41
-
42
-
43
 |
 |
