Dell DJ Getting Started Guide - Page 2
Transfer Files, Play Digital Music, USB synchronization cable, Cradle, Connect Your Dell DJ, Safety - software download
 |
View all Dell DJ manuals
Add to My Manuals
Save this manual to your list of manuals |
Page 2 highlights
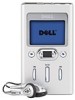
5.25 X 8.5_Mingus template15_r010.qxd 13/02/1950 19:25 Page 2 3 Connect Your Dell DJ 1 To computer's USB connector OR 2 To computer's USB connector USB synchronization cable Connect the USB connector of the USB synchronization cable to your computer. NOTE: To release the USB synchronization cable later, press the side buttons. 4 Transfer Files Using Musicmatch NOTE: Musicmatch has the capability to 'rip' or convert music CDs to digital music files on your computer. Refer to the Musicmatch Help tutorial to create digital music files from your music CDs. 1. Start Musicmatch by clicking Start Programs Musicmatch Musicmatch Jukebox. The Musicmatch main window appears. 2. Click View Portable Device Manager. 3. With the Portable Device Manager (PDM) open, you can transfer tracks or playlists in a drag-and-drop or copy-and-paste operation from your computer's Musicmatch Jukebox playlists onto the Dell DJ. 4. To drag-and-drop, locate and click the track or playlist that you want to copy, then drag it to Dell DJ or one of its playlists. 5. To copy-and-paste, locate and right-click the track or playlist that you want to copy, then click Copy. Right-click Dell DJ or one of its playlists, then click Paste. Cradle 1. Connect the larger end of the USB cable to your computer. 2. Align the dock connector on the bottom of your Dell DJ to the connector on the cradle, while facing the front of the Dell DJ toward the Dell logo, and insert the Dell DJ gently but firmly onto the connector. Using Dell DJ Explorer NOTE: When transferring music tracks to your Dell DJ, be sure to transfer them to the Music Library folder of your Dell DJ. If you transfer music files from your computer to the Data Library folder of your Dell DJ, these music tracks will be stored as data files and will not be playable on your Dell DJ. 1. Connect the Dell DJ to your computer using the included USB synchronization cable or cradle. 2. Select Start Programs Dell Dell DJ Explorer Dell DJ Explorer. or Open Microsoft Windows Explorer, then double-click Dell DJ Explorer. 3. With Dell DJ Explorer open, click Folders in the Dell DJ Explorer toolbar. 4. Click Dell DJ Explorer in the left window to expand its contents. 5. Click Dell DJ beneath Dell DJ Explorer in the left window to expand its contents. 6. Click Data Library or Music Library beneath Dell DJ in the left window to expand its contents. 7. Using Dell DJ Explorer, locate the track, file, or folder you want to copy. 8. To drag-and-drop, locate the track, file, or folder that you want to copy, and drag it to the folder in which you want to place the track, file, or folder. 9. To copy-and-paste, right-click the track, file, or folder you want to copy and click Copy. Locate and right-click the folder in which you want to place the copy, and then click Paste. A copy of the track, file, or folder is placed in the selected folder. 5 Play Digital Music The Dell DJ can play tracks in MP3, WMA, or WAV file formats. The Dell DJ comes with a few sample MP3 tracks already loaded into the Music Library. To play all music tracks: 1. Press the Home button on your Dell DJ. 2. Scroll-select Music Library. NOTE: Scroll-select means rotate and then press the scroll dial. 3. Scroll-select Play All Music Tracks. All tracks are added to the Selected Music list. Playback starts after all music tracks have been queued. NOTE: In addition to playing digital music, you can also use your Dell DJ as a data storage device. Be sure to check the User's Guide to learn about using these features. Also, be sure to periodically check support.dell.com for software and documentation updates for your Dell DJ. Safety Precautions • Do not store or use in areas outside of this temperature range: 0ºC - 40ºC or 32ºF - 104ºF. • Do not expose to heat or incinerate. Finding Information • Dell DJ User's Guide Setting up, and using your device. Install Adobe® Acrobat® Reader to view the file manual.pdf found in d:\user's guide\dj\ \ (replace d:\ with the drive letter of your CD-ROM/DVD-ROM drive and with the language the document is in). • Musicmatch Help Click Start Programs Musicmatch Musicmatch Jukebox. Click Help in Musicmatch. • support.dell.com Up-to-date information on your device including the latest software downloads, latest versions of the User's Guide, Getting Started Guide, and answers to the most Frequently Asked Questions. • Keep away from strong magnetic fields. • Do not subject to excessive force or impact. • Keep away from excessive moisture. • Do not dismantle. Information in this document is subject to change without notice. © 2005 Dell Inc. All rights reserved. Reproduction in any manner whatsoever without the written permission of Dell Inc. is strictly forbidden. Dell, Dell DJ, and the DELL logo are trademarks of Dell Inc.; Musicmatch is a registered trademark of Musicmatch Inc.; Microsoft and Windows are registered trademarks of Microsoft Corporation. Dell Inc disclaims any proprietary interest in the marks and names of others. April 2005 Printed in Singapore
-
 1
1 -
 2
2
 |
 |
