Dell DR2000v EMC Networker - Setting Up the Dell DR Series System as a NFS Bac
Dell DR2000v Manual
 |
View all Dell DR2000v manuals
Add to My Manuals
Save this manual to your list of manuals |
Dell DR2000v manual content summary:
- Dell DR2000v | EMC Networker - Setting Up the Dell DR Series System as a NFS Bac - Page 1
Setting up Dell™ DR Series Deduplication Appliance as NFS Backup Target on EMC Networker Dell Engineering January 2014 - Dell DR2000v | EMC Networker - Setting Up the Dell DR Series System as a NFS Bac - Page 2
Revisions Date January 2014 Description Initial release THIS WHITE PAPER IS FOR INFORMATIONAL PURPOSES ONLY, AND MAY CONTAIN TYPOGRAPHICAL ERRORS AND TECHNICAL INACCURACIES. THE CONTENT IS PROVIDED AS IS, WITHOUT EXPRESS OR IMPLIED WARRANTIES OF ANY KIND. © 2014 Dell Inc. All rights reserved. - Dell DR2000v | EMC Networker - Setting Up the Dell DR Series System as a NFS Bac - Page 3
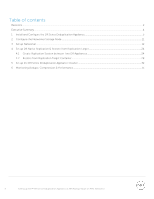
Table of contents Revisions ...2 Executive Summary ...4 1 Install and Configure the DR Series Deduplication Appliance 5 2 Configure the Networker Storage Node ...11 3 Set up Networker ...12 4 Set up DR Native Replication & Restore from Replication Target 24 4.1 Create Replication Session between - Dell DR2000v | EMC Networker - Setting Up the Dell DR Series System as a NFS Bac - Page 4
Appliance documentation for other data management application best practices whitepapers at http://www.dell.com/support/troubleshooting/us/en/04/Product/powervaultdr4100, under "Manuals & Documentation". NOTE: The DR Series Deduplication Appliance/Networker build versions and screen shots used for - Dell DR2000v | EMC Networker - Setting Up the Dell DR Series System as a NFS Bac - Page 5
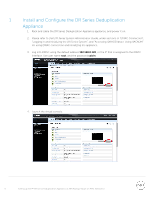
Appliance 1. Rack and cable the DR Series Deduplication Appliance appliance, and power it on. 2. Please refer to Dell DR Series System Administrator Guide, under sections of "iDRAC Connection", "Logging in and Initializing the DR Series System", and "Accessing IDRAC6/Idrac7 Using RACADM" for using - Dell DR2000v | EMC Networker - Setting Up the Dell DR Series System as a NFS Bac - Page 6
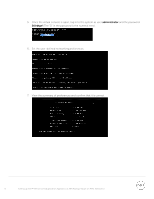
5. Once the virtual console is open, log in to the system as user administrator and the password St0r@ge! (The "0" in the password is the numeral zero). 6. Set the user- defined networking preferences. 7. View the summary of preferences and confirm that it is correct. 6 Setting up Dell™ DR Series - Dell DR2000v | EMC Networker - Setting Up the Dell DR Series System as a NFS Bac - Page 7
access to backup servers. NOTE: if you do not want to add DR Series Deduplication Appliance to Active Directory, see the Owner's Manual for guest login instructions. a. Select Active Directory in the tree on the left hand side of the dashboard. 7 Setting up Dell™ DR Series Deduplication Appliance - Dell DR2000v | EMC Networker - Setting Up the Dell DR Series System as a NFS Bac - Page 8
b. Enter your Active Directory credentials. 10. Create and mount the container. a. Select Containers in the tree on the left side of the dashboard, and then click the Create link at the top of the page. 8 Setting up Dell™ DR Series Deduplication Appliance as NFS Backup Target on EMC Networker - Dell DR2000v | EMC Networker - Setting Up the Dell DR Series System as a NFS Bac - Page 9
path (this will be used in configuring device on Networker server), and select Enable NFS. For Client Access section, choose either Open Access, or manually add clients into the allow list with having NFS Options as "rw" 9 Setting up Dell™ DR Series Deduplication Appliance as NFS Backup Target on - Dell DR2000v | EMC Networker - Setting Up the Dell DR Series System as a NFS Bac - Page 10
Note: For improved security, Dell recommends adding IP addresses for the following (Not all environments will have all components): − Backup console (Networker Server) − Network Storage Nodes − Networker Clients d. Click Create a New Container. e. Confirm that the container is added. 10 Setting up - Dell DR2000v | EMC Networker - Setting Up the Dell DR Series System as a NFS Bac - Page 11
down the mount point. This mount point is needed in step 9 of the next section of Set up Networker NOTE: On DR4x00 models, the maximum supported CIFS connections per Appliance is 32, and on DR6000 model the max is 64, so there should be no more than 32 and 64 corresponding - Dell DR2000v | EMC Networker - Setting Up the Dell DR Series System as a NFS Bac - Page 12
3 Set up Networker 1. Open the Networker Management Console (NMC) 2. Click the Enterprise menu button, high- light the storage node that the DR Series Deduplication Appliance export will be configured as backup device, right- click on the host and select New, then select Managed Application 3. - Dell DR2000v | EMC Networker - Setting Up the Dell DR Series System as a NFS Bac - Page 13
4. Click on Finish 5. High- light the newly created Networker application, right- click on the application and select Launch Application 13 Setting up Dell™ DR Series Deduplication Appliance as NFS Backup Target on EMC Networker - Dell DR2000v | EMC Networker - Setting Up the Dell DR Series System as a NFS Bac - Page 14
mount point on the storage node (if name resolution works, hostname or FQDN can be used in the server portion of the network path). Choose Manually enter local or remote device paths and type in the subdirectory name previously created as device path (please refer to step 4 of previous section - Dell DR2000v | EMC Networker - Setting Up the Dell DR Series System as a NFS Bac - Page 15
with password to access the DR Series Deduplication Appliance export. Click on Next 9. Set the sessions attributes according to Networker administration document. If Client Direct feature will be used, enter each of the client machine DR export mount points as a separate line into the Client Direct - Dell DR2000v | EMC Networker - Setting Up the Dell DR Series System as a NFS Bac - Page 16
NOTE: On DR4x00 models, the maximum supported CIFS connections per Appliance is 32, and on DR6000 model the max is 64, so there should be no more than 32 and 64 corresponding - Dell DR2000v | EMC Networker - Setting Up the Dell DR Series System as a NFS Bac - Page 17
12. Click on Finish 13. Under Configuration tab, select Clients, right- click on the client that will be backed up, select Client Backup Configuration, then New 17 Setting up Dell™ DR Series Deduplication Appliance as NFS Backup Target on EMC Networker - Dell DR2000v | EMC Networker - Setting Up the Dell DR Series System as a NFS Bac - Page 18
14. Go through the procedure of creating a new backup group 18 Setting up Dell™ DR Series Deduplication Appliance as NFS Backup Target on EMC Networker - Dell DR2000v | EMC Networker - Setting Up the Dell DR Series System as a NFS Bac - Page 19
Note: Pay special attention to the following step while setting the other options appropriately according to the backup environment: Deduplication should be set as None; Target Pool should be set as the pool that has DR Series Deduplication Appliance device included; Client Direct can be enabled if - Dell DR2000v | EMC Networker - Setting Up the Dell DR Series System as a NFS Bac - Page 20
20 Setting up Dell™ DR Series Deduplication Appliance as NFS Backup Target on EMC Networker - Dell DR2000v | EMC Networker - Setting Up the Dell DR Series System as a NFS Bac - Page 21
21 Setting up Dell™ DR Series Deduplication Appliance as NFS Backup Target on EMC Networker - Dell DR2000v | EMC Networker - Setting Up the Dell DR Series System as a NFS Bac - Page 22
15. Once the backup group is successfully created, start the backup 22 Setting up Dell™ DR Series Deduplication Appliance as NFS Backup Target on EMC Networker - Dell DR2000v | EMC Networker - Setting Up the Dell DR Series System as a NFS Bac - Page 23
16. Monitor the job status through Monitoring tab 23 Setting up Dell™ DR Series Deduplication Appliance as NFS Backup Target on EMC Networker - Dell DR2000v | EMC Networker - Setting Up the Dell DR Series System as a NFS Bac - Page 24
4 Set up DR Native Replication & Restore from Replication Target 4.1 Create Replication Session between Two DR Appliances Note: below screenshots show as CIFS containers, but the procedure is exact the same for NFS containers 1. Create a source container on the source DR appliance 2. Create a target - Dell DR2000v | EMC Networker - Setting Up the Dell DR Series System as a NFS Bac - Page 25
3. On source DR appliance, go to Replication menu, and then click Create 4. Select the newly created container as source container, then enter the target DR related info in Step 4 menu item 25 Setting up Dell™ DR Series Deduplication Appliance as NFS Backup Target on EMC Networker - Dell DR2000v | EMC Networker - Setting Up the Dell DR Series System as a NFS Bac - Page 26
5. Click Retrieve Container(s) button, then select the newly created target container from the list 6. Click Create Replication button 26 Setting up Dell™ DR Series Deduplication Appliance as NFS Backup Target on EMC Networker - Dell DR2000v | EMC Networker - Setting Up the Dell DR Series System as a NFS Bac - Page 27
7. Verify the replication relation between DRs is created, and Peer Status is Online 27 Setting up Dell™ DR Series Deduplication Appliance as NFS Backup Target on EMC Networker - Dell DR2000v | EMC Networker - Setting Up the Dell DR Series System as a NFS Bac - Page 28
4.2 Restore from Replication Target Container 1. Add the target container onto NetWorker Storage Node (Right- Click Device - > New Device Properties, then fill in necessary information for the target device). After it's done, Mount the device Note: Don't label the target device 2. Unmount the source - Dell DR2000v | EMC Networker - Setting Up the Dell DR Series System as a NFS Bac - Page 29
3. Go to Recover, click +, select a backup source host, then click Next 4. Select the data set to recover, click Versions to view Select Versions window, make selection on the data then click on OK 29 Setting up Dell™ DR Series Deduplication Appliance as NFS Backup Target on EMC Networker - Dell DR2000v | EMC Networker - Setting Up the Dell DR Series System as a NFS Bac - Page 30
5. Select the Recovery Options, choose Original path or enter a New destination path to recover data to, then click Next 6. Specify a Recover name, then click Run Recovery 30 Setting up Dell™ DR Series Deduplication Appliance as NFS Backup Target on EMC Networker - Dell DR2000v | EMC Networker - Setting Up the Dell DR Series System as a NFS Bac - Page 31
7. Check the Recovery Results 31 Setting up Dell™ DR Series Deduplication Appliance as NFS Backup Target on EMC Networker - Dell DR2000v | EMC Networker - Setting Up the Dell DR Series System as a NFS Bac - Page 32
5 Set up the DR Series Deduplication Appliance Cleaner The cleaner will run during idle time. If you workflow does not have a sufficient amount of idle time on a daily basis then you should consider scheduling the cleaner which will force it to run during that scheduled time. If necessary you can do - Dell DR2000v | EMC Networker - Setting Up the Dell DR Series System as a NFS Bac - Page 33
6 Monitoring Dedupe, Compression & Performance After backup jobs have run the DR Series Deduplication Appliance will track Capacity, Storage Savings and Throughput on the DR Series Deduplication Appliance dashboard. This information is valuable in understanding the benefits the DR Series
-
 1
1 -
 2
2 -
 3
3 -
 4
4 -
 5
5 -
 6
6 -
 7
7 -
8
-
9
-
10
-
11
-
12
-
13
-
14
-
15
-
16
-
17
-
18
-
19
-
20
-
21
-
22
-
23
-
24
-
25
-
26
-
27
-
28
-
29
-
30
-
31
-
32
-
33
 |
 |

Setting up Dell
™
DR Series Deduplication
Appliance as NFS Backup Target on EMC
Networker
Dell Engineering
January 2014