Dell Dimension E510 Service Manual - Page 32
Front Panel, Replacing the Drive Panel, Removing the Front Panel
 |
View all Dell Dimension E510 manuals
Add to My Manuals
Save this manual to your list of manuals |
Page 32 highlights
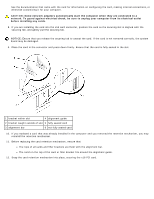
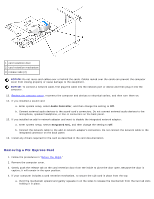
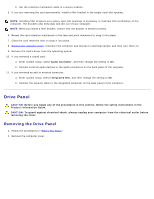
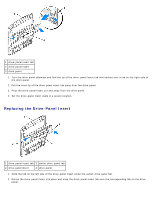
Replacing the Drive Panel 1. Follow the procedures in "Before You Begin." 2. Remove the computer cover. 3. If you are installing a replacement drive panel, remove the old drive panel. 1 sliding plate lever 3 drive panel 2 sliding plate 4 front panel 4. Align the drive panel tabs with the side-door hinges. 5. Rotate the drive panel toward the computer until it snaps into place on the front panel. Front Panel CAUTION: Before you begin any of the procedures in this section, follow the safety instructions in the Product Information Guide. CAUTION: To guard against electrical shock, always unplug your computer from the electrical outlet before removing the cover. Removing the Front Panel
-
 1
1 -
2
-
3
-
4
-
5
-
6
-
7
-
8
-
9
-
10
-
11
-
12
-
13
-
14
-
15
-
16
-
17
-
18
-
19
-
20
-
21
-
22
-
23
-
24
-
25
-
26
-
 27
27 -
 28
28 -
 29
29 -
 30
30 -
 31
31 -
 32
32 -
 33
33 -
 34
34 -
 35
35 -
 36
36 -
 37
37 -
38
-
39
-
40
-
41
-
42
-
43
-
44
-
45
-
46
-
47
-
48
-
49
-
50
-
51
-
52
-
53
-
54
-
55
-
56
-
57
-
58
-
59
-
60
-
61
-
62
-
63
-
64
-
65
-
66
-
67
-
68
-
69
-
70
-
71
-
72
 |
 |

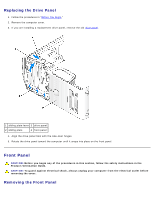
Replacing the Drive Panel
1. Follow the procedures in "
Before You Begin
."
2. Remove the computer cover.
3. If you are installing a replacement drive panel, remove the old
drive panel
.
1
sliding plate lever
3
drive panel
2
sliding plate
4
front panel
4. Align the drive panel tabs with the side-door hinges.
5. Rotate the drive panel toward the computer until it snaps into place on the front panel.
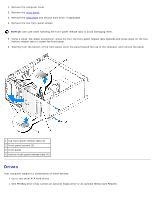
Front Panel
CAUTION:
Before you begin any of the procedures in this section, follow the safety instructions in the
Product Information Guide
.
CAUTION:
To guard against electrical shock, always unplug your computer from the electrical outlet before
removing the cover.
Removing the Front Panel