Dell Dimension XPS 66 Desktop Manual - Page 41
Removing and Replacing Hard Drive(s
 |
View all Dell Dimension XPS 66 manuals
Add to My Manuals
Save this manual to your list of manuals |
Page 41 highlights
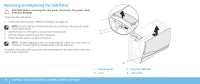
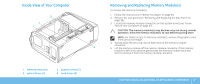
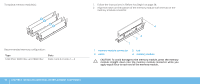
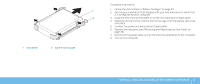
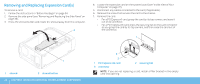
3. Insert the memory module into the memory module connector until the memory module snaps into position. If you insert the memory module correctly, the securing clips snap into the cutouts at each end of the memory module. NOTE: If the memory module is not installed properly, the computer may not boot. 4. Replace the side panel (see "Removing and Replacing the Side Panel" on page 36). 5. Connect the power cable, and all the external peripherals to the computer. 6. Turn on the computer. As the computer boots, it detects the additional memory and automatically updates the system configuration information. To confirm the amount of memory installed in the computer: Click Start → Control Panel→ System and Security→ System. Removing and Replacing Hard Drive(s) NOTE: For maximum performance of hard drive(s), connect the SATA 3.0 (6Gb/s) compatible hard drive(s) to the SATA 3.0 (6Gb/s) port(s) on the system board. To remove the hard drive(s): 1. Follow the instructions in "Before You Begin" on page 34. 2. Remove the side panel (see "Removing and Replacing the Side Panel" on page 36). 3. Disconnect the power and data cable from the hard drive (if applicable). CHAPTER 4: INSTALLING ADDITIONAL OR REPLACEMENT COMPONENTS 39
-
 1
1 -
2
-
3
-
4
-
5
-
6
-
7
-
8
-
9
-
10
-
11
-
12
-
13
-
14
-
15
-
16
-
17
-
18
-
19
-
20
-
21
-
22
-
23
-
24
-
25
-
26
-
27
-
28
-
29
-
30
-
31
-
32
-
33
-
34
-
35
-
 36
36 -
 37
37 -
 38
38 -
 39
39 -
 40
40 -
 41
41 -
 42
42 -
 43
43 -
 44
44 -
 45
45 -
 46
46 -
47
-
48
-
49
-
50
-
51
-
52
-
53
-
54
-
55
-
56
-
57
-
58
-
59
-
60
-
61
-
62
-
63
-
64
-
65
-
66
-
67
-
68
-
69
-
70
 |
 |
