Dell E157FPT User Guide
Dell E157FPT - 15" LCD Monitor Manual
 |
View all Dell E157FPT manuals
Add to My Manuals
Save this manual to your list of manuals |
Dell E157FPT manual content summary:
- Dell E157FPT | User Guide - Page 1
Software Using the Touch Screen Control Panel Advanced Settings Dell Right Mouse Button Tool (RMBT) Tool Tray Center Desktop Tool Edge Acceleration Tool (EAT) Solving Problems General Problems Touch screen Problems Appendix Warranty Information CAUTION:General Safety Instructions CAUTION: Monitor - Dell E157FPT | User Guide - Page 2
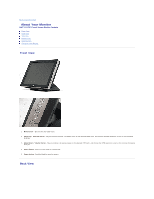
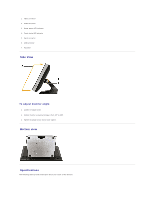
to Contents Page About Your Monitor Dell™ E157FPT Touch Screen Monitor Contents Front View Back View Side View Bottom view Specifications Caring for Your Monitor Front View 1. Menu button - Enters/exits the OSD menu. 2. Adjust up / Contrast button - Adjusts screen contrast, increases value of the - Dell E157FPT | User Guide - Page 3
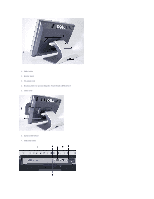
1. Cable holder 2. Monitor stand 3. Tilt-adjust knob 4. Mounting holes for optional Magnetic Stripe Reader (MSR) device 5. Cable cover 6. Optional MSR device 7. USB cable holder - Dell E157FPT | User Guide - Page 4
USB connector 7. AC power Side View To adjust monitor angle: 1. Loosen tilt-adjust knob. 2. Position monitor as desired (range is from 30o to 90o). 3. Tighten tilt-adjust knob. Do not over tighten. Bottom view Specifications The following tables provide information about your touch screen monitor. - Dell E157FPT | User Guide - Page 5
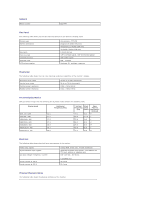
General Model number E157FPT Flat Panel The following table shows physical and optical properties of the monitor's display panel. Screen type Screen dimensions Pixel pitch Viewing angle Luminance output Contrast ratio LCD surface coating Active matrix - TFT LCD Diagonal 15 inches (381 mm) - Dell E157FPT | User Guide - Page 6
2.40 inches (61 mm ) Stand dimensions: Height 5.47 inches (139 mm ) Width 9.76 inches (248 mm ) Depth 3.58 inches (91 mm ) Weight with packaging 18.04 lb (8.2 kg ) max Weight with stand assembly and video cable 14.08 lb (6.4 kg ) max Weight without stand assembly (For wall mount or VESA - Dell E157FPT | User Guide - Page 7
touchmonitor. If liquid does get inside, have a qualified service technician check it before you power it on again. l To clean the touch screen, use window or glass cleaner. Apply cleaner to a rag and wipe the touch screen. Never apply the cleaner directly to the touch screen. Back to Contents Page - Dell E157FPT | User Guide - Page 8
Back to Contents Page Appendix Dell™ E157FPT Touch Screen Monitor Contents Warranty Information CAUTION:General Safety Instructions CAUTION: Monitor Safety Instructions Contacting Dell Regulatory Notices Your Monitor Setup Guide Warranty Information U.S. Terms and Conditions of Sale PLEASE READ THIS - Dell E157FPT | User Guide - Page 9
of software l Non-Dell-branded and Solution Provider Direct products and accessories l Problems that result from: ¡ External causes such as accident, abuse, misuse, or problems with electrical power ¡ Servicing not authorized by Dell ¡ Usage that is not in accordance with product instructions - Dell E157FPT | User Guide - Page 10
listed in the following table. Please also have your Dell Service Tag or order number available. support.dell.com/ContactUs/ContactUsHome.aspx?c=us&l=en&s=gen Web Support Individual Home Consumers: Hardware Warranty Support Customer Service U.S. Only 1-800-624-9896 1-800-624-9897 Individual Home - Dell E157FPT | User Guide - Page 11
or the return is a direct result of a Dell error, a restocking fee of 15% may be charged on hardware, accessories, peripherals, parts and unopened software still in its/their sealed package. How to Return: To return products, you must contact Dell customer service (www.dell.com/us/en/gen/contact.htm - Dell E157FPT | User Guide - Page 12
monitors. After reading this section, be sure to read the safety instructions pertaining to your specific equipment. IMPORTANT NOTICE FOR USE IN HEALTHCARE ENVIRONMENTS: Dell optional (PC card) modem, disconnect no user adjustments nor any user serviceable or use a commercial window cleaner to clean - Dell E157FPT | User Guide - Page 13
Dell. Always follow installation and service instructions closely. l To help avoid the potential hazard of electric shock, do not connect or disconnect any cables, or perform maintenance or reconfiguration of your equipment during an electrical storm. PC Cards manual monitor adapter model approved - Dell E157FPT | User Guide - Page 14
Contact Dell support (see your User's Guide or Owner's Manual for the appropriate contact information). NOTE: See the Limited Warranties and Return Policy section of this document or separate paper warranty document that shipped with your monitor - Dell E157FPT | User Guide - Page 15
through damaged portions, or if smoke or unusual odors are detected, disconnect the device from the electrical outlet and contact Dell support. See your User's Guide or Owner's Manual for the appropriate contact information. 1. Save and close any open files, exit any open programs, and shut down the - Dell E157FPT | User Guide - Page 16
Dell PowerEdge™, Dell PowerConnect™, and Dell PowerVault™ Technical Support Services Sales Aruba Online Support Technical Support, Customer Service, Sales Australia (Sydney) International Access Code: 0011 Country Code: 61 City Code: 2 Online Support Technical Support Technical Support for XPS - Dell E157FPT | User Guide - Page 17
City Code: 592 Online Support Technical Support E-mail Customer Service E-mail Technical Support Fax Technical Support - XPS computers only Technical Support - Dell™ Dimension™ and Dell Inspiron™ Technical Support - Dell OptiPlex™, Dell Latitude™, and Dell Precision™ Technical Support - Servers and - Dell E157FPT | User Guide - Page 18
Code: 00 Country Code: 45 Technical Support Customer Service Fax Technical Fax Switchboard Online Support Technical Support for XPS computers only Technical Support Customer Service - Relational Home/Small Business Customer Service Switchboard - Relational Switchboard Fax - Relational Switchboard - Dell E157FPT | User Guide - Page 19
Support Technical Support, Customer Service, Sales Online Support Technical Support, Customer Service, Sales Online Support Technical Support - XPS computers only Technical Support - Dimension and Inspiron Hong Kong Technical Support - OptiPlex, Latitude, and Dell Precision Technical Support - Dell E157FPT | User Guide - Page 20
Support Customer Service Fax Switchboard Online Support Technical Support, Customer Service, Sales (dial from within Jamaica only) Online Support Technical Support - XPS computers only Technical Support outside of Japan - XPS computers only Technical Support - Dimension 4000 support.euro.dell.com 02 - Dell E157FPT | User Guide - Page 21
Code: 60 City Code: 4 Online Support Support Home/Small Business Sales Corporate Sales Customer Service Fax Online Support Technical Support - XPS computers only Technical Support - Dell Precision, OptiPlex, and Latitude Technical Support - Dimension, Inspiron, and Electronics and Accessories - Dell E157FPT | User Guide - Page 22
Code: 20 Online Support Technical Support, Customer Service, Sales Online Support Technical Support, Customer Service, Sales Online Support Technical Support for XPS computers only Technical Support Technical Support Fax Home/Small Business Customer Service Relational Customer Service Home/Small - Dell E157FPT | User Guide - Page 23
Support - XPS computers only Technical Support - Dimension, Inspiron, and Electronics and International Access Code: 005 Accessories Country Code: 65 Technical Support - OptiPlex, Latitude, and Dell Precision Technical Support - PowerApp, PowerEdge, PowerConnect, and PowerVault Customer Service - Dell E157FPT | User Guide - Page 24
Support - XPS computers only Technical Support - OptiPlex, Latitude, Inspiron, Dimension, and Electronics and Accessories Technical Support - Servers and Storage Country Code: 886 Customer Service Transaction Sales Corporate Sales Online Support Technical Support (OptiPlex, Latitude, and Dell - Dell E157FPT | User Guide - Page 25
(EPP) Financial Services Leases and Loans Dell Preferred Accounts (DPA) Sales Dell Outlet Store Software and Peripherals Sales U.S. Virgin Islands Online Support Technical Support, Customer Service, Sales Venezuela Online Support Technical Support, Customer Service, Sales toll-free - Dell E157FPT | User Guide - Page 26
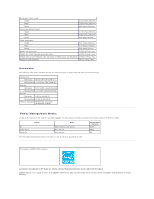
l Model number: E157FPTe l Company name: Dell Inc. Worldwide Regulatory Compliance & Environmental Affairs One Dell Way Round Rock, TX 78682 USA 512-338-4400 NOTE: For Further regulatory information, see your Product Information Guide. Recycling Information Dell recommends that customers dispose - Dell E157FPT | User Guide - Page 27
Dell™ E157FPT Touch Screen Monitor Contents Connecting Your Monitor Using the OSD On-Screen Menu/Display (OSD) Special OSD Functions OSD Warning Messages Setting the Optimal Resolution Connecting Your Monitor CAUTION: Before you begin any of the procedures in this section, follow the instructions - Dell E157FPT | User Guide - Page 28
. If it does not display an image, see Solving Problems. Using the OSD Use the control buttons on the right side of the monitor to adjust the characteristics of the image being displayed. As you use these buttons to adjust the controls, an on-screen display (OSD) shows their numeric values. The - Dell E157FPT | User Guide - Page 29
showing, use this button to activate automatic setup and adjustment. The following dialog will appear on screen as the monitor self-adjusts to the current input: The Auto Adjustment button allows the monitor to self-adjust to the incoming video signal. After using 'Auto Adjustment', you can further - Dell E157FPT | User Guide - Page 30
See the table below for a complete list of all the functions available for the monitor. 3. Press the 'Select' button once to activate the highlighted function. 4. Use the intensity difference between dark and light areas on the screen. Pressing "+" will increase the contrast. Pressing "-" will - Dell E157FPT | User Guide - Page 31
is used to return all monitor settings to their factory stored values. All settings previously saved by the user will be replaced by their factory the choices. The screen tint will change, as the cursor is moved. Select the desired choice by pressing "Select". Choosing the User choice will open - Dell E157FPT | User Guide - Page 32
The VOLUME function varies the audio's loudness from the monitor's internal speakers. Pressing "+" will increase the volume. screen's video. This adjustment should be done while viewing an entire screen of text characters. The normal setting is 0. A setting of 0 is recommended, unless the user - Dell E157FPT | User Guide - Page 33
Maximum is 100. PHASE The CLOCK function allows for manual fine adjustment of the monitor's dot clock. This function is recommended only for advanced users. It is normally adjusted automatically by the AUTO ADJUST function. If a manual setting for improved performance cannot be determined using this - Dell E157FPT | User Guide - Page 34
OSD HPOSITION The OSD V-POSITION function moves the OSD Menu window up or down in relation to the monitor bezel. Pressing "+" will move the OSD Menu up. Pressing "-" will move the OSD Menu down. OSD VPOSITION Minimum is 0. Maximum is 100. The OSD TIME - Dell E157FPT | User Guide - Page 35
pressing "Select". OSD LANGUAGE The TIMING INFO function simply displays information about the video signal which your computer is sending to the monitor. Screen resolution, horizontal scan rate (FH), and vertical refresh rate (FV) are displayed. It is recommended that your computer video output be - Dell E157FPT | User Guide - Page 36
Power Button may be disabled, thereby preventing unauthorized personnel from switching the monitor power off. To "Lock" (disable) the Power Button: 1. Press "Menu" and "-" buttons at the same time. A small window will appear, showing the present state of Power Button operation. 2. Continue holding - Dell E157FPT | User Guide - Page 37
@ 60Hz. NOTE: A Test-pattern window will appear on-screen if the monitor cannot sense a video signal. Occasionally, no warning message appears, but the screen is blank. This could also indicate that the monitor is not synchronizing with the computer. SeeSolving Problems for more information. Setting - Dell E157FPT | User Guide - Page 38
Back to Contents Page Solving Problems Dell™ E157FPT Touch Screen Monitor Contents General Problems Touch screen Problems General Problems Problem The monitor does not respond after you turn on the system. Characters on the screen are dim. The screen is blank. OSD or power buttons don't work "Out - Dell E157FPT | User Guide - Page 39
Dell™ E157FPT Touch Screen Monitor User's Guide NOTE: A NOTE indicates important information that helps you make better use of your computer. NOTICE: A NOTICE indicates either potential damage to hardware or loss of data and tells you how to avoid the problem. CAUTION: A CAUTION indicates a - Dell E157FPT | User Guide - Page 40
your monitor. The Dell Xpu driver supports the E157FPT Touch screen Monitor. While the touch screen software supports both Windows XP and Windows 2000, this manual uses the terminology and descriptions for Windows XP in cases where Windows XP and Windows 2000 differ. The Dell Touch Screen Software - Dell E157FPT | User Guide - Page 41
The driver files are installed. Following installation, the Setup Complete screen appears. 9. To calibrate the monitor, select Calibrate Dell Touch Screen monitors, click Finish. You may choose to run the calibrate program at a later time from the Dell Touch Screen Properties. Multiple Monitors with - Dell E157FPT | User Guide - Page 42
may want to take advantage of the Touch Screen software silent install facility. You can run a silent install from diskettes, a CD, hard drive, or network drive. To begin, you must create a silent install script that contains the recorded install instructions. l To Silent install for USB controllers - Dell E157FPT | User Guide - Page 43
run EloVA to calibrate the touchmonitors. If there are no Dell USB devices attached to the system, click on the Change option from the Add or Remove programs in the Control Panel, Dell entry. Uninstalling Touch Screen Software The Uninstall program removes all touch screen software components from - Dell E157FPT | User Guide - Page 44
vertical controls on your monitor. l When the cursor does not follow the movement of your finger, or does not reach the edges of the touch screen. To calibrate the touch screen: 1. Right-click the Dell icon in the Windows system tray and select Align. The Dell Touch screen Properties dialog appears. - Dell E157FPT | User Guide - Page 45
: If you press Escape or do not touch the touch screen within 20 seconds, the system automatically cancels the calibration process with no change to the current settings. 4. Repeat these instructions for additional calibration targets. Recalibrate the touch screen if any of the following tests fail - Dell E157FPT | User Guide - Page 46
size of double-click area accepted by Windows. The square is increased or decreased in size by touching the appropriate arrows adjacent to the square. Note that the double-click box size is independent of screen resolution and must be defined for each user. Options Options allow various features of - Dell E157FPT | User Guide - Page 47
Properties page that is related to the order in which controllers or ports were detected or enumerated. Each Properties page contains information extracted from the touch screen controller and the system about the monitor, touch screen, controller, and internal driver. - Dell E157FPT | User Guide - Page 48
number of the Windows COM port. No Screen configuration icons are displayed. About The About tab provides the version of the Control Panel (which is linked to the driver version) and also provides links to the Dell website, the readme included with the driver, and the user manual. Advanced Settings - Dell E157FPT | User Guide - Page 49
from reaching Windows for this touch screen. This feature may also be activated from the Tool Tray utility. Disabling touch has no effect on the operation of the standard mouse. Show right mouse button tool Show right mouse button tool launches this feature for this monitor. See Dell Right Mouse - Dell E157FPT | User Guide - Page 50
: l Access to Dell Touch screen Properties. l Align - Launches EloVA, the Dell Video Alignment program. l Center Desktop Tool - Launches Center Desktop Tool. l Dell Right Mouse Button Tool (RMBT) - Launches Right Mouse Button Tool for all touch monitors that have been calibrated. l Edge Acceleration - Dell E157FPT | User Guide - Page 51
, click "Apply" and touch is restored. l Readme - Launches Readme instructions. l User Manual - Quick link to this User Manual. l http://www.dell.com - A quick link to Dell's website l Exit - Clicking this button exits the Tool Tray application and also removes it from the Windows Taskbar. The Tool - Dell E157FPT | User Guide - Page 52
set from a value of 0-10 where, 1 corresponds to no acceleration. l Edge acceleration rectangle bounds dimensions. l Edge acceleration rectangle bounds position. l Enable cursor acceleration. l Apply to all touchscreens. These parameters can be configured using the mouse to resize or move the bounds
-
 1
1 -
 2
2 -
 3
3 -
 4
4 -
 5
5 -
 6
6 -
 7
7 -
8
-
9
-
10
-
11
-
12
-
13
-
14
-
15
-
16
-
17
-
18
-
19
-
20
-
21
-
22
-
23
-
24
-
25
-
26
-
27
-
28
-
29
-
30
-
31
-
32
-
33
-
34
-
35
-
36
-
37
-
38
-
39
-
40
-
41
-
42
-
43
-
44
-
45
-
46
-
47
-
48
-
49
-
50
-
51
-
52
 |
 |
Dell™ E157FPT Touch Screen Monitor Contents
Information in this document is subject to change without notice.
© 2007 Dell Inc. All rights reserved.
Reproduction in any manner whatsoever without the written permission of Dell Inc. is strictly forbidden.
Trademarks used in this text:
Dell
, the
DELL
logo,
Inspiron
,
Dell Precision
,
Dimension
,
OptiPlex
,
Latitude, PowerEdge, PowerVault, PowerApp, and Dell OpenManage
are trademarks of Dell
Inc.;
Intel
,
Pentium, and Celeron
are registered trademarks of Intel Corporation;
Microsoft
and
Windows
are registered trademarks of Microsoft Corporation.
Other trademarks and trade names may be used in this document to refer to either the entities claiming the marks and names or their products. Dell Inc. disclaims any
proprietary interest in trademarks and trade names other than its own.
February 2007
Rev. A02
About Your Monitor
Front View
Back View
Side View
Bottom view
Specifications
Caring for Your Monitor
Setting Up Your Monitor
Connecting Your Monitor
Using the OSD
On
-
Screen Menu/Display (OSD)
Special OSD Functions
OSD Warning Messages
Setting the Optimal Resolution
Using the Touch Screen Software
About Your Touch Screen Software
Installing Touch Screen Software
Uninstalling Touch Screen Software
Using the Touch Screen Control Panel
Advanced Settings
Dell Right Mouse Button Tool (RMBT)
Tool Tray
Center Desktop Tool
Edge Acceleration Tool (EAT)
Solving Problems
General Problems
Touch screen Problems
Appendix
Warranty Information
CAUTION:General Safety Instructions
CAUTION: Monitor Safety Instructions
Contacting Dell
Regulatory Notices
Your Monitor Setup Guide
Notes, Notices, and Cautions
NOTE:
A NOTE indicates important information that helps you make better use of your computer.
NOTICE:
A NOTICE indicates either potential damage to hardware or loss of data and tells you how to avoid the problem.
CAUTION:
A CAUTION indicates a potential for property damage, personal injury, or death.