Dell Equallogic PS4110X EqualLogic PS4110 Setup Poster - Page 2
Setting Up a PS Series Storage Array continued
 |
View all Dell Equallogic PS4110X manuals
Add to My Manuals
Save this manual to your list of manuals |
Page 2 highlights
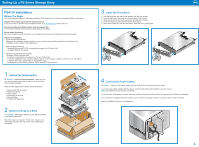
Setting Up a PS Series Storage Array (continued) 5 Connect the Array to the Network Recommended Configuration: For high performance and availability distribute the connections across multiple network switches. The switches must be connected with interswitch links that have sufficient bandwidth. See the Installation Guide for more information. Switch 0 CM0 Switch 1 Optical (SFP+) CM1 Switch 0 CM0 Switch 1 10GBASE-T CM1 6 Turn on Power to the Array Note: Before turning on power, allow enough time for the array to adjust to ambient temperature and humidity (for example, overnight). Turn on power to both power supply modules (in any order) by pressing (|) on the power switch. The power switch on each power supply module is located below the power plug. Note: Batteries will start to charge and some hardware components may start to synchronize when power is turned on. Array LEDs will indicate this normal activity. Hardware Installation is Complete! Your array hardware should now be up and running. If it is not, make sure that you have successfully completed all of the steps described in this poster. If you are still experiencing problems, see the Installation Guide for additional installation information. The Installation Guide also provides technical support and customer service information. For live technical support, call 1-800-945-3355. What to do Next Next, configure the array software. See the Installation Guide for array configuration information. Notes, Cautions, and Warnings A NOTE indicates important information that helps you make better use of your system. A CAUTION indicates potential damage to hardware or loss of data if instructions are not followed. A WARNING indicates a potential for property damage, personal injury, or death. Information in this document is subject to change without notice. Reproduction in any manner whatsoever without the written permission of Dell EqualLogic is strictly forbidden. Dell and EqualLogic are trademarks of Dell Inc. Copyright 2011 Dell Inc. All rights reserved. Printed in U.S.A. Printed on recycled paper. DNG36 rev.A00 DNG36A00 Setting Up a PS Series Storage Array
-
 1
1 -
 2
2
 |
 |
