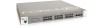
Dell Force10 S25-01-GE-24P Setup and Buffer Tuning of the S25P for Storage Env - Page 2
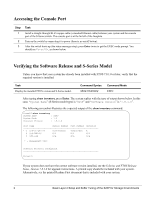
Accessing the Console Port, Verifying the Software Release and S-Series Model
 |
View all Dell Force10 S25-01-GE-24P manuals
Add to My Manuals
Save this manual to your list of manuals |
Page 2 highlights
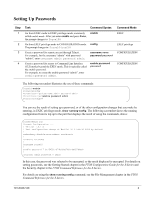
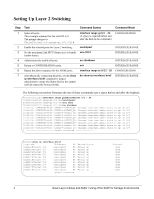
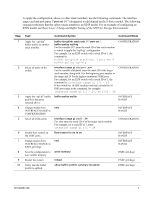
Accessing the Console Port Step 1 2 3 Task Install a straight-through RJ-45 copper cable (a standard Ethernet cable) between your system and the console port of the S-Series switch. The console port is at the far left of the faceplate. Turn on the switch by connecting it to power (there is no on/off button). After the switch boots up (the status messages stop), press Enter twice to get the EXEC mode prompt. You should see Force10>, as shown below. Verifying the Software Release and S-Series Model Unless you know that your system has already been installed with FTOS 7.8.1.0 or later, verify that the required version is installed. Task Display the installed FTOS version and S-Series model. Command Syntax show inventory Command Mode EXEC After typing show inventory, press Enter. The system replies with the type of output shown below. In this case, "System Name" (S-Series model type) is "S25P" and "Software version" is "7.8.1.0". The following screenshot illustrates the expected output of the show inventory command: Force10>show inventory System Name : S25P System Mode : 1.0 Software Version : 7.8.1.0 Unit Type Serial Number Part Number Revision * 0 S25-01-GE-24P DL277000000 7590004800 B 0 S50-PWR-AC N/A N/A N/A 0 S50-FAN N/A N/A N/A * - Management Unit Software Protocol Configured Force10> If your system does not have the correct software version installed, see the S-Series and FTOS Release Notes, Version 7.8.1.0 for upgrade instructions. A printed copy should be included with your system. Alternatively, see the printed Readme First document that is included with your system. 2 Basic Layer 2 Setup and Buffer Tuning of the S25P for Storage Environments
-
 1
1 -
 2
2 -
 3
3 -
 4
4 -
 5
5 -
 6
6 -
 7
7 -
 8
8
 |
 |