Dell Force10 S25-01-GE-24V S-Series Secure Management - Page 2

Introduction, Enabling SSH

Page 2 highlights

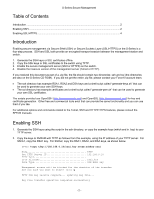
S-Series Secure Management Table of Contents Introduction ...2 Enabling SSH...2 Enabling SSL/HTTPS ...4 Introduction Enabling secure management via Secure SHell (SSH) or Secure Sockets Layer (SSL/HTTPS) on the S-Series is a four-step process. SSH and SSL both provide an encrypted transport session between the management station and switch. 1. Generate the SSH keys or SSL certificates offline. 2. Copy the SSH keys or SSL certificates to the switch using TFTP. 3. Enable the secure management server (SSH or HTTPS) on the switch. 4. Disable the insecure version of the management server (Telnet or HTTP). If you received this document as part of a .zip file, the file should contain two directories: ssh and ssl (the directories are also on the S-Series CD-ROM). If you did not get the entire .zip file, please contact your Force10 account team. • The ssh directory has example RSA1, RSA2 and DSA keys and a shell script called "generate-keys.sh" that can be used to generate your own SSH keys. • The ssl directory has example certificates and a shell script called "generate-pem.sh" that can be used to generate your own SSL certificates. The scripts provided use OpenSSH (http://www.openssh.org/) and OpenSSL (http://www.openssl.org/) for key and certificate generation. Other free and commercial tools exist that can provide the same functionality and you can use them if you like. For additional options and commands related to the Telnet, SSH and HTTP/HTTPS features, please consult the SFTOS manuals. Enabling SSH 1. Generate the SSH keys using the script in the ssh directory, or copy the example keys (which end in .key) to your TFTP server. 2. Copy the keys to NVRAM with TFTP as follows from this example, using the IP address of your TFTP server. For SSHv1, copy the RSA1 key. For SSHv2, copy the RSA1, RSA2, and DSA keys, as shown below. SFTOS #copy tftp://192.168.0.10/rsa1.key nvram:sshkey-rsa1 Mode TFTP Set TFTP Server IP 192.168.0.10 TFTP Path TFTP Filename rsa1.key Data Type SSH RSA1 key Management access will be blocked for the duration of the transfer Are you sure you want to start? (y/n) y TFTP SSH key receive complete... updating key file... Key file transfer operation completed successfully - 2 -

  • 1
  • 2
  • 3
  • 4
  • 5
  • 6

S-Series Secure Management
Table of Contents
Introduction
......................................................................................................................................
2
Enabling SSH
...................................................................................................................................
2
Enabling SSL/HTTPS
......................................................................................................................
4
Introduction
Enabling secure management via Secure SHell (SSH) or Secure Sockets Layer (SSL/HTTPS) on the S-Series is a
four-step process.
SSH and SSL both provide an encrypted transport session between the management station and
switch.
1.
Generate the SSH keys or SSL certificates offline.
2.
Copy the SSH keys or SSL certificates to the switch using TFTP.
3.
Enable the secure management server (SSH or HTTPS) on the switch.
4.
Disable the insecure version of the management server (Telnet or HTTP).
If you received this document as part of a .zip file, the file should contain two directories: ssh and ssl (the directories
are also on the S-Series CD-ROM).
If you did not get the entire .zip file, please contact your Force10 account team.
The ssh directory has example RSA1, RSA2 and DSA keys and a shell script called “generate-keys.sh” that can
be used to generate your own SSH keys.
The ssl directory has example certificates and a shell script called “generate-pem.sh” that can be used to generate
your own SSL certificates.
The scripts provided use OpenSSH (
) and OpenSSL (
) for key and
certificate generation.
Other free and commercial tools exist that can provide the same functionality and you can use
them if you like.
For additional options and commands related to the Telnet, SSH and HTTP/HTTPS features, please consult the
SFTOS manuals.
Enabling SSH
1.
Generate the SSH keys using the script in the ssh directory, or copy the example keys (which end in .key) to your
TFTP server.
2.
Copy the keys to NVRAM with TFTP as follows from this example, using the IP address of your TFTP server.
For
SSHv1, copy the RSA1 key.
For SSHv2, copy the RSA1, RSA2, and DSA keys, as shown below.
SFTOS #
copy tftp://192.168.0.10/rsa1.key nvram:sshkey-rsa1
Mode
...........................................
TFTP
Set TFTP Server IP
.............................
192.168.0.10
TFTP Path
......................................
TFTP Filename
..................................
rsa1.key
Data Type
......................................
SSH RSA1 key
Management access will be blocked for the duration of the transfer
Are you sure you want to start? (y/n)
y
TFTP SSH key receive complete... updating key file...
Key file transfer operation completed successfully
- 2 -