Dell Inspiron 1521 Service Manual - Page 38
Keyboard
 |
UPC - 705105233017
View all Dell Inspiron 1521 manuals
Add to My Manuals
Save this manual to your list of manuals |
Page 38 highlights
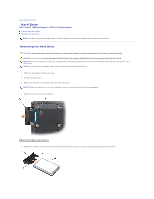
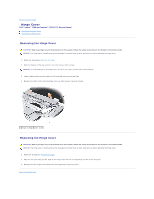
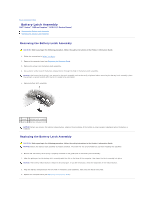
Back to Contents Page Keyboard Dell™ Vostro™ 1500 and Inspiron™ 1520/1521 Service Manual Removing the Keyboard Replacing the Keyboard For more information about the keyboard, see "Using the Keyboard and Touchpad" in your Owner's Manual. Removing the Keyboard CAUTION: Before you begin any of the procedures in this section, follow the safety instructions in the Product Information Guide. 1. Follow the procedures in Before You Begin. 2. Remove the hinge cover (see Removing the Hinge Cover). 3. Remove the two M2.5 x 5-mm screws at the top of the keyboard. NOTICE: The key caps on the keyboard are fragile, easily dislodged, and time-consuming to replace. Exercise care when removing and handling the keyboard. 4. Lift the keyboard and hold it up and slightly forward to access to the keyboard connector. 5. Rotate the keyboard connector latch upward to release the keyboard cable. 6. Slide the keyboard cable out of the keyboard connector. 1 M2.5 x 5-mm screws (2) 2 keyboard 3 tabs (5) 4 keyboard cable 5 keyboard connector latch Replacing the Keyboard CAUTION: Before you begin any of the procedures in this section, follow the safety instructions in the Product Information Guide. 1. Follow the procedures in Before You Begin. NOTICE: The key caps on the keyboard are fragile, easily dislodged, and time-consuming to replace. Exercise care when removing and handling the keyboard. 2. Slide the keyboard cable into the keyboard connector.
-
 1
1 -
2
-
3
-
4
-
5
-
6
-
7
-
8
-
9
-
10
-
11
-
12
-
13
-
14
-
15
-
16
-
17
-
18
-
19
-
20
-
21
-
22
-
23
-
24
-
25
-
26
-
27
-
28
-
29
-
30
-
31
-
32
-
 33
33 -
 34
34 -
 35
35 -
 36
36 -
 37
37 -
 38
38 -
 39
39 -
 40
40 -
 41
41 -
 42
42 -
 43
43 -
44
-
45
-
46
-
47
-
48
-
49
-
50
-
51
-
52
-
53
-
54
-
55
-
56
-
57
-
58
-
59
-
60
-
61
-
62
-
63
-
64
-
65
-
66
 |
 |