Dell Inspiron 17 3737 Owner's Manual - Page 35
Replacing the Wireless Mini-Card, Procedure, Postrequisites - black
 |
View all Dell Inspiron 17 3737 manuals
Add to My Manuals
Save this manual to your list of manuals |
Page 35 highlights
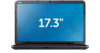
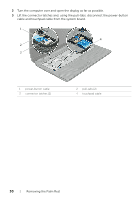
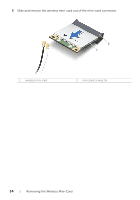
Replacing the Wireless Mini-Card WARNING: Before working inside your computer, read the safety information that shipped with your computer and follow the steps in "Before Working Inside Your Computer" on page 9. After working inside your computer, follow the instructions in "After Working Inside Your Computer" on page 11. For additional safety best practices information, see the Regulatory Compliance Homepage at dell.com/regulatory_compliance. Procedure CAUTION: To avoid damage to the wireless mini-card, make sure that no cables are placed under the wireless mini-card. 1 Align the notch on the wireless mini-card with the tab on the mini-card connector. 2 Insert the wireless mini-card at a 45-degree angle into the mini-card connector. 3 Press the other end of the wireless mini-card down and replace the screw that secures the wireless mini-card to the system board. 4 Connect the antenna cables to the wireless mini-card. The following table provides the antenna cable color schemes for the wireless mini-card supported by your computer. Connectors on the wireless mini-card WLAN + Bluetooth (2 cables) Main WLAN + Bluetooth (white triangle) Auxiliary WLAN + Bluetooth (black triangle) Antenna cable color schemes white black Postrequisites 1 Replace the palm rest. See "Replacing the Palm Rest" on page 32. 2 Replace the keyboard. See "Replacing the Keyboard" on page 19. 3 Replace the base cover. See "Replacing the Base Cover" on page 21. 4 Replace the battery. See "Replacing the Battery" on page 13. Replacing the Wireless Mini-Card | 35
-
 1
1 -
2
-
3
-
4
-
5
-
6
-
7
-
8
-
9
-
10
-
11
-
12
-
13
-
14
-
15
-
16
-
17
-
18
-
19
-
20
-
21
-
22
-
23
-
24
-
25
-
26
-
27
-
28
-
29
-
 30
30 -
 31
31 -
 32
32 -
 33
33 -
 34
34 -
 35
35 -
 36
36 -
 37
37 -
 38
38 -
 39
39 -
 40
40 -
41
-
42
-
43
-
44
-
45
-
46
-
47
-
48
-
49
-
50
-
51
-
52
-
53
-
54
-
55
-
56
-
57
-
58
-
59
-
60
-
61
-
62
-
63
-
64
-
65
-
66
-
67
-
68
-
69
-
70
-
71
 |
 |
