Dell Inspiron Zino 300 Inspiron Zino Service Manual - Page 10
Graphics Card Inspiron 400 Only
 |
View all Dell Inspiron Zino 300 manuals
Add to My Manuals
Save this manual to your list of manuals |
Page 10 highlights
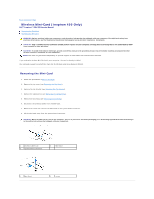
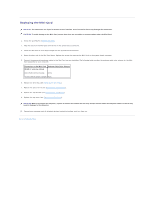
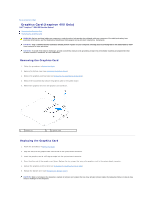
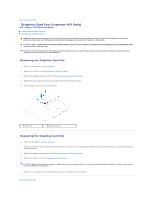
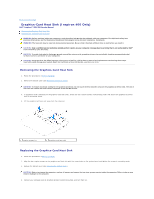
Back to Contents Page Graphics Card (Inspiron 400 Only) Dell™ Inspiron™ 300/400 Service Manual Removing the Graphics Card Replacing the Graphics Card WARNING: Before working inside your computer, read the safety information that shipped with your computer. For additional safety best practices information, see the Regulatory Compliance Homepage at www.dell.com/regulatory_compliance. CAUTION: Only a certified service technician should perform repairs on your computer. Damage due to servicing that is not authorized by Dell™ is not covered by your warranty. CAUTION: To avoid electrostatic discharge, ground yourself by using a wrist grounding strap or by periodically touching an unpainted metal surface (such as a connector on your computer). Removing the Graphics Card 1. Follow the procedures in Before You Begin. 2. Remove the bottom cover (see Removing the Bottom Cover). 3. Remove the graphics-card heat sink (see Removing the Graphics-Card Heat Sink). 4. Remove the two screws that secure the graphics card to the system board. 5. Remove the graphics card from the graphics card connector. 1 screws (2) 2 graphics card Replacing the Graphics Card 1. Follow the procedures in Before You Begin. 2. Align the notch on the graphics card with the tab in the system-board connector. 3. Insert the graphics card at a 45-degree angle into the system board connector. 4. Press the other end of the graphics card down. Replace the two screws that secure the graphics card to the system-board connector. 5. Replace the graphics-card heat sink (see Replacing the Graphics-Card Heat Sink). 6. Replace the bottom cover (see Replacing the Bottom Cover). CAUTION: Before turning on the computer, replace all screws and ensure that no stray screws remain inside the computer. Failure to do so may result in damage to the computer.
-
 1
1 -
2
-
3
-
4
-
 5
5 -
 6
6 -
 7
7 -
 8
8 -
 9
9 -
 10
10 -
 11
11 -
 12
12 -
 13
13 -
 14
14 -
 15
15 -
16
-
17
-
18
-
19
-
20
-
21
-
22
-
23
-
24
-
25
-
26
-
27
-
28
-
29
-
30
-
31
-
32
-
33
-
34
-
35
-
36
-
37
-
38
-
39
-
40
-
41
-
42
-
43
-
44
-
45
-
46
-
47
-
48
-
49
-
50
-
51
-
52
-
53
 |
 |
