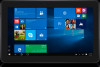
Dell Latitude 5179 2-in-1 User Guide
Dell Latitude 5179 2-in-1 Manual
 |
View all Dell Latitude 5179 2-in-1 manuals
Add to My Manuals
Save this manual to your list of manuals |
Dell Latitude 5179 2-in-1 manual content summary:
- Dell Latitude 5179 2-in-1 | User Guide - Page 1
Latitude 5175/5179 User's Guide Regulatory Model: T04E Regulatory Type: T04E001 - Dell Latitude 5179 2-in-1 | User Guide - Page 2
potential damage to hardware or loss of data and tells you how to avoid the problem. WARNING: A WARNING indicates a potential for property damage, personal injury, or death. Copyright © 2015 Dell Inc. All rights reserved. This product is protected by U.S. and international copyright and intellectual - Dell Latitude 5179 2-in-1 | User Guide - Page 3
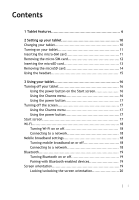
Contents 1 Tablet features 6 2 Setting up your tablet 10 Charging your tablet 10 Turning on your tablet 11 Inserting the micro-SIM card 11 Removing the micro-SIM card 12 Inserting the microSD card 13 Removing the microSD card 14 Using the headset 15 3 Using your tablet 16 Turning off your - Dell Latitude 5179 2-in-1 | User Guide - Page 4
your tablet 21 Resetting your tablet 22 Gestures 22 4 Keyboards and Pens 25 Latitude 11 Slim Keyboard 25 Connecting your tablet 25 Disconnecting your tablet 27 Tilt 28 Dell Active Pen holder 28 Latitude 11 Keyboard 29 Features 29 Connecting your tablet 30 Disconnecting your tablet 32 - Dell Latitude 5179 2-in-1 | User Guide - Page 5
8 Getting help 46 Self-help resources 46 9 Contacting Dell 47 10 Locating your Service Tag and Express Service Code.......48 5 - Dell Latitude 5179 2-in-1 | User Guide - Page 6
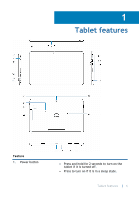
1 Tablet features Feature 1. Power button • Press and hold for 2 seconds to turn on the tablet if it is turned off. • Press to turn on if it is in a sleep state. Tablet features 6 - Dell Latitude 5179 2-in-1 | User Guide - Page 7
Feature • Press to turn off the screen. NOTE: Press the Power button and Windows button together to access the lock/logout menu. NOTE: The tablet can be configured to enable beep sound during start up. To enable this feature, enter the BIOS setup program, and under Post Behavior select Enable Sign - Dell Latitude 5179 2-in-1 | User Guide - Page 8
, and so on. Allows NFC-enabled devices to communicate with your tablet. • Latitude 5175 - optional • Latitude 5179 - shipped with the system 15. Fingerprint reader (Latitude 5179 only) 16. Smart-card reader (Latitude 5179 only) 17. Docking connector Press your finger on the fingerprint reader to - Dell Latitude 5179 2-in-1 | User Guide - Page 9
Latitude 5179 only) 22. Rear camera 23. Security-cable slot 24. Micro-SIM card slot 25. MicroSD-card slot 26. Windows button Allows docking to the keyboard dock. Allows docking to the keyboard dock. Provides the Service Tag and Express Service Code needed for contacting Dell tablet supports a - Dell Latitude 5179 2-in-1 | User Guide - Page 10
procedures in this section, read the safety information that shipped with your tablet. For additional best practices information, go to www.dell.com/regulatory_compliance. Topics: • Charging your tablet • Turning on your tablet • Inserting the micro-SIM card • Removing the micro-SIM card • Inserting - Dell Latitude 5179 2-in-1 | User Guide - Page 11
turn on the tablet for the first time, you must finish Windows setup to start using your tablet. For more information, see the Quick Start Guide that shipped with your tablet. 1 Press and hold the power button for 2 seconds to turn on your tablet. The lock screen is displayed. 2 Swipe up - Dell Latitude 5179 2-in-1 | User Guide - Page 12
CAUTION: Ensure that the micro-SIM card is aligned as shown in the image. 2 Insert the micro-SIM card into the card slot until it locks into place. 3 Close the slot cover. Removing the micro-SIM card CAUTION: Removing the micro-SIM card while it is in use may cause data loss or result in application - Dell Latitude 5179 2-in-1 | User Guide - Page 13
Inserting the microSD card 1 Open the slot cover and locate the microSD card slot. CAUTION: Ensure that the microSD card is aligned as shown in the image. 2 Insert the microSD card into the card slot until it locks into place. 3 Close the slot cover. Setting up your tablet 13 - Dell Latitude 5179 2-in-1 | User Guide - Page 14
Removing the microSD card CAUTION: Removing the microSD card while it is in use may cause data loss or result in application errors. 1 In the notification area at the bottom-right corner of the Windows desktop, tap (Safely Remove Hardware and Eject Media). NOTE: If you do not see Safely Remove - Dell Latitude 5179 2-in-1 | User Guide - Page 15
Using the headset WARNING: Listening to loud music for an extended period of time can lead to hearing loss. Connect a headset, headphones, microphone, or other audio equipment to the headset port of your tablet. 1 Connect headset to the headset port on the tablet. 2 Wear the headset and adjust the - Dell Latitude 5179 2-in-1 | User Guide - Page 16
3 Using your tablet NOTE: For detailed information on using Windows, see Getting help. Topics: • Turning off your tablet • Turning off the screen • Start screen • Wi-Fi • Mobile broadband settings • Bluetooth • Screen orientation • Adjusting the screen brightness • Synchronizing your tablet • - Dell Latitude 5179 2-in-1 | User Guide - Page 17
Using the power button 1 Press and hold the power button for at least 4 seconds. 2 Swipe down the shut-down confirmation screen to turn off the tablet. Turning off the screen Using the Charms menu 1 Swipe-in from the right edge of the display to access the Charms menu. 2 Tap Settings → Power → Sleep - Dell Latitude 5179 2-in-1 | User Guide - Page 18
You can customize the Start screen by pinning your favorite apps as tiles, setting your favorite picture as a wallpaper, and so on. Wi-Fi Turning Wi-Fi on or off 1 Swipe in from the right edge of the display to access the Charms menu. 2 Tap Settings → wireless network icon . 3 Swipe the Wi-Fi slider - Dell Latitude 5179 2-in-1 | User Guide - Page 19
or left to turn off or on Bluetooth. Pairing with Bluetooth-enabled devices NOTE: Bluetooth connection between your tablet and Apple devices are not supported. 1 Swipe-in from the right edge of the display to access the Charms menu. 2 Tap Settings → Change PC settings → PC and devices → Bluetooth - Dell Latitude 5179 2-in-1 | User Guide - Page 20
Locking/unlocking the screen orientation 1 Change the screen to the desired orientation. 2 Swipe in from the right edge of the display to access the Charms menu. 3 Tap Settings → Screen . 4 Tap to lock the screen orientation, or tap orientation. to unlock the screen Adjusting the screen - Dell Latitude 5179 2-in-1 | User Guide - Page 21
Synchronizing your tablet When you use your Microsoft account to sign in to Windows 8.1 devices, the settings such as browser history, Windows and app settings, Start screen, and personal files are automatically synchronized. NOTE: To synchronize, the devices must be connected to the internet. If - Dell Latitude 5179 2-in-1 | User Guide - Page 22
Store are automatically reinstalled after the refresh is complete. Apps installed from sources other than the Windows Store are removed and have to be manually installed. Resetting your tablet CAUTION: Back up all the required data before you proceed. Resetting your tablet erases all data from your - Dell Latitude 5179 2-in-1 | User Guide - Page 23
Gestures Functions Drag 1 Touch and hold your finger on an item on the screen. 2 Keeping your finger in contact with the display, move your fingertip to the desired location. 3 Take your finger off the display to drop the item in the desired location. Move items such as images and icons on the - Dell Latitude 5179 2-in-1 | User Guide - Page 24
Gestures Functions Zoom out Touch the display with two fingers and then move the fingers closer. Reduce the view of an image or web page. Rotate Rotate an object by 90 degrees. Touch the display with two or more fingers and then move the fingers in a clockwise or counter-clockwise arc. Using - Dell Latitude 5179 2-in-1 | User Guide - Page 25
4 Keyboards and Pens Your tablet supports the following accessories that are sold separately: • Latitude 11 Slim Keyboard • Latitude 11 Keyboard with mini Active Pen Topics: • Latitude 11 Slim Keyboard • Latitude 11 Keyboard Latitude 11 Slim Keyboard Connecting your tablet 1 Open the flap on the - Dell Latitude 5179 2-in-1 | User Guide - Page 26
2 Align the tabs on the keyboard dock to the slots on the tablet and dock the tablet to the keyboard dock. Keyboards and Pens 26 - Dell Latitude 5179 2-in-1 | User Guide - Page 27
Disconnecting your tablet Hold the keyboard, lift and release the tablet away from the keyboard. Keyboards and Pens 27 - Dell Latitude 5179 2-in-1 | User Guide - Page 28
Tilt Dell Active Pen holder NOTE: The Pen holder accommodates the Dell Active Pen which is sold separately. Store the Dell Active Pen here after use. Keyboards and Pens 28 - Dell Latitude 5179 2-in-1 | User Guide - Page 29
Latitude 11 Keyboard Features Feature 1. Undock button Press to undock the tablet. 2. Docking pins Allows the tablet to communicate with the keyboard when docked. 3. Power-adapter - Dell Latitude 5179 2-in-1 | User Guide - Page 30
Feature 7. Right-click area 8. mini Active Pen 9. Pen buttons (2) 10. Pen garage Press to right-click. Allows you to draw, write text, and perform basic mouse functions. Customize these buttons to perform functions such as right-click, draw, highlight, write text, erase, and so on. Allows you to - Dell Latitude 5179 2-in-1 | User Guide - Page 31
Keyboards and Pens 31 - Dell Latitude 5179 2-in-1 | User Guide - Page 32
Disconnecting your tablet Press and hold the undock button to release the tablet and lift the tablet away from the keyboard. Charging the keyboard To charge the keyboard connect the power adapter to the charging port on the tablet or the charging port on the keyboard dock. NOTE: If the keyboard has - Dell Latitude 5179 2-in-1 | User Guide - Page 33
Keyboards and Pens 33 - Dell Latitude 5179 2-in-1 | User Guide - Page 34
Using the mini Active Pen The mini Active Pen supports features such as hovering and pressure sensing. You can use the mini Active Pen to draw shapes, select text, turn a page, and so on. You - Dell Latitude 5179 2-in-1 | User Guide - Page 35
Paste • Undo • Redo • Disable NOTE: To customize the buttons, download and install the active pen control panel driver from support website. For more information, see www.dell.com/ support/drivers. Charging the mini Active Pen Insert the mini Active Pen into the Pen garage to charge the mini Active - Dell Latitude 5179 2-in-1 | User Guide - Page 36
NOTE: For charging the mini Active Pen, the tablet must be docked and turned on. Keyboards and Pens 36 - Dell Latitude 5179 2-in-1 | User Guide - Page 37
tablet. 2 Press the power button to turn on your tablet. 3 When the Dell logo is displayed, press F2. Without keyboard 1 Press the power button to turn on your tablet. 2 Press and hold the Volume Up button when the Dell logo is displayed on the screen. 3 When the F12 boot selection menu is - Dell Latitude 5179 2-in-1 | User Guide - Page 38
mm (11.01 in.) Height 176.80 mm (6.96 in.) Weight (minimum) 0.71 kg (1.56 lb) Latitude 5179 14.32 mm (0.56 in.) 279.76 mm (11.01 in.) 176.83 mm (6.96 in.) 0.76 kg drive • 256 GB self-encrypting drive Memory: Type Speed Configurations supported LPDDR3 1600 MHz 4 GB and 8 GB Specifications 38 - Dell Latitude 5179 2-in-1 | User Guide - Page 39
-card slot One micro-SIM card slot (optional) One USB 3.0 port One USB-C port that supports power delivery and USB 3.0 Dual-band 802.11ac Bluetooth 4.1 LE Supported • Latitude 5175 - optional • Latitude 5179 - shipped with the system Intel HD graphics 515 10.8-inch Full HD 1920 x 1080 16:9 360 - Dell Latitude 5179 2-in-1 | User Guide - Page 40
Display: Color depth 8 bits Security: Fingerprint reader Smart card reader Supported on Latitude 5179 only Supported on Latitude 5179 only Camera: Type Resolution Still image Video Viewing angle Front-facing camera 5 MP fixed focus Rear-facing camera 8 MP auto focus Up to 5 MP Up - Dell Latitude 5179 2-in-1 | User Guide - Page 41
m (-50 ft to 10,000 ft) -15.20 m to 10,668 m (-50 ft to 35,000 ft) Keyboard: Dimensions: Width Depth Thickness Weight Features Latitude 11 Slim Keyboard Latitude 11 Keyboard 357.70 mm (14.08 in.) 277.90 mm (10.94 in.) 5.40 mm (0.21 in.) 0.498 kg (1.10 lb) • Backlit - Dell Latitude 5179 2-in-1 | User Guide - Page 42
7 Battery Troubleshooting Problems Battery does not charge Possible causes The cable connections may the battery in an ambient temperature between 0°C to 35°C (32°F to 95°F). Contact Dell. See Contacting Dell. • Let the battery drain until the battery charge drops below 95%. • Restart the tablet - Dell Latitude 5179 2-in-1 | User Guide - Page 43
off. This recalibrates the battery charge value. Network Problems Possible causes Possible solutions No wireless connection The wireless connections The signal strength is not Contact your internet strong enough. service provider (ISP). Unable to pair with a Bluetooth device • Ensure - Dell Latitude 5179 2-in-1 | User Guide - Page 44
from the cloth to seep down to the tablet ports or buttons. Problems Tablet does not turn on Tablet does not turn off Tablet locks the power button for 2 seconds and wait for 8 seconds to see whether the Dell logo is displayed. • Press and hold the power button for 15 seconds to Troubleshooting 44 - Dell Latitude 5179 2-in-1 | User Guide - Page 45
expected Pen Problems Pen does not work Possible causes The pen is not charged minute for the Dell logo to be displayed. • Restart the tablet. See Turning off your tablet and Turning on your tablet. • Refresh the tablet. See Restoring your operating system . Contact Dell's support service. Go to - Dell Latitude 5179 2-in-1 | User Guide - Page 46
using these self-help resources: Information about Dell products and services Dell Help & Support app www.dell.com Help + Tips app Accessing help Online help for operating system Troubleshooting information, user manuals, setup instructions, product specifications, technical help blogs, drivers - Dell Latitude 5179 2-in-1 | User Guide - Page 47
at the bottom of the page. 3 Select the appropriate service or support link based on your requirement or choose the method of contacting Dell that is convenient for you. Dell provides several online and telephone-based support and service options. Availability varies by country and product, and some - Dell Latitude 5179 2-in-1 | User Guide - Page 48
10 Locating your Service Tag and Express Service Code You must provide the Service Tag and Express Service Code of your tablet when contacting Dell for customer service or technical assistance. NOTE: The telephone systems prompts you to enter the Express Service Code that helps in routing your call
-
 1
1 -
 2
2 -
 3
3 -
 4
4 -
 5
5 -
 6
6 -
 7
7 -
8
-
9
-
10
-
11
-
12
-
13
-
14
-
15
-
16
-
17
-
18
-
19
-
20
-
21
-
22
-
23
-
24
-
25
-
26
-
27
-
28
-
29
-
30
-
31
-
32
-
33
-
34
-
35
-
36
-
37
-
38
-
39
-
40
-
41
-
42
-
43
-
44
-
45
-
46
-
47
-
48
 |
 |

Latitude 5175/5179
User’s Guide
Regulatory Model: T04E
Regulatory Type: T04E001