Dell Latitude C500 Service Manual - Page 23
Keyboard Assembly, Removing the Keyboard Assembly
 |
View all Dell Latitude C500 manuals
Add to My Manuals
Save this manual to your list of manuals |
Page 23 highlights
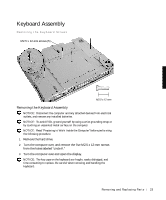
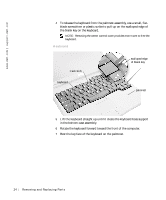
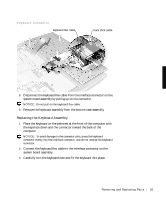
Keyboard Assembly Removing the Keyboard Screws M2.5 x 12-mm screws (5) Removing the Keyboard Assembly NOTICE: Disconnect the computer and any attached devices from electrical outlets, and remove any installed batteries. NOTICE: To avoid ESD, ground yourself by using a wrist grounding strap or by touching an unpainted metal surface on the computer. NOTICE: Read "Preparing to Work Inside the Computer" before performing the following procedure. 1 Remove the hard drive. 2 Turn the computer over, and remove the five M2.5 x 12-mm screws from the holes labeled "circle K." 3 Turn the computer over and open the display. NOTICE: The key caps on the keyboard are fragile, easily dislodged, and time-consuming to replace. Be careful when removing and handling the keyboard. Removing and Repl aci ng Part s 23
-
 1
1 -
2
-
3
-
4
-
5
-
6
-
7
-
8
-
9
-
10
-
11
-
12
-
13
-
14
-
15
-
16
-
17
-
 18
18 -
 19
19 -
 20
20 -
 21
21 -
 22
22 -
 23
23 -
 24
24 -
 25
25 -
 26
26 -
 27
27 -
 28
28 -
29
-
30
-
31
-
32
-
33
-
34
-
35
-
36
-
37
-
38
-
39
-
40
-
41
-
42
-
43
-
44
-
45
-
46
-
47
-
48
-
49
-
50
-
51
-
52
-
53
-
54
-
55
-
56
-
57
-
58
-
59
-
60
-
61
-
62
 |
 |
