Dell Latitude E6500 Setup and Quick Reference Guide - Page 57
Using the Operating System Media, Recovery Option, Dell Factory Image Restore. - system recovery
 |
View all Dell Latitude E6500 manuals
Add to My Manuals
Save this manual to your list of manuals |
Page 57 highlights
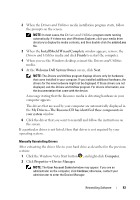
3 In the System Recovery Options window, select a keyboard layout and click Next. 4 To access the recovery options, log on as a local user. To access the command prompt, type administrator in the user name field, then click OK. 5 Click Dell Factory Image Restore. NOTE: Depending upon your configuration, you may need to select Dell Factory Tools, then Dell Factory Image Restore. The Dell Factory Image Restore welcome screen appears. 6 On the Dell Factory Restore Image welcome screen, click Next. The Confirm Data Deletion screen appears. NOTICE: If you do not want to proceed with Factory Image Restore, click Cancel. 7 Click the checkbox to confirm that you want to continue reformatting the hard drive and restoring the system software to the factory condition, then click Next. The restore process begins and may take 5 or more minutes to complete. 8 Click Finish to restart the computer. Using the Operating System Media Before you Begin If you are considering reinstalling the Windows operating system to correct a problem with a newly installed driver, first try using Windows Device Driver Rollback. See "Returning to a Previous Device Driver Version" on page 52. If Device Driver Rollback does not resolve the problem, then use Microsoft Windows System Restore to return your operating system to the operating state it was in before you installed the new device driver. See "Using Microsoft® Windows® System Restore" on page 54. NOTICE: Before performing the installation, back up all data files on your primary hard drive. For conventional hard drive configurations, the primary hard drive is the first drive detected by the computer. Reinstalling Software 57
-
 1
1 -
2
-
3
-
4
-
5
-
6
-
7
-
8
-
9
-
10
-
11
-
12
-
13
-
14
-
15
-
16
-
17
-
18
-
19
-
20
-
21
-
22
-
23
-
24
-
25
-
26
-
27
-
28
-
29
-
30
-
31
-
32
-
33
-
34
-
35
-
36
-
37
-
38
-
39
-
40
-
41
-
42
-
43
-
44
-
45
-
46
-
47
-
48
-
49
-
50
-
51
-
 52
52 -
 53
53 -
 54
54 -
 55
55 -
 56
56 -
 57
57 -
 58
58 -
 59
59 -
 60
60 -
 61
61 -
 62
62 -
63
-
64
-
65
-
66
-
67
-
68
-
69
-
70
-
71
-
72
 |
 |
