Dell Latitude XT2 Battery Slice Setup Guide
Dell Latitude XT2 Manual
 |
View all Dell Latitude XT2 manuals
Add to My Manuals
Save this manual to your list of manuals |
Dell Latitude XT2 manual content summary:
- Dell Latitude XT2 | Battery Slice Setup Guide - Page 1
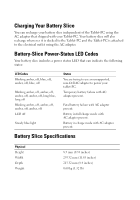
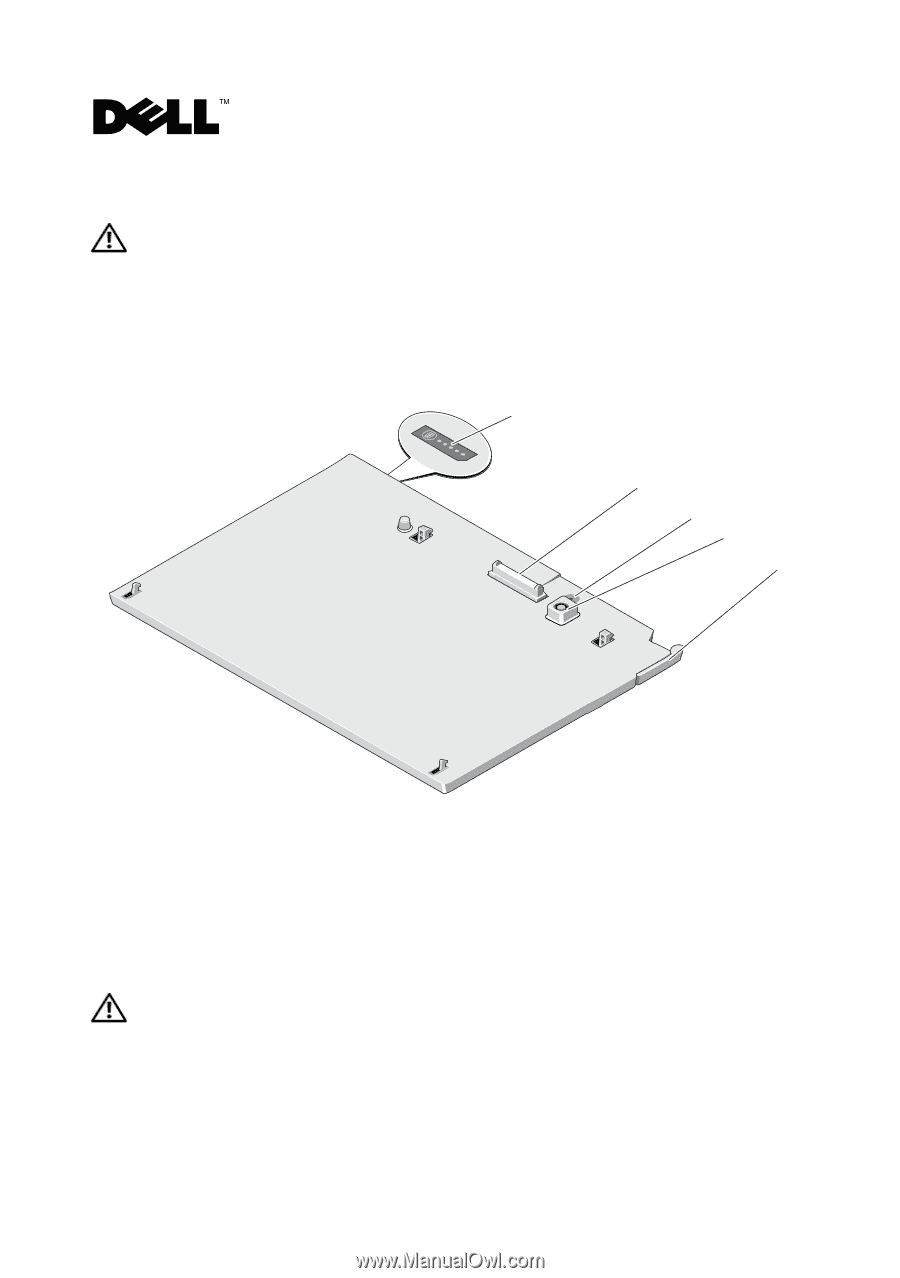
indicates a potential for property damage, personal injury, or death. Battery Slice Features 1 2 3 4 5 1 battery-slice status LED 3 power status light 5 release lever 2 docking connector 4 AC adapter connector Setting Up Your Battery Slice WARNING: The AC adapter works with electrical outlets - Dell Latitude XT2 | Battery Slice Setup Guide - Page 2
from earlier models of Dell computers-you may damage the battery slice or the Tablet-PC. CAUTION: Use the Latitude™ XT2 battery slice with your Latitude XT2 only. If you use a battery slice from other models of Dell computers you may damage the battery slice or the Tablet-PC. CAUTION: When you - Dell Latitude XT2 | Battery Slice Setup Guide - Page 3
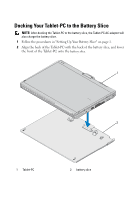
Docking Your Tablet-PC to the Battery Slice NOTE: After docking the Tablet-PC to the battery slice, the Tablet-PC AC adapter will also charge the battery slice. 1 Follow the procedures in "Setting Up Your Battery Slice" on page 1. 2 Align the back of the Tablet-PC with the back of the battery slice, - Dell Latitude XT2 | Battery Slice Setup Guide - Page 4
"Setting Up Your Battery Slice" on page 1. 2 Pull the Tablet-PC release lever (see "Features" on page 1 for more information) to release the Tablet-PC from the battery slice. 1 2 3 1 Tablet-PC 3 release lever 2 battery slice 3 Lift the back of the Tablet-PC up and slide the Tablet-PC out towards - Dell Latitude XT2 | Battery Slice Setup Guide - Page 5
the AC adapter that shipped with your Tablet-PC. Your battery slice will also recharge whenever it is docked to the Tablet-PC and the Tablet-PC is attached to the electrical outlet using the AC adapter. Battery-Slice Power-Status LED Codes Your battery slice includes a power status LED that can - Dell Latitude XT2 | Battery Slice Setup Guide - Page 6
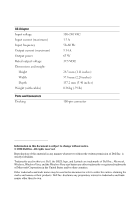
Docking 100-240 VAC 1.5 A 50-60 Hz 3.34 A 65 W 19.5 VDC 28.3 mm (1.11 inches) 57.8 mm (2.28 inches) 137.2 mm (5.40 inches) Dell Inc. is strictly forbidden. Trademarks used in this text: Dell, the DELL logo, and Latitude are trademarks of Dell Inc.; Microsoft, Windows, Windows Vista, and the Windows - Dell Latitude XT2 | Battery Slice Setup Guide - Page 7
risque d'endommagement du matériel, de blessure corporelle ou de mort. Extension de batterie Fonctionnalités 1 2 3 4 5 1 LED d'état d'alimentation de l'extension de batterie 3 voyant d'état de l'alimentation 5 levier de dégagement 2 connecteur d'amarrage 4 Connecteur d'adaptateur secteur Novembre - Dell Latitude XT2 | Battery Slice Setup Guide - Page 8
EN GARDE : Utilisez uniquement l'extension de batterie Latitude™ XT2 avec votre Tablet PC Latitude XT2. Si vous utilisez une extension de batterie destinée à un autre modèle d'ordinateur Dell, vous risquez d'endommager l'extension de batterie ou le Tablet PC. MISE EN GARDE : Lorsque vous déconnectez - Dell Latitude XT2 | Battery Slice Setup Guide - Page 9
Ne rien faire). Windows® XP a Cliquez computer (Lorsque je ferme le couvercle de mon ordinateur portable), sélectionnez Do nothing (Ne rien faire). Amarrage du Tablet PC à l'extension de batterie REMARQUE : Une fois que le Tablet PC est amarré à l'extension de batterie, l'adaptateur secteur du Tablet - Dell Latitude XT2 | Battery Slice Setup Guide - Page 10
1 2 1 Tablet PC 2 extension de batterie 3 Poussez le Tablet PC sur l'extension de batterie jusqu'à ce que vous entendiez un déclic vous indiquant qu'il est bien fixé. 4 Allumez le Tablet PC. Le système d'exploitation reconnaît l'extension de batterie. - Dell Latitude XT2 | Battery Slice Setup Guide - Page 11
8. 2 Tirez le levier de dégagement du Tablet PC (voir « Fonctionnalités » à la page 7 pour plus d'informations) pour retirer le Tablet PC de l'extension de batterie. 1 2 3 1 Tablet PC 3 levier de dégagement 2 extension de batterie 3 Soulevez l'arrière du Tablet PC et retirez-le de l'extension de - Dell Latitude XT2 | Battery Slice Setup Guide - Page 12
bleu : éteint Vous tentez d'utiliser un adaptateur secteur qui n'est pas de Dell et qui n'est pas pris en charge pour alimenter votre Tablet PC. Orange clignotant : éteint, orange : Défaillance de batterie temporaire éteint, orange : éteint, orange : éteint, lorsqu'il existe un adaptateur secteur - Dell Latitude XT2 | Battery Slice Setup Guide - Page 13
forme que ce soit sans l'autorisation écrite de Dell Inc est strictement interdite. Marques utilisées dans ce texte : Dell, le logo DELL et Latitude sont des marques de Dell Inc. ; Microsoft, Windows, Windows Vista et le logo du bouton Démarrer de Windows Vista sont des marques ou des marques dépos - Dell Latitude XT2 | Battery Slice Setup Guide - Page 14
- Dell Latitude XT2 | Battery Slice Setup Guide - Page 15
Sobre os avisos e advertências Um AVISO indica um potencial de danos à propriedade, de lesões corporais ou mesmo de morte. Bateria auxiliar Recursos 1 2 3 4 5 1 LED de status da bateria auxiliar 3 luz de status de alimentação 5 alavanca de liberação 2 conector de encaixe 4 conector do adaptador CA - Dell Latitude XT2 | Battery Slice Setup Guide - Page 16
adaptador CA disponível no mercado ou do adaptador CA de modelos mais antigos de computadores Dell poderá danificar a bateria auxiliar ou o Tablet PC. ADVERTÊNCIA: Use a bateria auxiliar do Latitude™ XT2 apenas com o seu Latitude XT2. O uso de uma bateria auxiliar de outros modelos de computadores - Dell Latitude XT2 | Battery Slice Setup Guide - Page 17
selecione Não fazer nada. Windows® XP a Clique em Iniciar→ Painel de controle→ Desempenho e manutenção→ Opções de energia→ Avançado. b Na opção When I close the lid of my portable computer (Ao fechar a tampa do computador portátil), selecione Nada a fazer. Acoplamento do Tablet PC à bateria auxiliar - Dell Latitude XT2 | Battery Slice Setup Guide - Page 18
1 2 1 Tablet PC 2 bateria auxiliar 3 Pressione o Tablet PC contra a bateria auxiliar até ouvir o clique de encaixe indicando que o computador está firmemente assentado. 4 Ligue o Tablet PC. O sistema operacional reconhece a bateria auxiliar. - Dell Latitude XT2 | Battery Slice Setup Guide - Page 19
na página 16. 2 Puxe a alavanca de liberação do Tablet PC (consulte "Recursos" na página 15 para obter mais informações) para soltá-lo da bateria auxiliar. 1 2 3 1 Tablet PC 3 alavanca de liberação 2 bateria auxiliar 3 Levante a traseira do Tablet PC e deslize-o para fora, em direção à traseira - Dell Latitude XT2 | Battery Slice Setup Guide - Page 20
âmbar - apagado, azul apagado, âmbar - apagado, azul apagado, Você está tentando usar um adaptador CA não suportado (que não é da marca Dell) para alimentar o seu Tablet PC. Piscando: âmbar - apagado, âmbar apagado, âmbar - apagado, âmbar apagado, azul por um longo tempo apagado por um longo tempo - Dell Latitude XT2 | Battery Slice Setup Guide - Page 21
In. é expressamente proibida. Marcas comerciais usadas neste texto: Dell, o logotipo DELL e Latitude e Latitude são marcas comerciais da Dell Inc.; Microsoft, Windows, Windows Vista e o botão de iniciar do Windows Vista são marcas comerciais ou marcas registradas da Microsoft Corporation nos Estados - Dell Latitude XT2 | Battery Slice Setup Guide - Page 22
- Dell Latitude XT2 | Battery Slice Setup Guide - Page 23
Acerca de las advertencias y precauciones un mensaje de ADVERTENCIA indica el riesgo de daños en la propiedad, de lesiones personales e incluso de muerte. Batería laminar Funciones 1 2 3 4 5 1 LED de estado de la batería laminar 2 Conector de acoplamiento 3 Indicador luminoso de energía 4 - Dell Latitude XT2 | Battery Slice Setup Guide - Page 24
de CA de venta en establecimientos comerciales, o el adaptador de modelos de equipos Dell anteriores, la batería laminar o el Tablet PC pueden sufrir daños. PRECAUCIÓN: utilice la batería laminar Latitude™ XT2 sólo con Latitude XT2. Si utiliza una batería laminar de otros modelos de equipos - Dell Latitude XT2 | Battery Slice Setup Guide - Page 25
3 Antes de desacoplar el Tablet PC ajuste su configuración de administración de energía de forma que no entre en modo de espera, suspensión o hibernación al cerrar (bajar) la pantalla: Windows Vista® a Haga clic en Inicio → Panel de control→ Equipo portátil→ Opciones de energía→ Cambiar la acción - Dell Latitude XT2 | Battery Slice Setup Guide - Page 26
1 2 1 Tablet PC 2 Batería laminar 3 Presione el Tablet PC sobre la batería laminar hasta que oiga un clic y el Tablet PC se acople correctamente. 4 Encienda el Tablet PC. El sistema operativo reconoce la batería laminar. - Dell Latitude XT2 | Battery Slice Setup Guide - Page 27
la batería laminar" en la página 24. 2 Tire de la palanca de liberación del Tablet PC (consulte "Funciones" en la página 23 para obtener más información) para separar el Tablet PC de la batería laminar. 1 2 3 1 Tablet PC 3 Palanca de liberación 2 Batería laminar 3 Levante la parte posterior del - Dell Latitude XT2 | Battery Slice Setup Guide - Page 28
del Tablet PC mediante el adaptador de CA incluido con el Tablet PC. La batería laminar también se cargará mientras esté acoplada al Tablet PC de apaga, ámbar, se apaga, azul, se apaga CA no compatible y no de marca Dell para cargar el portátil. Parpadea en ámbar, se apaga, ámbar, Error temporal de - Dell Latitude XT2 | Battery Slice Setup Guide - Page 29
Inc. está terminantemente prohibida. Marcas comerciales utilizadas en este texto: Dell, el logotipo de DELL y Latitude son marcas comerciales de Dell Inc.; Microsoft, Windows, Windows Vista y el botón de inicio de Windows Vista son marcas comerciales o marcas comerciales registradas de Microsoft - Dell Latitude XT2 | Battery Slice Setup Guide - Page 30
-
 1
1 -
 2
2 -
 3
3 -
 4
4 -
 5
5 -
 6
6 -
 7
7 -
8
-
9
-
10
-
11
-
12
-
13
-
14
-
15
-
16
-
17
-
18
-
19
-
20
-
21
-
22
-
23
-
24
-
25
-
26
-
27
-
28
-
29
-
30
 |
 |
About Warnings and Cautions
A WARNING indicates a potential for property damage, personal injury, or death.
Battery Slice
Features
Setting Up Your Battery Slice
WARNING:
The AC adapter works with electrical outlets worldwide. However,
power connectors and power strips vary among countries. Using an incompatible
cable or improperly connecting the cable to the power strip or electrical outlet may
cause fire or damage the equipmentt.
1
battery-slice status LED
2
docking connector
3
power status light
4
AC adapter connector
5
release lever
1
3
2
4
5
November 2008