Dell OptiPlex GX1p Dell OptiPlex GX1/GX1p Managed PC and OptiPlex NX1 Net PC - Page 146
Disconnect the computer and any attached peripherals from their
 |
View all Dell OptiPlex GX1p manuals
Add to My Manuals
Save this manual to your list of manuals |
Page 146 highlights
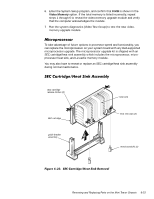
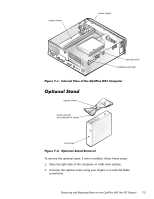
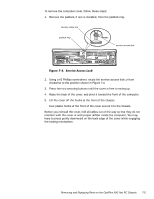
Before you perform any of the procedures in this chapter, take a few moments to read the following warning for your personal safety and to prevent damage to the system from ESD. 1. Turn off the computer and any attached peripherals. 2. Disconnect the computer and any attached peripherals from their power sources to reduce the potential for personal injury. Also, disconnect any telephone or telecommunication lines from the computer. 3. Wait 5 seconds after powering down the computer before disconnecting a peripheral from the computer or removing a component from the computer's system board to avoid possible damage to the system board. Figure 7-1 shows an internal view of the interior of the OptiPlex NX1 computer and identifies major components for orientation. Refer to this illustration, as needed, when performing the component removal/replacement procedures in this chapter. 7-2
-
 1
1 -
2
-
3
-
4
-
5
-
6
-
7
-
8
-
9
-
10
-
11
-
12
-
13
-
14
-
15
-
16
-
17
-
18
-
19
-
20
-
21
-
22
-
23
-
24
-
25
-
26
-
27
-
28
-
29
-
30
-
31
-
32
-
33
-
34
-
35
-
36
-
37
-
38
-
39
-
40
-
41
-
42
-
43
-
44
-
45
-
46
-
47
-
48
-
49
-
50
-
51
-
52
-
53
-
54
-
55
-
56
-
57
-
58
-
59
-
60
-
61
-
62
-
63
-
64
-
65
-
66
-
67
-
68
-
69
-
70
-
71
-
72
-
73
-
74
-
75
-
76
-
77
-
78
-
79
-
80
-
81
-
82
-
83
-
84
-
85
-
86
-
87
-
88
-
89
-
90
-
91
-
92
-
93
-
94
-
95
-
96
-
97
-
98
-
99
-
100
-
101
-
102
-
103
-
104
-
105
-
106
-
107
-
108
-
109
-
110
-
111
-
112
-
113
-
114
-
115
-
116
-
117
-
118
-
119
-
120
-
121
-
122
-
123
-
124
-
125
-
126
-
127
-
128
-
129
-
130
-
131
-
132
-
133
-
134
-
135
-
136
-
137
-
138
-
139
-
140
-
 141
141 -
 142
142 -
 143
143 -
 144
144 -
 145
145 -
 146
146 -
 147
147 -
 148
148 -
 149
149 -
 150
150 -
 151
151 -
152
-
153
-
154
-
155
-
156
-
157
-
158
-
159
-
160
-
161
-
162
-
163
-
164
-
165
-
166
-
167
-
168
-
169
-
170
-
171
-
172
-
173
-
174
-
175
-
176
-
177
-
178
 |
 |