Dell PowerConnect 2708 Getting Started Guide - Page 12
Starting and Configuring the Device - vlan
 |
View all Dell PowerConnect 2708 manuals
Add to My Manuals
Save this manual to your list of manuals |
Page 12 highlights
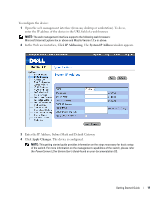
Starting and Configuring the Device NOTE: The device is designed to function as an unmanaged switch without any configuration of the management interface. Setup of the management interface is not a requirement if the switch is deployed as an unmanaged switch. To use the management functions, refer the configuration options and details in the User's Guide on the enclosed CD. Without specific configuration, the device functions with the default settings, as described in the User's Guide. NOTE: Before proceeding, read the release notes for this product. You can download the release notes from the Dell Support website at support.dell.com. NOTE: It is recommended that you obtain the most recent revision of the user documentation from the Dell Support website at support.dell.com. Booting the Switch When the device is connected to a power source, the device LEDs glow indicating that power is being supplied to the device. A power-on self-test (POST) runs every time the device is initialized and checks hardware components to determine if the device is fully operational before completely booting. If POST passes successfully, the System and the Power LEDs glow and a valid executable image is loaded into RAM. The boot process runs approximately 90 seconds. Initial Configuration NOTE: The initial configuration uses the following assumptions: • The PowerConnect device is configured with the pre configured default IP (192.168.2.1) and subnet mask (255.255.255.0). • The PowerConnect device booted successfully. To begin using the device, it is advisable to configure the device with the system specific configuration. NOTE: Obtain the following information from the network administrator before configuring the device: • The IP address to be assigned to the VLAN 1 interface through which the device is to be managed • The IP subnet mask for the network • The default gateway (next hop router) IP address for configuring the default route. 10 Getting Started Guide
-
 1
1 -
2
-
3
-
4
-
5
-
6
-
 7
7 -
 8
8 -
 9
9 -
 10
10 -
 11
11 -
 12
12 -
 13
13 -
 14
14 -
 15
15 -
 16
16 -
 17
17 -
18
-
19
-
20
-
21
-
22
-
23
-
24
-
25
-
26
-
27
-
28
-
29
-
30
-
31
-
32
-
33
-
34
-
35
-
36
-
37
-
38
-
39
-
40
-
41
-
42
-
43
-
44
-
45
-
46
-
47
-
48
-
49
-
50
-
51
 |
 |
