Dell PowerConnect Brocade M5424 Brocade M5424 Blade Server SAN I/O QuickStart - Page 4
Cabling guidelines, Configuring the SAN I/O Module
 |
View all Dell PowerConnect Brocade M5424 manuals
Add to My Manuals
Save this manual to your list of manuals |
Page 4 highlights
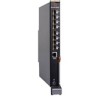
Cabling guidelines After modifying the SAN I/O Module's IP address and domain name (if Module is in Fabric OS Native mode), we recommend that you cable all external ports to fabric connections before bringing the SAN I/O Module online. Refer to "Configuring the SAN I/O Module" on page 6 for steps on modifying the IP address. Begin by cabling ports 17, 18, 19, 20, 21, 22, 23, and 0. Ports 17 and 18 are licensed at the factory as part of Dynamic Ports On Demand (DPOD). By cabling these ports first, you will not need to move licenses to other ports you may have cabled. Configuring the SAN I/O Module Use procedures in this section to configure the SAN I/O Module to operate on a network and fabric. Also provided are steps to change the Module's operating mode (Fabric OS Native and Access Gateway modes), activating Ports on Demand (POD), and connecting to the SAN I/O Module using Web Tools. NOTE Although the SAN I/O Module is configured at the factory for Fabric OS Native mode, you can enable Access Gateway mode. Refer to procedures under "Changing from Fabric OS Native to Access Gateway mode" on page 12. This publication provides procedures that use SAN I/O Module Command Line Interface (CLI) and the Web Tools application. For details refer to the Brocade Web Tools Administrator's Guide, Access Gateway Administrator's Guide, and Fabric OS Command Reference Manual. If the same operation can be performed using the Blade Server chassis management application, use that application instead. Items required The following items are required for configuring and connecting the SAN I/O Module for use in a network and fabric: • The SAN I/O Module installed in a Blade Server Enclosure. For instructions, refer to the steps on installing an I/O module in the Hardware Owner's Manual for the Blade Server Enclosure. • If required, management workstation (computer) that has a terminal emulator (such as HyperTerminal) or a keyboard, video, and mouse (KVM) device. Note that this is only required if not changing the SAN I/O Module IP address through the Blade Server Enclosure GUI or CLI management programs. • An unused IP address and corresponding subnet mask and gateway address unless DHCP is used. • If required, a serial cable to connect to the SAN I/O Module serial console port. Note that this is only required if not changing the SAN I/O Module IP address through the Blade Server Enclosure GUI or CLI management programs. • SFP transceivers and compatible fibre cables, as required. NOTE Use only brocade branded SFPs on the external optical ports of this module. • Access to an FTP server for backing up the SAN I/O Module configuration. • Access to these publications: • Blade Server Enclosure Hardware Owner's Manual • Blade Server Enclosure Configuration Guide • Fabric OS Command Reference Manual • SAN TECH NOTE - Preparing to Install the Brocade Access Gateway 6 of 16 M5424 QuickStart Guide Publication Number: 53-1001081-01
-
 1
1 -
 2
2 -
 3
3 -
 4
4 -
 5
5 -
 6
6 -
 7
7 -
 8
8 -
 9
9 -
 10
10 -
11
-
12
-
13
-
14
 |
 |
